Docker容器
基于Airflow、Spark、S3和Docker的YouTube趋势分析管道流程:进行ETL(数据抽取、转换和加载)操作
在这篇文章中,我们将使用Apache Airflow和PySpark来创建一个自动化的ETL(提取、转换、加载)管道。此管道将从YouTube Data API获取热门视频的数据,处理数据,并将数据存储到S3中。
看完Darshil Parmar在YouTube上展示使用Twitter API搭建管道的视频后,我受到了启发,决定尝试一个类似项目。然而,由于Twitter API的价格调整,一位观众建议利用YouTube Data API作为替代方案,这让我产生了兴趣。
在正式开始项目前,有两件必需的准备事项:
1. 获取 YouTube 数据 API 密钥
- 访问Google开发者控制台网站。
- 新建一个项目。
- 找到“YouTube 数据 API”并开启它。
- 生成新的凭证并复制API密钥,以后项目中会用到。
对于详细说明和指导,请参阅以下内容YouTube Data API 入门指南。
2. 获取 AWS 访问密钥 ID(Access Key ID)和秘密密钥
- 登录到您的AWS管理控制台。
- 导航到IAM(身份和访问管理)部分,创建一个新用户。
- 为S3访问附加必要的策略,并创建访问密钥。
- 安全保存生成的访问密钥ID和秘密访问密钥,以便在项目中使用。
现在,我们要开始真正的项目啦!!大家准备好了没!!
项目架构设计
这篇文章我分为了4个关键点:
- 软件安装与配置
- 从YouTube Data API提取数据
- 使用PySpark处理数据
- 将数据上传至AWS S3
- VS Code — 下载并安装VS Code。
- Docker Desktop — 下载并安装 Docker Desktop。
- (可选) Windows Subsystem for Linux (WSL) — 数据工程中使用的许多工具和库(如 Apache Airflow 和 PySpark)最初是为类 Unix 系统而设计的。在原生 Linux 环境(通过 WSL)中运行这些工具,可以有效避免在 Windows 上使用时可能出现的兼容性问题。
- -> 以管理员模式打开 PowerShell。
- -> 运行命令:
wsl --install。 - -> 按照提示安装 WSL,并从 Microsoft Store 选择一个 Linux 发行版(例如 Ubuntu)。
- -> 使用用户名和密码完成 Linux 发行版的设置。
我们并不严格需要 WSL 来运行这个项目,不过... Docker Desktop 可以直接在 Windows 上运行,并且它使用 Docker 自身管理的轻量级 Linux 虚拟机(VM)。然而,结合使用 WSL 和 Docker Desktop 可以带来几个好处,因为它允许我们在 Windows 上直接运行 Linux 命令和工作流,提供了一个更接近原生的开发环境。
我们现在开始设置过程。
第一部分 ,制作Docker镜像
- 创建一个新的文件夹,用于你的项目,并将其命名为“Airflow-Project”。
- 在该文件夹内打开命令提示符。
- 在命令提示符中,输入以下命令:
输入code .``
-
这将把文件夹作为项目在 VS Code 中打开。
- 在 VS Code 中创建一个名为“Dockerfile”的新文件,并粘贴下面的代码:
FROM apache/airflow:latest

# 切换到root用户以安装系统依赖项
USER root

# 安装git、OpenJDK,并清理apt缓存
RUN apt-get update && \
    apt-get -y install git default-jdk && \
    清理 apt 缓存 && \
    删除 /var/lib/apt/lists 目录下的文件

# 切换到airflow用户安装Python库
USER airflow

# 安装所需的Python库
RUN pip install --no-cache-dir pyspark pandas google-api-python-client emoji boto3
这个 Docker 文件包含了运行该项目所需的全部必要软件包。
- 在 VS Code 中右键点击文件并选择“构建图像”选项。当被要求输入名称时,输入“airflow-project”。此命令将生成一个名为“airflow-project”的 Docker 镜像。但是,该镜像只有在创建并配置
docker-compose.yml文件来使用它之后才会被使用。
(小贴士:不知道为什么文件里没有提到安装Python?原来,在Dockerfile中使用的基础镜像apache/airflow:latest内部已经预装了Python,因为Airflow本身是用Python编写的,并且主要使用Python来定义任务和工作流。所以你不需要在Dockerfile里单独安装Python!)
第二部分:创建一个 Docker Compose 配置文件
使用 docker-compose.yml 文件对于处理多容器 Docker 应用程序非常有帮助。它可以让我们用一条命令定义并运行多个 Docker 容器,并允许我们以清晰、有序的方式为每个服务配置环境变量、数据卷、端口等其他设置。使用 Docker Compose,您可以轻松地启动、停止和管理多个服务(可以使用 docker-compose up 来启动服务,使用 docker-compose down 来停止)。
- 让我们创建一个名为“docker-compose.yml”的文件
- 你可以把下面的代码粘贴进去:
    version: '3'
    services:

      airflowproject:
        image: airflow-project:latest
        environment:
          # AWS访问密钥
          - AWS_ACCESS_KEY_ID=your-aws-access-key
          # AWS访问密钥ID
          - AWS_SECRET_ACCESS_KEY=your-aws-secret-access-key
          # YouTube API密钥
          - YOUTUBE_API_KEY=your-youtube-api-key
        volumes:
          - ./airflow:/opt/airflow
        ports:
          - "8080:8080"
        # 启动Airflow的单机模式命令
        command: airflow standalone
- 现在,在VS Code里右键点击文件,然后选择“Compose Up”选项。点击这个选项来执行“Compose Up”操作。
- 哇,意想不到的是!完成这一步后,你可能会看到VS Code中的项目目录里出现了一个名为“airflow”的新文件夹。
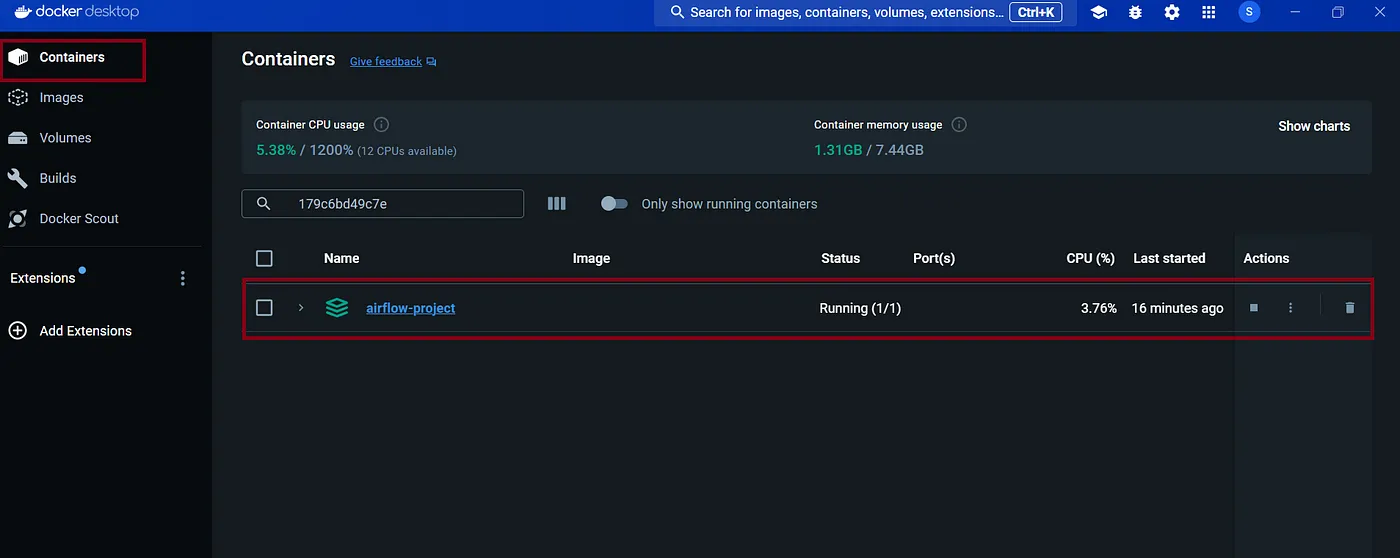
打开 Docker Desktop,如果一切正常,你会看到类似这样的东西。
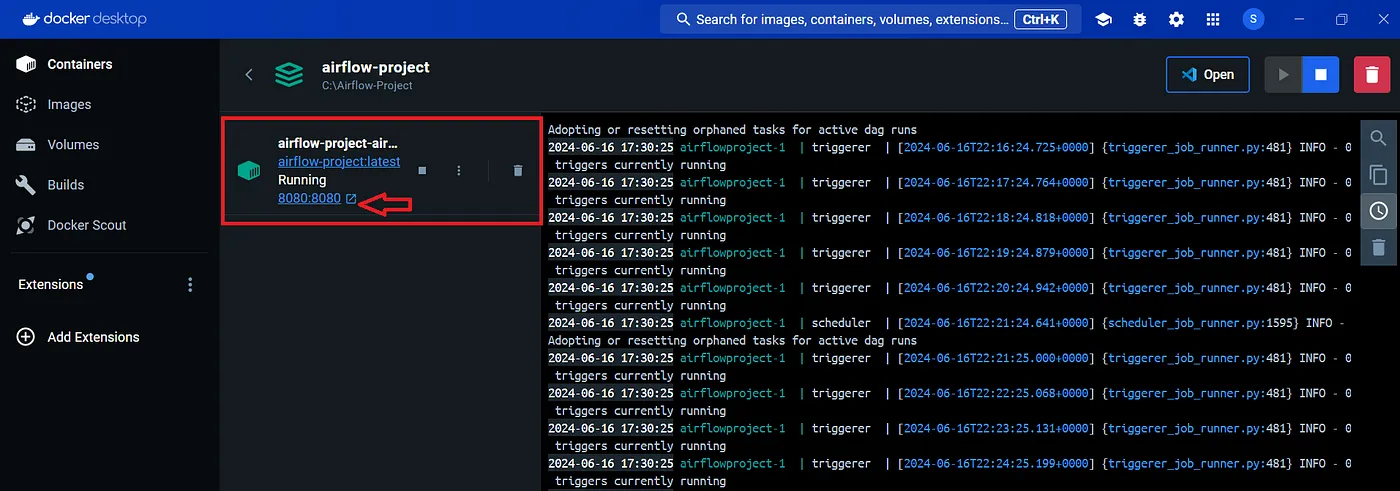
- 现在,点击Airflow项目名称,这会打开一个显示日志信息的屏幕,并且会显示Airflow正在端口8080上运行的信息。
- 点击链接,这会带你到Airflow的登录页面。如果你是第一次使用这个链接,你需要输入凭证。
- 用户名是“admin”,密码则可以在运行compose up命令后生成的Airflow文件夹里的“standalone_admin_password.txt”文件里找到。
- 在输入登录页面的凭据后,您将在本地主机上看到Airflow运行的情况。它将显示如下:
这表明我们的带有所有依赖的Airflow环境的Docker镜像正在Docker容器中正常运行。
你的环境设置好了!呼!
- 在airflow文件夹下创建一个名为“dags”的文件夹,并在该dags文件夹内创建youtube_etl_dag.py这个Python文件
- 接下来在youtube_etl_dag.py中导入以下项目
    import logging  # 导入日志处理模块
    import os  # 导入操作系统接口模块
    import re  # 导入正则表达式处理模块
    import shutil  # 导入文件操作模块
    from datetime import datetime, timedelta  # 从datetime模块导入日期和时间处理功能

    import boto3  # 导入AWS服务接口
    import emoji  # 导入表情符号处理模块
    import pandas as pd  # 导入数据分析库
    from googleapiclient.discovery import build  # 从googleapiclient模块导入API构建功能
    from pyspark.sql import SparkSession  # 从pyspark.sql模块导入SparkSession类
    from pyspark.sql.functions import col, to_date, udf  # 从pyspark.sql.functions模块导入列操作、日期转换和用户定义的函数
    from pyspark.sql.types import (DateType, IntegerType, LongType, StringType,  # 从pyspark.sql.types模块导入数据类型
                                   StructField, StructType)

    from airflow import DAG  # 从airflow模块导入DAG类
    from airflow.operators.python_operator import PythonOperator  # 从airflow.operators.python_operator模块导入Python操作符
- 上面列出的所有库都将在该项目的实现中用到(一旦我们开始写代码,它们就会派上用场)。
- 因为所有依赖项都在 Docker 上安装了,但在本地机器上还没有安装,所以在 vs code 中看到的错误请不要理会。
- 如果有语法错误,Airflow 会把错误显示在屏幕顶部,对于逻辑错误或异常,我们可以在 Airflow 日志中找到。
    # 定义DAG及其默认参数
    default_args = {
        'owner': 'airflow',  # DAG的所有者:
        'depends_on_past': False,  # 是否依赖过去的运行结果:
        'email_on_failure': False,  # 失败时不发送邮件通知:
        'email_on_retry': False,  # 重试时不发送邮件通知:
        'retries': 1,  # 重试次数:
        'retry_delay': timedelta(minutes=5),  # 重试之间的延迟时间:
        'start_date': datetime(2023, 6, 10, 0, 0, 0),  # 从2023年6月10日开始,每天00:00 UTC运行:
    }

    dag = DAG(
        'youtube_etl_dag',  # DAG标识符:
        default_args=default_args,  # 设置默认参数:
        description='一个简单的ETL DAG',  # DAG的简要描述:
        schedule_interval=timedelta(days=1),  # 调度周期:每天一次:
        catchup=False,  # 不回溯错过的时间点:
    )
我们将定义一个名为‘youtube_etl_dag’的DAG,该DAG每天在午夜(也就是0点)运行。这个DAG会由Airflow来管理和启动,所以你不需要在VS Code里运行任何东西。只需更新Python文件,Airflow会自动检测到并应用这些更改。
目前,DAG 存在于 Airflow 中,但尚未定义任何任务,因此没有显示任何任务。为了让 DAG 起作用,让我们创建一个提取数据的任务。
    # 用于从YouTube API提取数据的Python函数
    def extract_data(**kwargs):
        api_key = kwargs['api_key']
        region_codes = kwargs['region_codes']
        category_ids = kwargs['category_ids']

        df_trending_videos = fetch_data(api_key, region_codes, category_ids)
        current_date = datetime.now().strftime("%Y%m%d")
        output_path = f'/opt/airflow/Youtube_Trending_Data_Raw_{current_date}'
        # 将DataFrame保存到CSV文件
        df_trending_videos.to_csv(output_path, index=False)

    def fetch_data(api_key, region_codes, category_ids):
        """
        从YouTube API获取多个地区和类别的热门视频数据。
        """
        # 初始化一个空列表来存储视频数据
        video_data = []

        # 构建YouTube API服务
        youtube = build('youtube', 'v3', developerKey=api_key)

        for region_code in region_codes:
            for category_id in category_ids:
                # 将每个地区和类别的next_page_token初始化为None
                next_page_token = None
                while True:
                    # 向YouTube API请求热门视频
                    request = youtube.videos().list(
                        part='snippet,contentDetails,statistics',
                        chart='mostPopular',
                        regionCode=region_code,
                        videoCategoryId=category_id,
                        maxResults=50,
                        pageToken=next_page_token
                    )
                    response = request.execute()
                    videos = response['items']

                    # 处理每个视频并收集数据
                    for video in videos:
                        video_info = {
                            'region_code': region_code,
                            'category_id': category_id,
                            'video_id': video['id'],
                            'title': video['snippet']['title'],
                            'published_at': video['snippet']['publishedAt'],
                            'view_count': int(video['statistics'].get('viewCount', 0)),
                            'like_count': int(video['statistics'].get('likeCount', 0)),
                            'comment_count': int(video['statistics'].get('commentCount', 0)),
                            'channel_title': video['snippet']['channelTitle']
                        }
                        video_data.append(video_info)

                    # 获取下一页的标记,如果还有额外的页面
                    next_page_token = response.get('nextPageToken')
                    if not next_page_token:
                        break

        return pd.DataFrame(video_data)

    # 定义DAG中的extract任务
    extract_task = PythonOperator(
        task_id='extract_data_from_youtube_api',
        python_callable=extract_data,
        op_kwargs={
            'api_key': os.getenv('YOUTUBE_API_KEY'),
            'region_codes': ['US', 'GB', 'IN', 'AU', 'NZ'],
            'category_ids': ['1', '2', '10', '15', '20', '22', '23']
        },
        dag=dag,
    )

    extract_task #让DAG执行此任务
在这段代码里正在进行两个主要动作。
- 我们正在为DAG创建一个名为
extract_task的任务。 - 我们正在定义一个可调用的函数
extract_data,该函数被extract_task调用。此函数从YouTube Data API抓取数据,并将其存储为以 'Youtube_Trending_Data_Raw' 为前缀的CSV文件,使用pandas DataFrame进行处理。
你可以查阅 YouTube Data API 文档以获得不同部分数据的详细信息。因为我们对趋势视频数据感兴趣,所以我们专注于 API 中与此相关的特定部分。next_page_token 确保我们能够从所有可用的页面中获取数据。
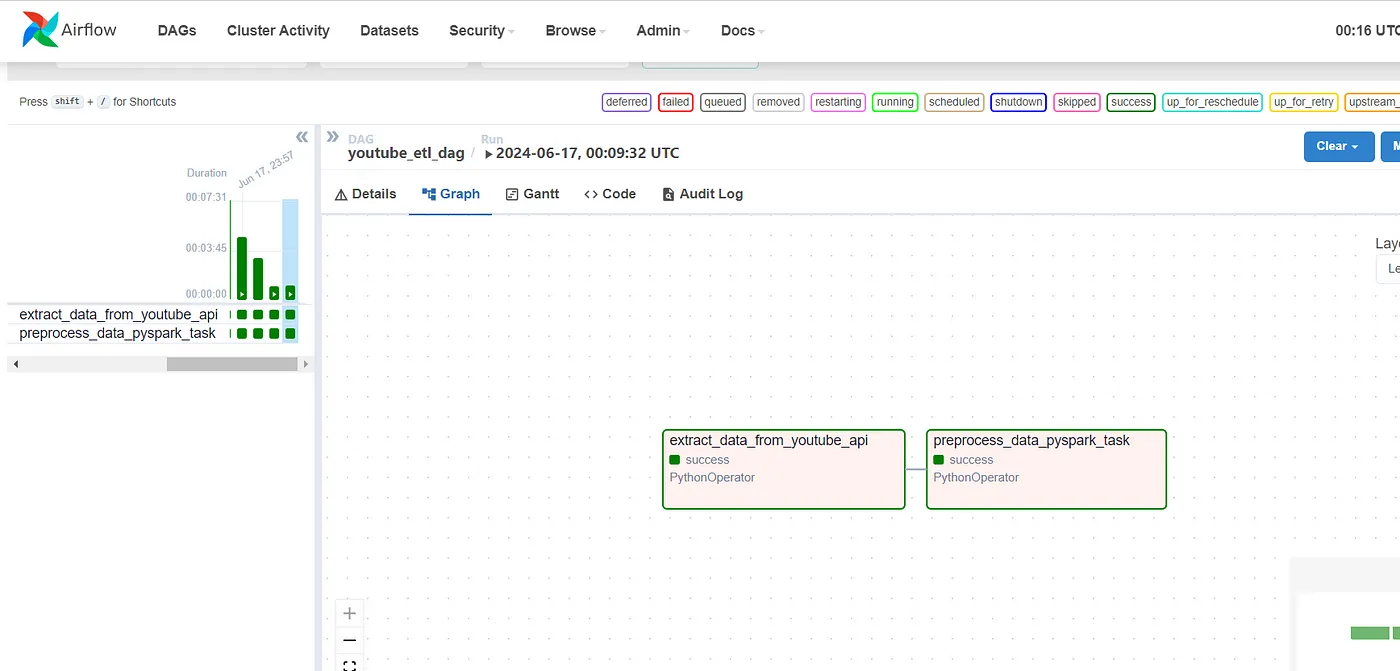
修改代码后,您的Airflow页面应该会显示这些更改。您可以通过点击左上角的“运行”按钮来手动触发DAG。任务的状态(如排队、运行、成功等)会以不同的颜色在图中显示。DAG运行时,您还可以查看日志。
一旦你点击运行按钮,获取数据并将数据存储在文件中需要一些时间。你将会看到图表在任务的每个阶段颜色会不断变化。这有多酷啊? :)
当任务状态变为绿色,表示成功时,您可以查看名为“ VS Code ”中的新文件“Youtube-Trending-Data-Raw”。
这就是我们原始数据的样子如下。
这样一来,我们的提取任务就完成了,接着我们继续下一个任务吧!
如果你查看原始数据文件,你会注意到数据中有很多标签(#)和表情符号,这些对我们项目来说是多余的。我们先把这些预处理和清理一下,以便更好地用于进一步分析。
我们将用PySpark来做这个任务,它是一个专门为处理大规模数据集和执行转换设计的强大框架。虽然我们的数据集不大,也可以用Pandas,但我更喜欢用PySpark。我最近在学PySpark,我发现实际操作比只是学理论有趣多了。
    # 用于从YouTube API提取数据的Python函数
    def extract_data(**kwargs):
        api_key = kwargs['api_key']
        region_codes = kwargs['region_codes']
        category_ids = kwargs['category_ids']

        df_trending_videos = fetch_data(api_key, region_codes, category_ids)
        current_date = datetime.now().strftime("%Y%m%d")
        output_path = f'/opt/airflow/Youtube_Trending_Data_Raw_{current_date}'
        # 将DataFrame保存为CSV文件
        df_trending_videos.to_csv(output_path, index=False)

    def fetch_data(api_key, region_codes, category_ids):
        """
        从YouTube API提取多个国家和类别的热门视频数据。
        返回包含视频数据的pandas DataFrame。
        """
        video_data = []

        # 构建YouTube API服务
        youtube = build('youtube', 'v3', developerKey=api_key)

        for region_code in region_codes:
            for category_id in category_ids:
                # 对每个区域和类别,初始化next_page_token为None
                next_page_token = None
                while True:
                    # 向YouTube API发出请求,以获取热门视频
                    request = youtube.videos().list(
                        part='snippet,contentDetails,statistics',
                        chart='mostPopular',
                        regionCode=region_code,
                        videoCategoryId=category_id,
                        maxResults=50,
                        pageToken=next_page_token
                    )
                    response = request.execute()
                    videos = response['items']

                    # 处理每个视频并收集数据
                    for video in videos:
                        video_info = {
                            'region_code': region_code,
                            'category_id': category_id,
                            'video_id': video['id'],
                            'title': video['snippet']['title'],
                            'published_at': video['snippet']['publishedAt'],
                            'view_count': video['statistics'].get('viewCount', 0),
                            'like_count': video['statistics'].get('likeCount', 0),
                            'comment_count': video['statistics'].get('commentCount', 0),
                            'channel_title': video['snippet']['channelTitle']
                        }
                        video_data.append(video_info)

                    # 获取下一页的token,如果还有更多的结果页面
                    next_page_token = response.get('nextPageToken')
                    if not next_page_token:
                        break

        return pd.DataFrame(video_data)

    def preprocess_data_pyspark_job():
        spark = SparkSession.builder.appName('YouTubeTransform').getOrCreate()
        current_date = datetime.now().strftime("%Y%m%d")
        output_path = f'/opt/airflow/Youtube_Trending_Data_Raw_{current_date}'
        df = spark.read.csv(output_path, header=True)

        # 定义UDF以去除#号和emoji
        def clean_text(text):
            if text is not None:
                # 去除emoji
                text = emoji.demojize(text, delimiters=('', ''))

                # 去除#号数据
                if text.startswith('#'):
                    text = text.replace('#', '').strip()
                else:
                    split_text = text.split('#')
                    text = split_text[0].strip()

                # 去除多余的双引号和反斜杠
                text = text.replace('\\"', '')  # 去除转义的双引号
                text = re.sub(r'\"+', '', text)  # 去除多余的双引号
                text = text.replace('\\', '')  # 去除反斜杠

                return text.strip()  # 去除前后空白

            return text
        # 注册UDF
        clean_text_udf = udf(clean_text, StringType())

        # 清洗数据
        df_cleaned = df.withColumn('title', clean_text_udf(col('title'))) \
                       .withColumn('channel_title', clean_text_udf(col('channel_title'))) \
                       .withColumn('published_at', to_date(col('published_at'))) \
                       .withColumn('view_count', col('view_count').cast(LongType())) \
                       .withColumn('like_count', col('like_count').cast(LongType())) \
                       .withColumn('comment_count', col('comment_count').cast(LongType())) \
                       .dropna(subset=['video_id'])

        # 基于当前日期生成文件名
        current_date = datetime.now().strftime("%Y%m%d")
        output_path = f'/opt/airflow/Transformed_Youtube_Data_{current_date}'

        # 将清洗后的DataFrame写入指定路径
        df_cleaned.write.csv(output_path, header=True, mode='overwrite')

    # 定义用于DAG的提取任务
    extract_task = PythonOperator(
        task_id='extract_data_from_youtube_api',
        python_callable=extract_data,
        op_kwargs={
            'api_key': os.getenv('YOUTUBE_API_KEY'),
            'region_codes': ['US', 'GB', 'IN', 'AU', 'NZ'],
            'category_ids': ['1', '2', '10', '15', '20', '22', '23']
        },
        dag=dag,
    )

    # 定义用于DAG的预处理任务
    preprocess_data_pyspark_task = PythonOperator(
        task_id='preprocess_data_pyspark_task',
        python_callable=preprocess_data_pyspark_job,
        dag=dag
    )

    extract_task >> preprocess_data_pyspark_task
下面这段代码是做什么的:
-
它创建了一个名为
preprocess_data_pyspark_task的任务。 -
该任务调用了
preprocess_data_pyspark_job函数。 -
preprocess_data_pyspark_job函数用来清理数据。 -
清理后的数据将保存在名为
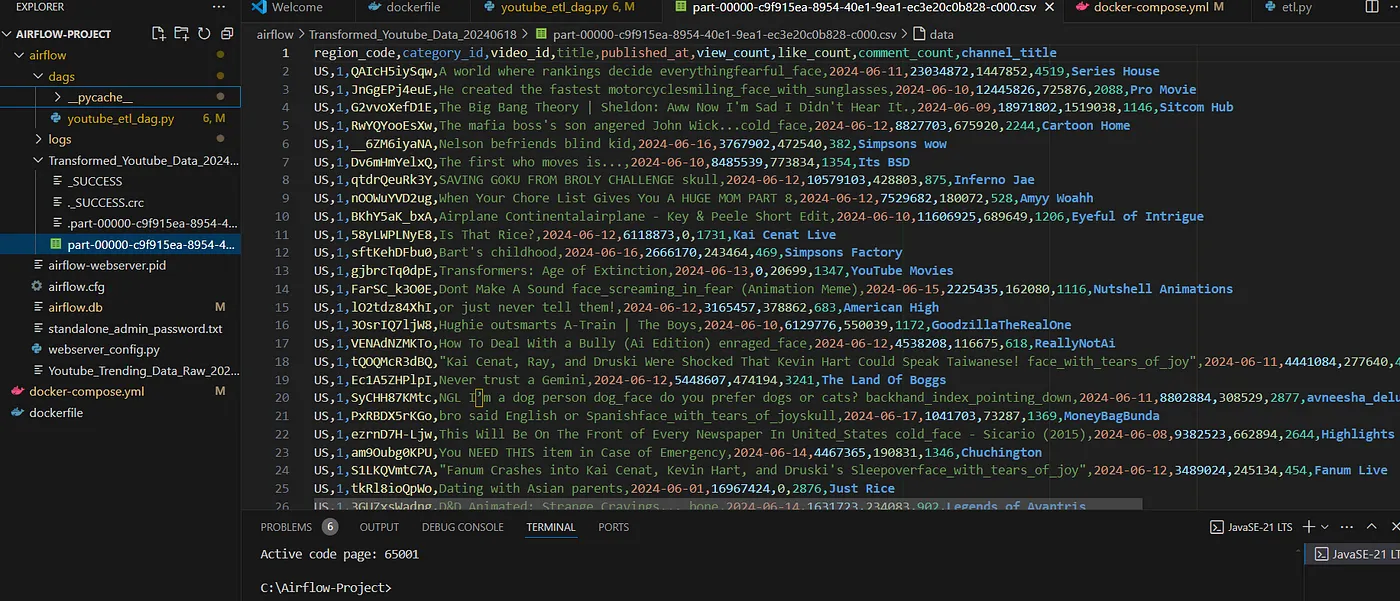
Transformed_Youtube_Data_currentDate的文件夹里。 - 在该文件夹里会生成一个名为“part-”的 CSV 文件,其中包含清理后的数据。
如果你看到 "Airflow",会在第一个任务后面再加上一个任务,如下:
这就是我们转换后的数据的样子:
这项任务做完了,接下来我们将进入最后一个任务。
在开始这项任务之前,请使用你之前设置的IAM用户创建一个S3存储桶,并记下存储桶的名称。
这是我们最后的代码!
    import logging
    import os
    import re
    import shutil
    from datetime import datetime, timedelta

    import boto3
    import emoji
    import pandas as pd
    from googleapiclient.discovery import build
    from pyspark.sql import SparkSession
    from pyspark.sql.functions import col, to_date, udf
    from pyspark.sql.types import (DateType, IntegerType, LongType, StringType,
                                   StructField, StructType)

    from airflow import DAG
    from airflow.operators.python_operator import PythonOperator

    # 定义DAG及其默认参数
    default_args = {
        'owner': 'airflow',  # DAG的所有者
        'depends_on_past': False,  # 是否依赖过去的DAG运行
        'email_on_failure': False,  # 失败时不发邮件通知
        'email_on_retry': False,  # 重试时不发邮件通知
        'retries': 1,  # 重试次数
        'retry_delay': timedelta(minutes=5),  # 重试之间的延迟
        'start_date': datetime(2023, 6, 10, 0, 0, 0),  # 每天午夜(00:00 UTC)运行
    }

    dag = DAG(
        'youtube_etl_dag',  # DAG标识符
        default_args=default_args,  # 指定默认参数
        description='一个简单的ETL工作流',  # DAG描述
        schedule_interval=timedelta(days=1),  # 调度间隔:每天
        catchup=False,  # 不追赶未运行的DAG
    )
    # 从YouTube API提取数据的Python可调用函数
    def extract_data(**kwargs):
        api_key = kwargs['api_key']
        region_codes = kwargs['region_codes']
        category_ids = kwargs['category_ids']

        df_trending_videos = fetch_data(api_key, region_codes, category_ids)
        current_date = datetime.now().strftime("%Y%m%d")
        output_path = f'/opt/airflow/Youtube_Trending_Data_Raw_{current_date}'
        # 将DataFrame保存为CSV文件
        df_trending_videos.to_csv(output_path, index=False)

    def fetch_data(api_key, region_codes, category_ids):
        """
        从YouTube API获取多个地区和类别的热门视频数据。
        返回包含视频数据的pandas数据帧。
        """
        # 初始化一个空列表以保存视频数据
        video_data = []

        # 构建YouTube API服务
        youtube = build('youtube', 'v3', developerKey=api_key)

        for region_code in region_codes:
            for category_id in category_ids:
                # 对于每个地区和类别,将next_page_token初始化为None
                next_page_token = None
                while True:
                    # 向YouTube API发出请求以获取热门视频
                    request = youtube.videos().list(
                        part='snippet,contentDetails,statistics',
                        chart='mostPopular',
                        regionCode=region_code,
                        videoCategoryId=category_id,
                        maxResults=50,
                        pageToken=next_page_token
                    )
                    response = request.execute()
                    videos = response['items']

                    # 处理每个视频并收集数据
                    for video in videos:
                        video_info = {
                            'region_code': region_code,
                            'category_id': category_id,
                            'video_id': video['id'],
                            'title': video['snippet']['title'],
                            'published_at': video['snippet']['publishedAt'],
                            'view_count': video['statistics'].get('viewCount', 0),
                            'like_count': video['statistics'].get('likeCount', 0),
                            'comment_count': video['statistics'].get('commentCount', 0),
                            'channel_title': video['snippet']['channelTitle']
                        }
                        video_data.append(video_info)

                    # 获取下一页标记,如果还有更多页面的结果
                    next_page_token = response.get('nextPageToken')
                    if not next_page_token:
                        break

        return pd.DataFrame(video_data)

    def preprocess_data_pyspark_job():
        spark = SparkSession.builder.appName('YouTubeTransform').getOrCreate()
        current_date = datetime.now().strftime("%Y%m%d")
        output_path = f'/opt/airflow/Youtube_Trending_Data_Raw_{current_date}'
        df = spark.read.csv(output_path, header=True)

        # 定义UDF以清理文本数据,移除hashtag和表情符号
        def clean_text(text):
            if text is not None:
                # 移除表情符号
                text = emoji.demojize(text, delimiters=('', ''))

                # 移除hashtag和其后的内容
                if text.startswith('#'):
                    text = text.replace('#', '').strip()
                else:
                    split_text = text.split('#')
                    text = split_text[0].strip()

                # 移除多余的双引号和反斜杠
                text = text.replace('\\"', '')  # 移除转义引号
                text = re.sub(r'\"+', '', text)  # 移除剩余的双引号
                text = text.replace('\\', '')  # 移除反斜杠

                return text.strip()  # 移除任何前导或尾随空白字符

            return text
        # 注册UDF
        clean_text_udf = udf(clean_text, StringType())

        # 清理数据
        df_cleaned = df.withColumn('title', clean_text_udf(col('title'))) \
                       .withColumn('channel_title', clean_text_udf(col('channel_title'))) \
                       .withColumn('published_at', to_date(col('published_at'))) \
                       .withColumn('view_count', col('view_count').cast(LongType())) \
                       .withColumn('like_count', col('like_count').cast(LongType())) \
                       .withColumn('comment_count', col('comment_count').cast(LongType())) \
                       .dropna(subset=['video_id'])

        # 根据当前日期生成文件名
        current_date = datetime.now().strftime("%Y%m%d")
        output_path = f'/opt/airflow/Transformed_Youtube_Data_{current_date}'

        # 将清理后的DataFrame写入指定路径
        df_cleaned.write.csv(output_path, header=True, mode='overwrite')

    def load_data_to_s3(**kwargs):
        bucket_name = kwargs['bucket_name']
        today = datetime.now().strftime('%Y/%m/%d')
        prefix = f"processed-data/{today}"
        current_date = datetime.now().strftime("%Y%m%d")
        local_dir_path = f'/opt/airflow/Transformed_Youtube_Data_{current_date}'
        upload_to_s3(bucket_name, prefix, local_dir_path)

    def upload_to_s3(bucket_name, prefix, local_dir_path):
        aws_access_key_id = os.getenv('AWS_ACCESS_KEY_ID')
        aws_secret_access_key = os.getenv('AWS_SECRET_ACCESS_KEY')

        s3_client = boto3.client(
            's3',
            aws_access_key_id=aws_access_key_id,
            aws_secret_access_key=aws_secret_access_key
        )

        for root, dirs, files in os.walk(local_dir_path):
             for file in files:
                if file.endswith('.csv'):
                    file_path = os.path.join(root, file)
                    s3_key = f"{prefix}/{file}"
                    logging.info(f"上传文件 {file_path} 到 S3 位置 s3://{bucket_name}/{s3_key}")
                    s3_client.upload_file(file_path, bucket_name, s3_key)

    # 定义DAG的提取任务
    extract_task = PythonOperator(
        task_id='extract_data_from_youtube_api',
        python_callable=extract_data,
        op_kwargs={
            'api_key': os.getenv('YOUTUBE_API_KEY'),
            'region_codes': ['US', 'GB', 'IN', 'AU', 'NZ'],
            'category_ids': ['1', '2', '10', '15', '20', '22', '23']
        },
        dag=dag,
    )

    # 定义DAG的预处理任务
    preprocess_data_pyspark_task = PythonOperator(
        task_id='preprocess_data_pyspark_task',
        python_callable=preprocess_data_pyspark_job,
        dag=dag
    )

    # 定义DAG的加载任务
    load_data_to_s3_task = PythonOperator(
        task_id='上传数据到S3任务',
        python_callable=load_data_to_s3,
        op_kwargs={
            'bucket_name': '请在此处粘贴您的Bucket名称,例如:my-bucket'
        },
        dag=dag
    )

    extract_task >> preprocess_data_pyspark_task >> load_data_to_s3_task
我们创建了最后一个任务,命名为load_data_to_s3_task,这个任务调用了load_data_to_s3函数,将我们的文件上传到了S3桶。您可以通过查看S3桶里的内容来确认文件是否上传成功。
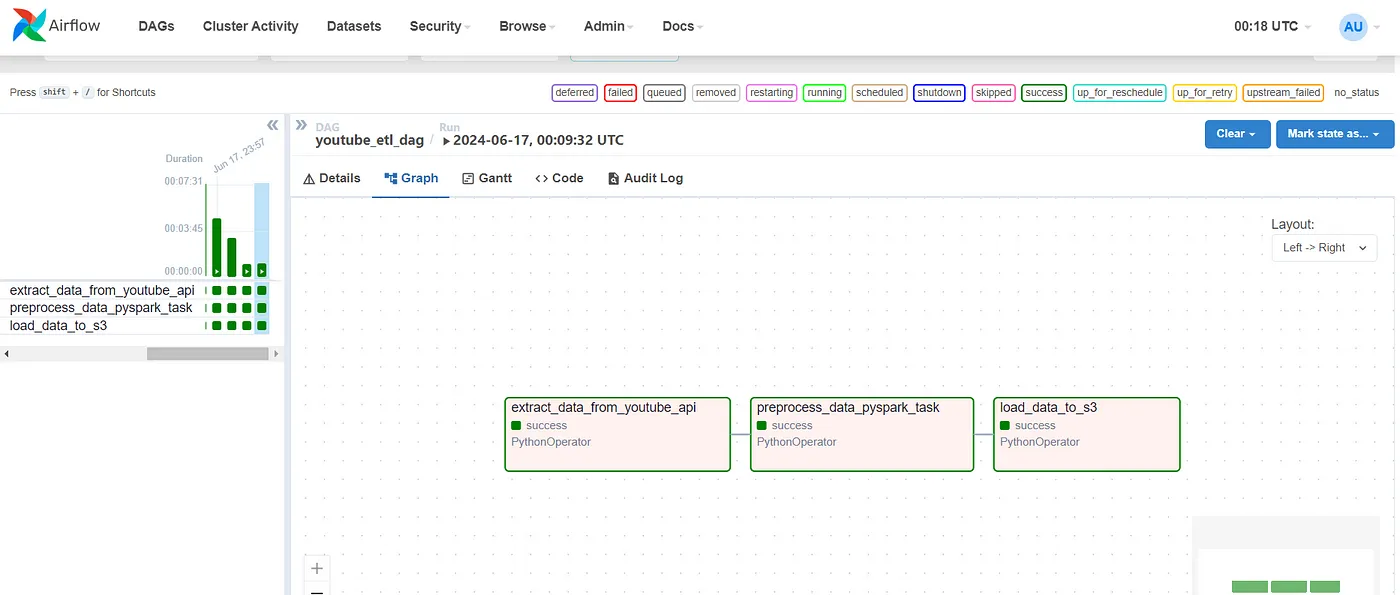
最后我们的Airflow看起来像这样。
现在,你可以将这些数据连接到Tableau或其他BI工具,创建一个酷炫的仪表板,并可视化这些洞察。
希望你跟我一起走完了这段旅程,希望你在途中学到了一些新技能!🚀 如果你成功走到这里,恭喜你!🎉 希望这份新学的知识能助你在未来的数据工程之旅中一臂之力!
这里附上该项目的github仓库链接:
如果你喜欢这篇文章,请分享、点个赞、写下你的评论,并点击关注。🎉👍📝
拉上窗帘啦! 🎭
-
Docker部署资料:新手入门教程12-20
-
Docker部署实战:新手入门教程12-19
-
Docker部署教程:新手入门详解12-19
-
云原生周刊:在Docker上部署大语言模型12-09
-
Docker教程:新手快速入门指南12-05
-
Docker项目实战:新手教程与案例解析12-05
-
Docker入门教程:快速掌握基础操作12-04
-
Docker入门教程:轻松搭建你的第一个容器化应用12-04
-
Docker-Compose 入门教程:全面解析基础命令与应用场景12-04
-
Docker入门:新手必读的简单教程12-04
-
基于Kafka、Spark、Airflow、PostgreSQL和Docker的端到端数据工程实战教程12-02
-
云原生周刊:Kubernetes 和 Docker 的对比12-02
-
重启 Docker 容器的命令有哪些?-icode9专业技术文章分享11-30
-
Docker-Compose容器集群化项目实战:新手入门指南11-19
-
Docker镜像仓库项目实战:新手入门教程11-19


