C/C++教程
Kakfa成长记8:Producer如何将消息放入到内存缓冲区(下)
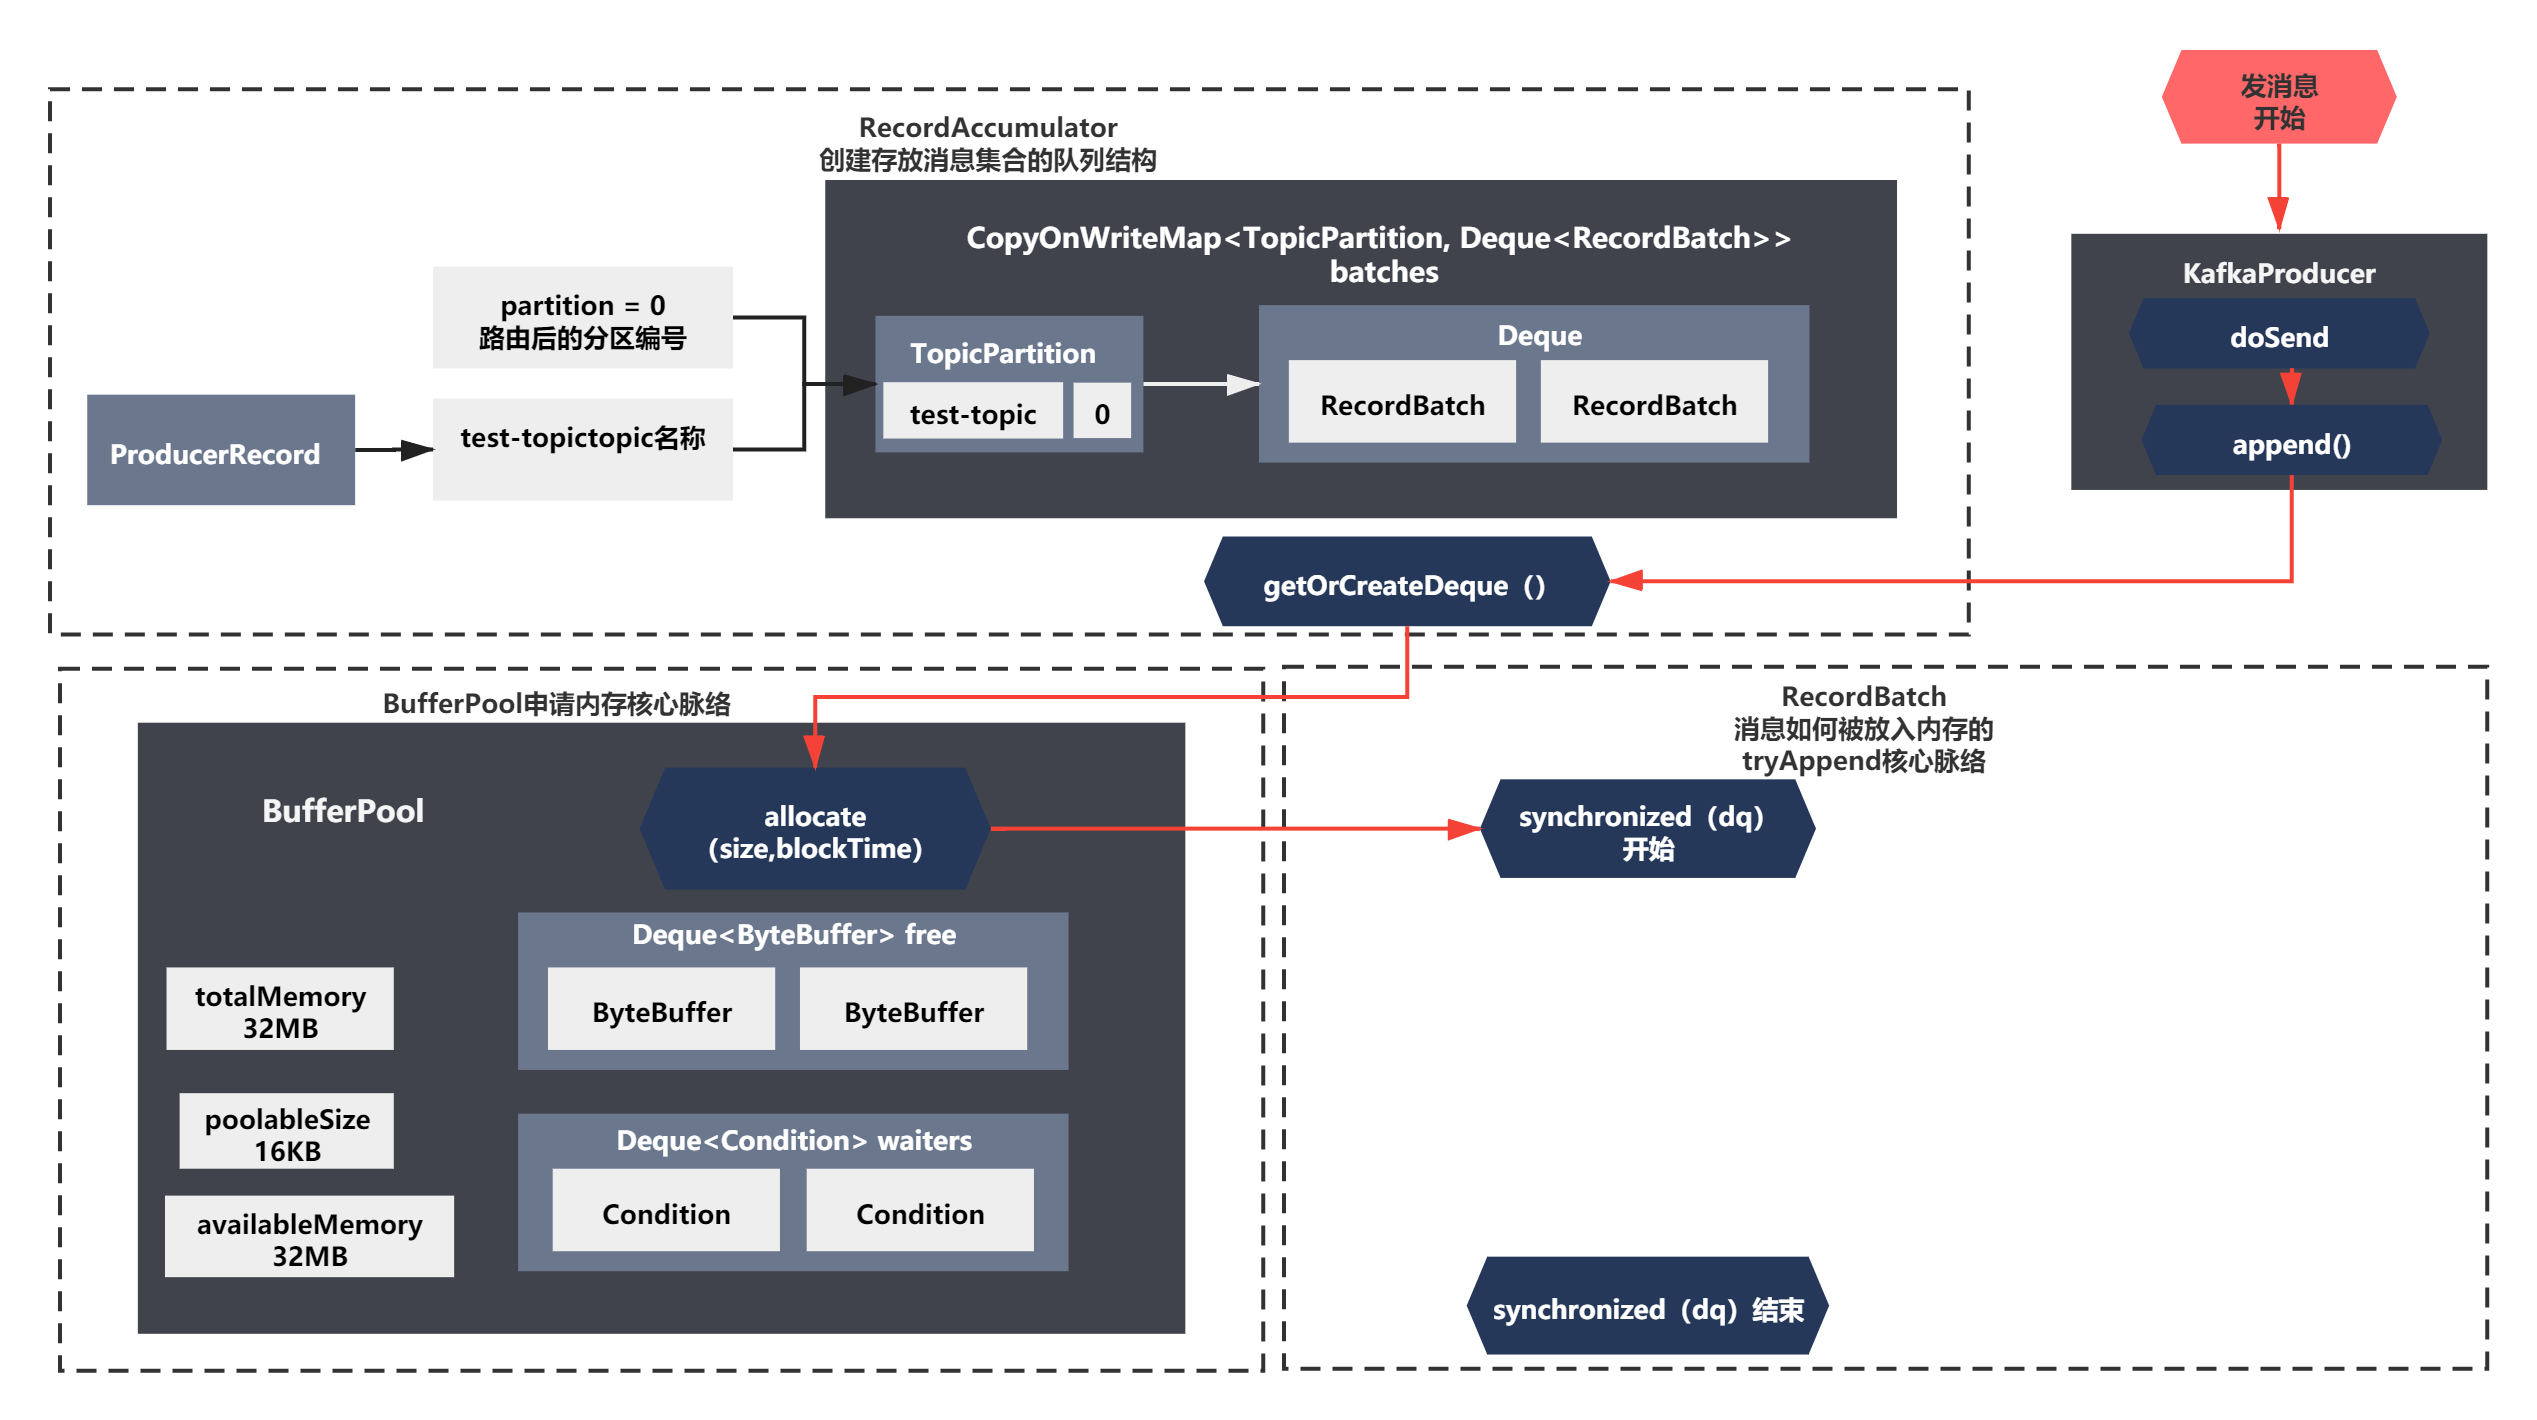
上一节我们主要分析了RecordAccumulator通过BufferPool申请内存的源码原理,在之前的分析中,在KafkaProducer发送消息时,把消息放入内存缓冲区中主要分为了三步。如下:
而且之前我们主要分析了前两步的代码,如下注释所示:
 public RecordAppendResult append(TopicPartition tp,
                                     long timestamp,
                                     byte[] key,
                                     byte[] value,
                                     Callback callback,
                                     long maxTimeToBlock) throws InterruptedException {
        // We keep track of the number of appending thread to make sure we do not miss batches in
        // abortIncompleteBatches().
        appendsInProgress.incrementAndGet();
        try {
            // check if we have an in-progress batch
            // 1、创建存放消息的内存结果 本质是一个map集合,内部主要是双端队列 (已分析)
            Deque<RecordBatch> dq = getOrCreateDeque(tp);

            //这段tryAppend代码发第一条消息的时候不会执行,暂时没有分析
            synchronized (dq) {
                if (closed)
                    throw new IllegalStateException("Cannot send after the producer is closed.");
                RecordAppendResult appendResult = tryAppend(timestamp, key, value, callback, dq);
                if (appendResult != null)
                    return appendResult;
            }

            //2、BufferPool申请内存块逻辑 (已分析)
            // we don't have an in-progress record batch try to allocate a new batch
            int size = Math.max(this.batchSize, Records.LOG_OVERHEAD + Record.recordSize(key, value));
            log.trace("Allocating a new {} byte message buffer for topic {} partition {}", size, tp.topic(), tp.partition());
            ByteBuffer buffer = free.allocate(size, maxTimeToBlock);

            //3、将消息封装到内存块中,放入之前准备的内存结构 (待分析)
            synchronized (dq) {
                // Need to check if producer is closed again after grabbing the dequeue lock.
                if (closed)
                    throw new IllegalStateException("Cannot send after the producer is closed.");

                RecordAppendResult appendResult = tryAppend(timestamp, key, value, callback, dq);
                if (appendResult != null) {
                    // Somebody else found us a batch, return the one we waited for! Hopefully this doesn't happen often...
                    free.deallocate(buffer);
                    return appendResult;
                }
                MemoryRecords records = MemoryRecords.emptyRecords(buffer, compression, this.batchSize);
                RecordBatch batch = new RecordBatch(tp, records, time.milliseconds());
                FutureRecordMetadata future = Utils.notNull(batch.tryAppend(timestamp, key, value, callback, time.milliseconds()));

                dq.addLast(batch);
                incomplete.add(batch);
                return new RecordAppendResult(future, dq.size() > 1 || batch.records.isFull(), true);
            }
        } finally {
            appendsInProgress.decrementAndGet();
        }
    }
之前分析的逻辑,可以概括如下图所示:
这一节我们继续来分析将消息放入缓冲区的最后一步—tryAppend的逻辑,让我们一起来看下吧!
tryAppend的核心脉络
首先我们肯定要初步摸一下第三步代码主要在做什么。它的逻辑主要如下:
 synchronized (dq) {
                // Need to check if producer is closed again after grabbing the dequeue lock.
                if (closed)
                    throw new IllegalStateException("Cannot send after the producer is closed.");

                RecordAppendResult appendResult = tryAppend(timestamp, key, value, callback, dq);
                if (appendResult != null) {
                    // Somebody else found us a batch, return the one we waited for! Hopefully this doesn't happen often...
                    free.deallocate(buffer);
                    return appendResult;
                }
                MemoryRecords records = MemoryRecords.emptyRecords(buffer, compression, this.batchSize);
                RecordBatch batch = new RecordBatch(tp, records, time.milliseconds());
                FutureRecordMetadata future = Utils.notNull(batch.tryAppend(timestamp, key, value, callback, time.milliseconds()));

                dq.addLast(batch);
                incomplete.add(batch);
                return new RecordAppendResult(future, dq.size() > 1 || batch.records.isFull(), true);
            }
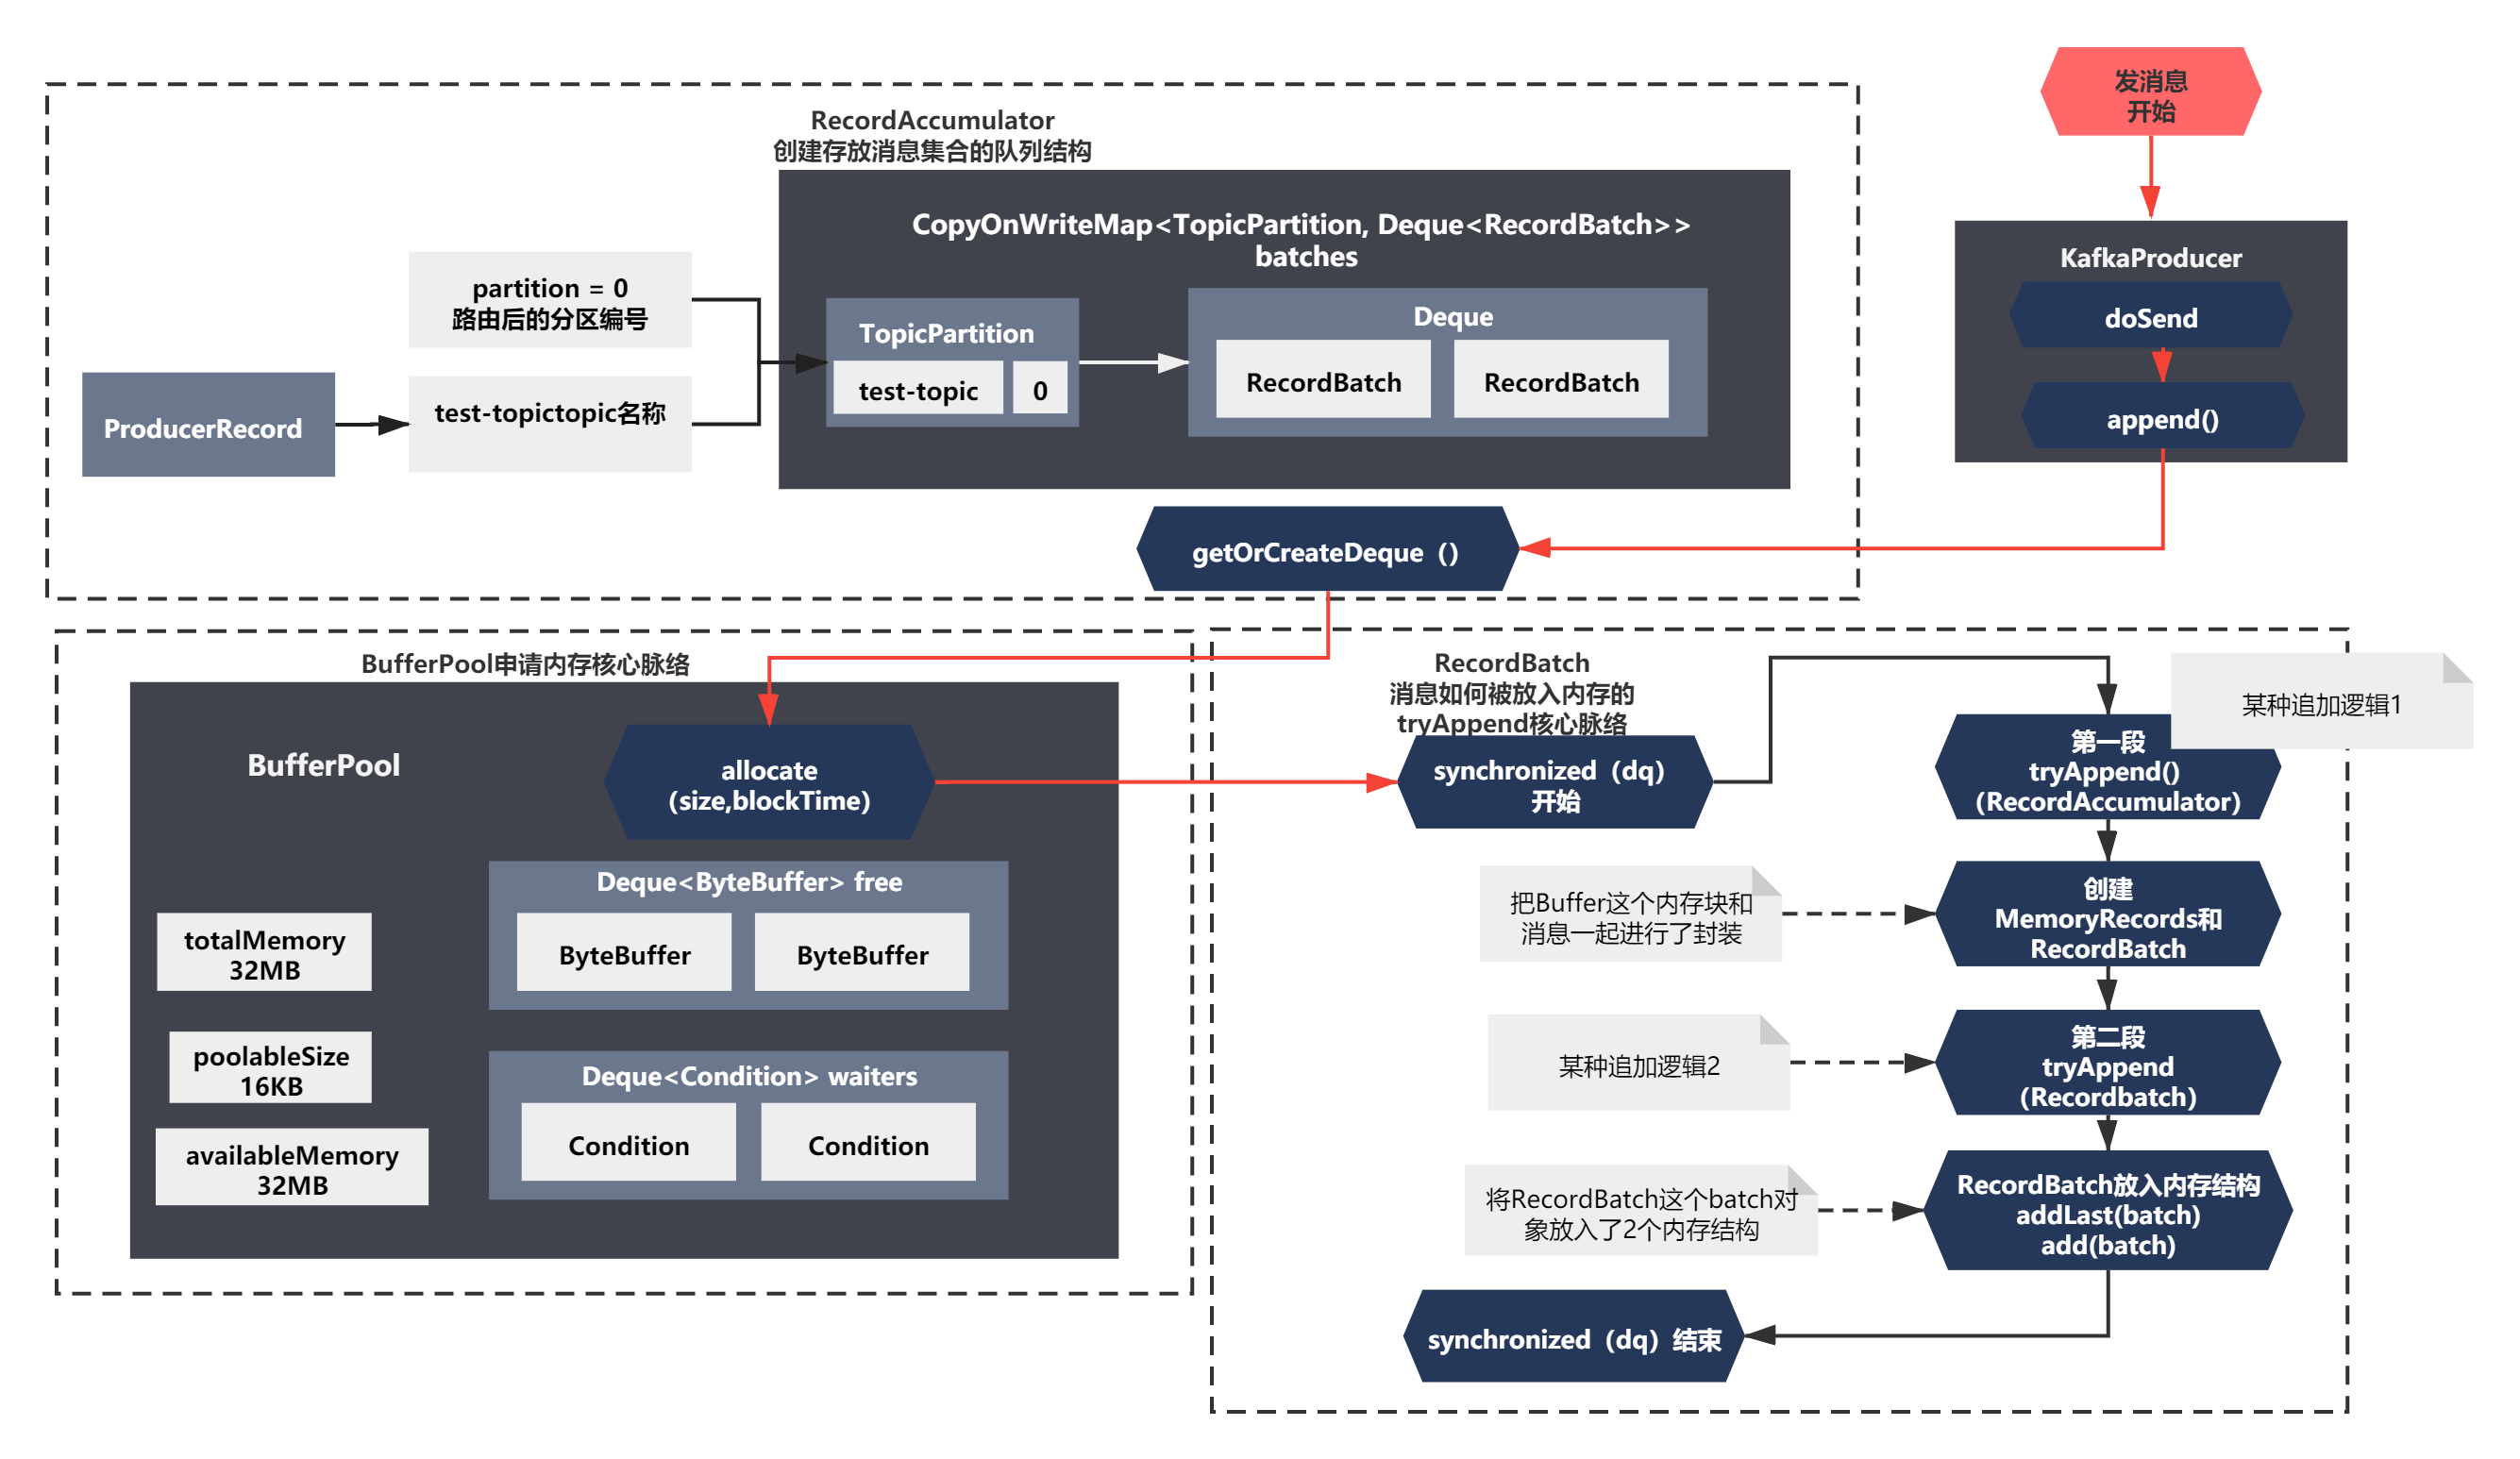
可以看到上面的代码主要脉络:
1)执行了一段tryAppend() 如果返回appendResult非空,则进行了一个释放BufferPool内存块的逻辑。否则什么都不做,这个之前第一步 getOrCreateDeque后面的逻辑很像,应该是同样的逻辑。
2)创建了 MemoryRecords和RecordBatch这两个关键的对象,应该是通过这两个对象,把Buffer这个内存块和消息一起进行了封装
3)之后执行了Recordbatch.tryAppend方法,又一个tryAppend,还是异步的一个Feature。应该也是某种追加逻辑。
4)最后就是将RecordBatch这个batch对象放入了2个内存结构了,dp就是之前的双端队列,incomplete是一个RecordBatch的Set集合,从名字上看是正在处理中或者未完成发送的RecordBatch的意思
整个脉络补充到上面的图中,如下所示:
既然知道了这个核心脉络,我们一步一步来分析下就好。
两段tryAppend()到底在干什么?
在上面核心脉络中,有两段TryAppend逻辑。首先我们来看下tryAppend()在做什么。
//RecordAccumulator.java
synchronized (dq) {
   RecordAppendResult appendResult = tryAppend(timestamp, key, value, callback, dq);
    if (appendResult != null) {
        // Somebody else found us a batch, return the one we waited for! Hopefully this doesn't happen often...
        free.deallocate(buffer);
        return appendResult;
    }


}

private RecordAppendResult tryAppend(long timestamp, byte[] key, byte[] value, Callback callback, Deque<RecordBatch> deque) {
    RecordBatch last = deque.peekLast();
    if (last != null) {
        FutureRecordMetadata future = last.tryAppend(timestamp, key, value, callback, time.milliseconds());
        if (future == null)
            last.records.close();
        else
            return new RecordAppendResult(future, deque.size() > 1 || last.records.isFull(), false);
    }
    return null;
}

// RecordBatch.tryAppend()
    public FutureRecordMetadata tryAppend(long timestamp, byte[] key, byte[] value, Callback callback, long now) {
        if (!this.records.hasRoomFor(key, value)) {
            return null;
        } else {
            long checksum = this.records.append(offsetCounter++, timestamp, key, value);
            this.maxRecordSize = Math.max(this.maxRecordSize, Record.recordSize(key, value));
            this.lastAppendTime = now;
            FutureRecordMetadata future = new FutureRecordMetadata(this.produceFuture, this.recordCount,
                                                                   timestamp, checksum,
                                                                   key == null ? -1 : key.length,
                                                                   value == null ? -1 : value.length);
            if (callback != null)
                thunks.add(new Thunk(callback, future));
            this.recordCount++;
            return future;
        }
    }

//MemoryRecords.java append方法
    public long append(long offset, long timestamp, byte[] key, byte[] value) {
        if (!writable)
            throw new IllegalStateException("Memory records is not writable");

        int size = Record.recordSize(key, value);
        compressor.putLong(offset);
        compressor.putInt(size);
        long crc = compressor.putRecord(timestamp, key, value);
        compressor.recordWritten(size + Records.LOG_OVERHEAD);
        return crc;
    }
这段逻辑其实比较不好理解。内部调用了两个不同类的tryAppend()。我起初看这块的时候,都没理解它在干什么。
为什么这里加了synchronized (dq)?
从这个队列中deque.peekLast()是在干吗?
为啥又执行了last.tryAppend?
…
反正有各种问题,各种不理解。我们看源码经常会遇到这种情况。这个时候怎么办呢?
其实就是一个办法:尝试。
尝试各种方法,比如看看注释、比如能不能debug、比如能不能举例子、比如画图、比如能不能搜搜帖子看看有人研究过这块逻辑么。或者你可能就是自己非要死磕硬钢,不断重复阅读逻辑,聚焦这里,仔细思考、研究这这块逻辑核心目的是什么…
总之,就这样不断重复尝试,钻研,不放弃,你就会慢慢理解晦涩的知识点。
就像有句老话说:”只要思想不滑坡,办法总比困难多。“ 意思就是对技术有兴趣,保持心态好,不抱怨,不烦躁,慢慢来,不断研究和尝试各种方法,总会解决困难的。其实这个就是许多人的差异所在,也正是每个人需要成长的地方。
而这块逻辑经过我不断研究和思考后,发现逻辑并不复杂。下面我举几个例子来帮助大家理解这段逻辑。
场景是这样的,Producer有一个线程1,不断发送总大小为3KB的消息Record。连续发送了6条,我们来看下它的流程是怎么样的呢?
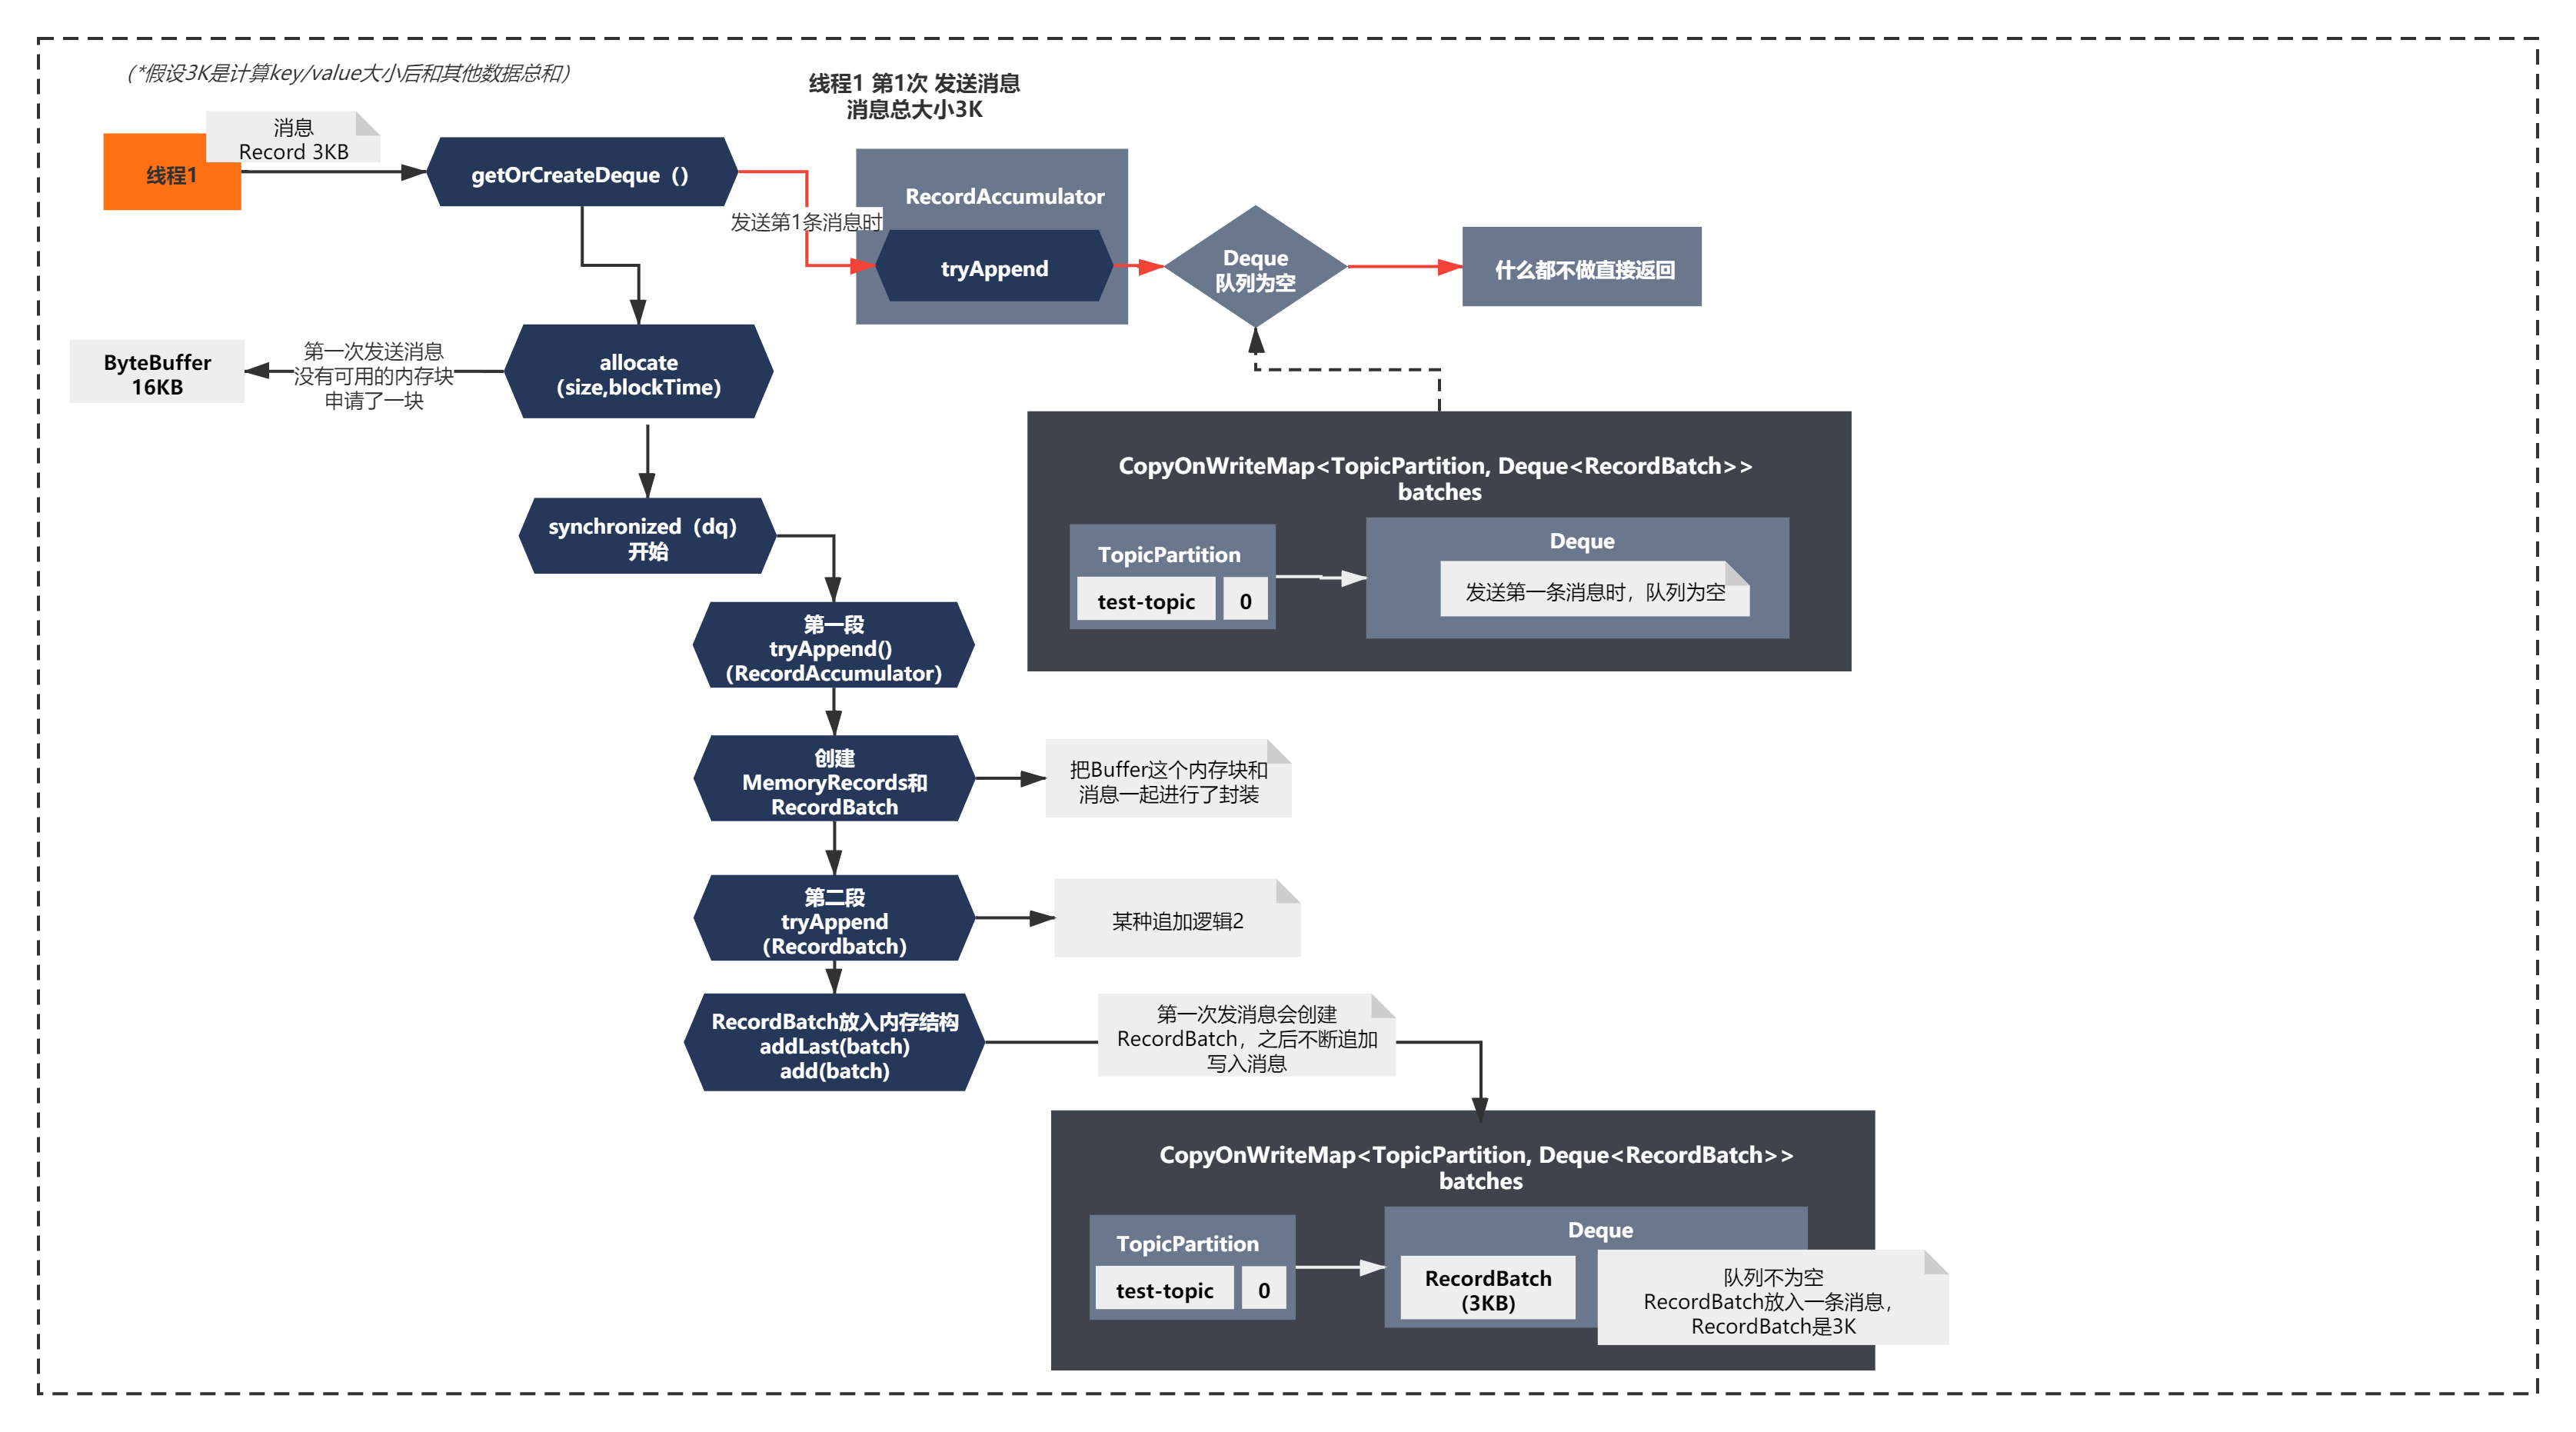
首先线程1第1次发送消息的话,按照上面的核心脉络,执行过程如下所示:
从图中可以清晰的看到线程1第1次发送消息时候,创建了一个内存块ByteBuffer,之后将消息进行了封装处理,写入到了RecordBatch,最后将RecordBatch放入队列中。(可以对应上面的代码来理解)
通过画图,我们可以梳理思路,串起来整个流程整个方法在你困惑的时候非常有用。
接这线程1继续发送消息,发送第2-5条消息,流程则会发生一些改变,如下图所示:
在发送第2-5条消息时,可以发现不会申请新的ByteBuffer,直接向现有的的RecordBatch写入消息,通过MemoryRecords追加消息到ByteBuffer的字节流中,最终RecordBatch的大小为15KB。(可以对应上面的代码来理解)
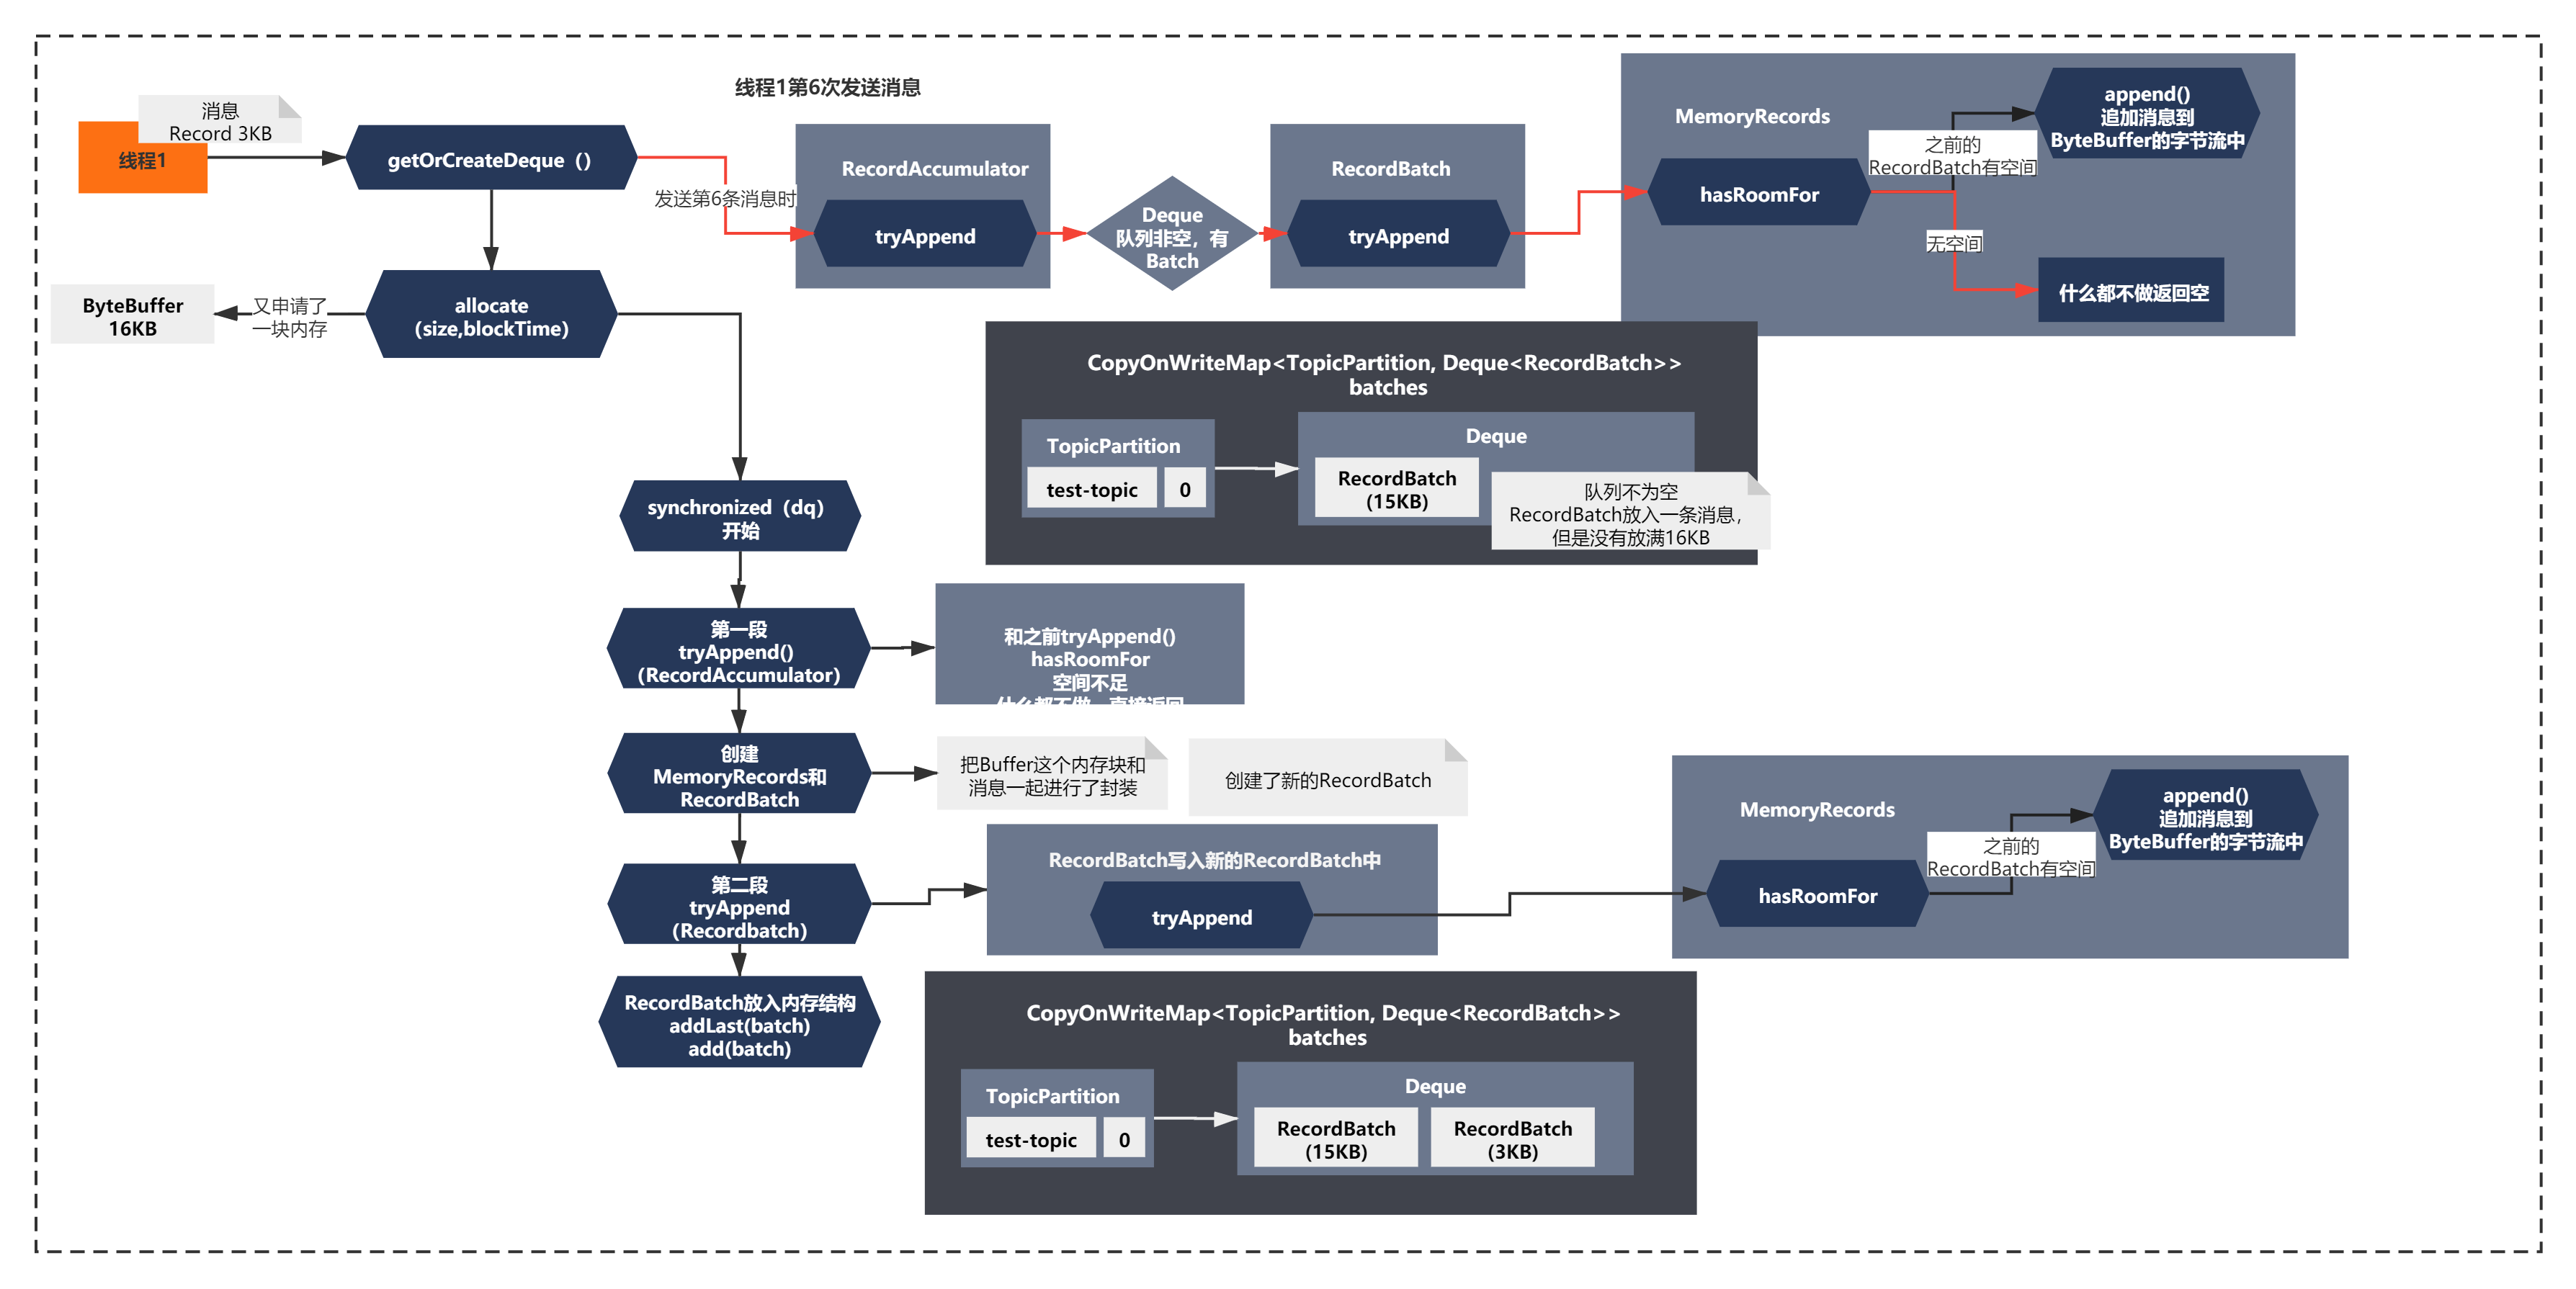
接着线程1发送第6条消息时,流程又会发生新的变化,整体如下图所示:
在发送第6条消息时,又申请了一块内存块和创建了新的RecordBatch。之后由于第一个Batch写满了,会将消息写入第二个Batch,并放入队列中。(可以对应上面的代码来理解)
通过上面的例子,你可以发现KafkaProducer整个发送消息的过程是一个打包发送的过程,会将消息一条一条打成一个16KB的batch,放入队列,之后发送出去。
这种微打包逻辑很多中间件和框架,甚至业务系统中都可以借鉴,你可以发散下思维想想是不是?
其实这里还有很多思考点:
比如单条消息如果超过16KB会怎么样?提示:ByteBuffer不会被复用,直接会生成一个大的RecordBatch。
每个Batch为什么会生成一个异步feature,放入List thunks列表中?提示:可能是为了每条消息绑定回调和超时控制,提升性能和吞吐量。
synchronized加锁的目的什么?提示:肯定是考虑多线程发送消息的场景的。
这些留给大家去思考和练习下,大家可以在评论区留下你的回答。或者在之后的我建立微信群后讨论下。
Record消息的进一步封装和序列化
分析完两段tryAppend()到底在干什么之后,其实整个tryAppend的核心脉络就剩下一段逻辑了。
如何创建了 MemoryRecords和RecordBatch这两个关键的对象,并通过这两个对象,把ByteBuffer这个内存块和消息一起进行了封装的呢?
让我们来看下代码:
 MemoryRecords records = MemoryRecords.emptyRecords(buffer, compression, this.batchSize);
 RecordBatch batch = new RecordBatch(tp, records, time.milliseconds());

//MemoryRecords.java
private MemoryRecords(ByteBuffer buffer, CompressionType type, boolean writable, int writeLimit) {
    this.writable = writable;
    this.writeLimit = writeLimit;
    this.initialCapacity = buffer.capacity();
    if (this.writable) {
        this.buffer = null;
        this.compressor = new Compressor(buffer, type);
    } else {
        this.buffer = buffer;
        this.compressor = null;
    }
}
//Compressor.java
public Compressor(ByteBuffer buffer, CompressionType type) {
    this.type = type;
    this.initPos = buffer.position();

    this.numRecords = 0;
    this.writtenUncompressed = 0;
    this.compressionRate = 1;
    this.maxTimestamp = Record.NO_TIMESTAMP;

    if (type != CompressionType.NONE) {
        // for compressed records, leave space for the header and the shallow message metadata
        // and move the starting position to the value payload offset
        buffer.position(initPos + Records.LOG_OVERHEAD + Record.RECORD_OVERHEAD);
    }

    // create the stream
    bufferStream = new ByteBufferOutputStream(buffer);
    appendStream = wrapForOutput(bufferStream, type, COMPRESSION_DEFAULT_BUFFER_SIZE);
}

//RecordBatch.java
public RecordBatch(TopicPartition tp, MemoryRecords records, long now) {
    this.createdMs = now;
    this.lastAttemptMs = now;
    this.records = records;
    this.topicPartition = tp;
    this.produceFuture = new ProduceRequestResult();
    this.thunks = new ArrayList<Thunk>();
    this.lastAppendTime = createdMs;
    this.retry = false;
}
其实可以看到,基本就是初始化RecordBatch和MemoryRecords内部数据结构,核心通过一个组件Compressor操作ByteBuffer,将消息消息的key和Value之后写入到一个outPutStream流中。
至于具体如何写入的,其实是在之后MemoryRecords.append()中
public long append(long offset, long timestamp, byte[] key, byte[] value) {
    if (!writable)
        throw new IllegalStateException("Memory records is not writable");

    int size = Record.recordSize(key, value);
    compressor.putLong(offset);
    compressor.putInt(size);
    long crc = compressor.putRecord(timestamp, key, value);
    compressor.recordWritten(size + Records.LOG_OVERHEAD);
    return crc;
}
public static int recordSize(int keySize, int valueSize) {
    return CRC_LENGTH + MAGIC_LENGTH + ATTRIBUTE_LENGTH + TIMESTAMP_LENGTH + KEY_SIZE_LENGTH + keySize + VALUE_SIZE_LENGTH + valueSize;
}

public long putRecord(long timestamp, byte[] key, byte[] value, CompressionType type,
                      int valueOffset, int valueSize) {
    // put a record as un-compressed into the underlying stream
    long crc = Record.computeChecksum(timestamp, key, value, type, valueOffset, valueSize);
    byte attributes = Record.computeAttributes(type);
    putRecord(crc, attributes, timestamp, key, value, valueOffset, valueSize);
    return crc;
}


 public static void write(Compressor compressor, long crc, byte attributes, long timestamp, byte[] key, byte[] value, int valueOffset, int valueSize) {
        // write crc
        compressor.putInt((int) (crc & 0xffffffffL));
        // write magic value
        compressor.putByte(CURRENT_MAGIC_VALUE);
        // write attributes
        compressor.putByte(attributes);
        // write timestamp
        compressor.putLong(timestamp);
        // write the key
        if (key == null) {
            compressor.putInt(-1);
        } else {
            compressor.putInt(key.length);
            compressor.put(key, 0, key.length);
        }
        // write the value
        if (value == null) {
            compressor.putInt(-1);
        } else {
            int size = valueSize >= 0 ? valueSize : (value.length - valueOffset);
            compressor.putInt(size);
            compressor.put(value, valueOffset, size);
        }
    }
    public void putByte(final byte value) {
        try {
            appendStream.write(value);
        } catch (IOException e) {
            throw new KafkaException("I/O exception when writing to the append stream, closing", e);
        }
    }
通过上面的代码可以看出来,消息最终会按照一定格式最终序列化成字节数组写入到输出流中。
什么样的格式呢?其实根据写入的顺序可以看出它的自定义二进制协议如下:
offset | size | crc | magic | attibutes | timestamp | key size | key | value size | value
整个过程他规范里规定了,就是先是几个字节的offset,然后是几个字节的size,然后是几个字节的crc,接着是几个字节的magic,以此类推,他就是完全按照规范来写入ByteBuffer里去的。
并且可以看到他最最底层的写入ByteBuffer的IO流的方式。
整个过程简单可以概括如下图所示:
如果你仔细分析下,会发现个流可以进行压缩,ByteBufferOutputStream给包裹在一个压缩流里,gzip、lz4、snappy,如果是包裹在压缩流里,写入的时候会先进入压缩流的流的缓冲区,之后再写入ByteBufferOutputStream。 如果是非压缩的模式,最最普通的情况下,就是DataOutputStream包裹了ByteBufferOutputSteram,然后写入数据,Long、Byte、String,都会在底层转换为字节进入到ByteBuffer里去。
其实这才是消息最终的序列化,根据自定义的二进制协议写入流中发送出去。之前的序列化定义只是对key和value的定义而已,最终底层的序列化,会包装一些元数据。
这里kafka对消息格式其实做过优化和改进,有兴趣的同学可以去查阅下资料了解下。它为什么这么设计呢?解决了哪些问题,其实都是值得思考的地方。
这里剧透下,通过这样的消息格式其实可以解决粘包拆包的问题,你看出来了么?
小结
好了,今天就到这里了。我们主要分析了tryAppend逻辑:
1)是如何将消息最终放入到内存的队列中的。
2)并且知道了batch打包消息的机制
3)最终序列化消息的自定义二进制协议
这当中其实有很多值得思考的亮点,Kafka这块的源码逻辑还是很值得大家多研究几遍。
之后的我们要分析的逻辑其实就是如何内存队列中将打包好的消息发送给Broker的。我们下一节再见!
-
安卓NDK 是什么?-icode9专业技术文章分享12-25
-
caddy 可以定义日志到 文件吗?-icode9专业技术文章分享12-25
-
wordfence如何设置密码规则?-icode9专业技术文章分享12-25
-
有哪些方法可以实现 DLL 文件路径的管理?-icode9专业技术文章分享12-25
-
错误信息 "At least one element in the source array could not be cast down to the destination array-icode9专业技术文章分享12-25
-
'flutter' 不是内部或外部命令,也不是可运行的程序 或批处理文件。错误信息提示什么意思?-icode9专业技术文章分享12-25
-
flutter项目 as提示Cannot resolve symbol 'embedding'提示什么意思?-icode9专业技术文章分享12-25
-
怎么切换 Git 项目的远程仓库地址?-icode9专业技术文章分享12-24
-
怎么更改 Git 远程仓库的名称?-icode9专业技术文章分享12-24
-
更改 Git 本地分支关联的远程分支是什么命令?-icode9专业技术文章分享12-24
-
uniapp 连接之后会被立马断开是什么原因?-icode9专业技术文章分享12-24
-
cdn 路径可以指定规则映射吗?-icode9专业技术文章分享12-24
-
CAP:Serverless?+AI?让应用开发更简单12-24
-
新能源车企如何通过CRM工具优化客户关系管理,增强客户忠诚度与品牌影响力12-23
-
原创tauri2.1+vite6.0+rust+arco客户端os平台系统|tauri2+rust桌面os管理12-23


