C/C++教程
基于 TiDB 资源管控 + TiCDC 实现多业务融合容灾测试

导读
随着金融行业的不断发展,多个业务系统的整合成为了趋势,分布式数据库的应用也愈发广泛。为了应对多业务融合带来的复杂性,金融机构需要在保障各业务系统高效运行的同时,确保 IT 系统的高可用性和稳定性。本文将介绍 TiDB 如何通过多租户资源管控与容灾技术,助力金融机构在分布式环境中实现高效的业务整合与容灾能力,并探讨 TiCDC 工具在跨区域数据同步中的应用。
背景
金融机构越来越多的选择将多套业务系统融合到一套分布式数据库集群来支撑,一方面可以节约硬件成本,另一方面可以简化运维复杂性。多租户能力及资源管控技术是数据库中实现多业务融合的最常用及有效手段。
容灾是金融机构 IT 系统满足高可用性必需的一个能力,金融机构的容灾能力根据高可用程度划分为多个等级,较常用的一种容灾部署方式是采用主备库的方案,在分布式数据库中也称为主备集群方案。
金融机构每年都有容灾切换演练的场景,根据系统重要等级不同,切换演练的频次也有所不同。对于 A 类业务系统,一般是每年覆盖一次;对于 B 类或 C 类系统,则可能是 2 年或更长时间循环覆盖一次。
在多业务融合的场景中,为了缩小切换演练的范围,避免切换演练对所有业务产生影响,金融企业期望底层数据库产品能支持单个租户 (应用) 的容灾切换能力。
TiDB 资源管控及 TiCDC 概要
- 资源管控
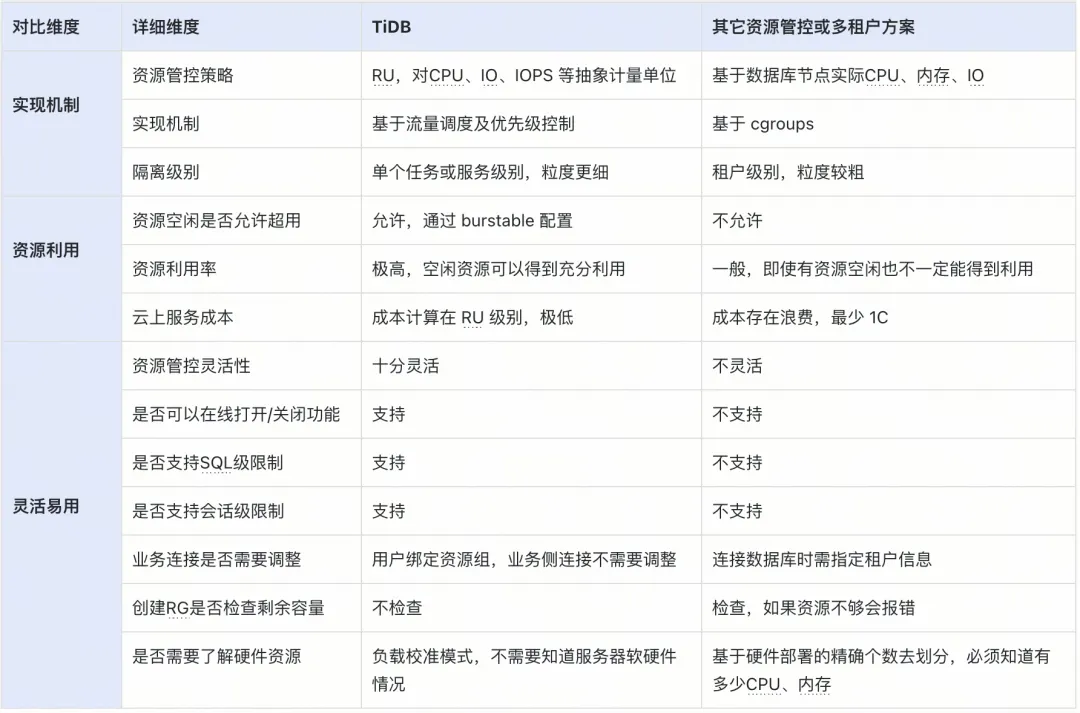
TiDB 资源管控提供了两层资源管理能力,包括在 TiDB 层的流控能力和 TiKV 层的优先级调度的能力。通过流控和调度这两层控制,可以实现应用的资源隔离,满足服务质量 (QoS) 要求。当把数据库当成一个资源池来使用时,数据库通常会被划分为 N 个资源单元。TiDB 中的资源单元 Request Unit (RU) 是对 CPU、IO 等系统资源的统一抽象的计量单位,用于表示对数据库的单个请求消耗的资源量。以下表格为 TiDB 资源管控对比其它资源管控或多租户方案:
- TiCDC
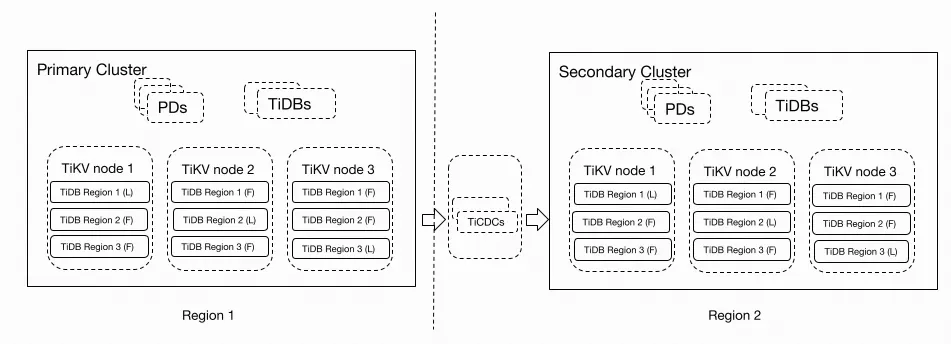
TiCDC 是一款 TiDB 增量数据同步工具,通过拉取上游 TiKV 的数据变更日志,TiCDC 可以将数据解析为有序的行级变更数据输出到下游。通过 TiCDC 可以实现多 TiDB 集群跨区域数据高可用和容灾方案,保证在灾难发生时保证主备集群数据的最终一致性。
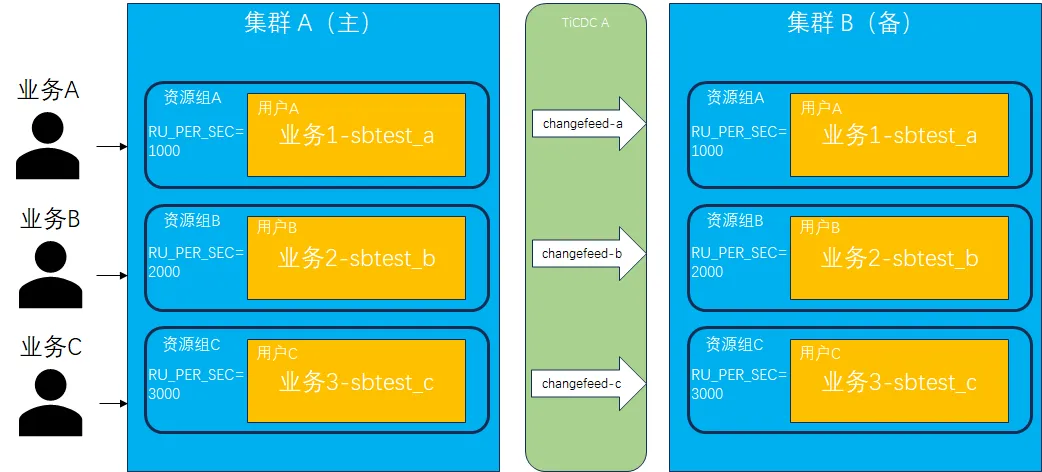
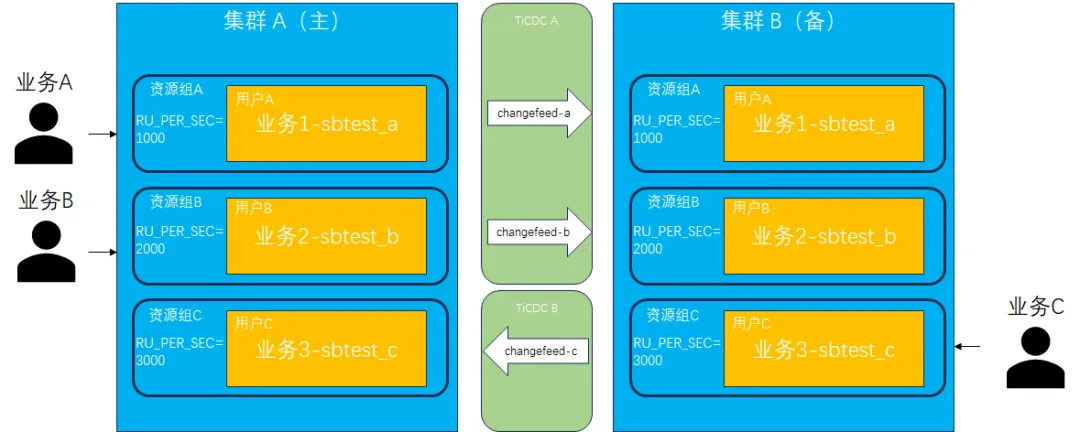
构建基于资源管控 + TiCDC 的多业务融合容灾测试
TiDB 支持基于 RU (Request Unit,资源单元) 的资源管控能力,方便解决多业务融合共享集群资源的场景。TiDB 也支持基于 TiCDC 的实时同步,可以实现 TiDB 集群间的容灾方案。基于 TiDB 的资源管控及 TiCDC 实时同步工具,理论上可以实现一套多业务融合的容灾方案,满足单个租户 (应用) 容灾切换而不影响其他租户的要求。以下通过实际测试步骤来验证方案的可行性。
1. 准备集群环境。
搭建 2 套相同节点数的 TiDB 测试环境,命名为 tidb-A 和 tidb-B,并分别安装部署 TiCDC 组件。
[tidb@host-xx-xx-x-151 packages]$ tiup cluster display tidb-A
tiup is checking updates for component cluster …
Starting component cluster: /home/tidb/.tiup/components/cluster/v1.14.1/tiup-cluster display tidb-A
Cluster type: tidb
Cluster name: tidb-A
Cluster version: v7.5.1
Deploy user: tidb
SSH type: builtin
Dashboard URL: http://xx.xx.x.152:2379/dashboard
Grafana URL: http://xx.xx.x.151:3000
ID Role Host Ports OS/Arch Status Data Dir Deploy Dir
xx.xx.x.151:9093 alertmanager xx.xx.x.151 9093/9094 linux/aarch64 Up /data1/tidb-data/alertmanager-9093 /data1/tidb-deploy/alertmanager-9093
xx.xx.x.151:8300 cdc xx.xx.x.151 8300 linux/aarch64 Up /data1/cdc-free /data1/tidb-deploy/cdc-8300
xx.xx.x.152:8300 cdc xx.xx.x.152 8300 linux/aarch64 Up /data1/cdc-free /data1/tidb-deploy/cdc-8300
xx.xx.x.151:3000 grafana xx.xx.x.151 3000 linux/aarch64 Up - /data1/tidb-deploy/grafana-3000
xx.xx.x.151:2379 pd xx.xx.x.151 2379/2380 linux/aarch64 Up /data1/tidb-data/pd-2379 /data1/tidb-deploy/pd-2379
xx.xx.x.152:2379 pd xx.xx.x.152 2379/2380 linux/aarch64 Up|UI /data1/tidb-data/pd-2379 /data1/tidb-deploy/pd-2379
xx.xx.x.153:2379 pd xx.xx.x.153 2379/2380 linux/aarch64 Up|L /data1/tidb-data/pd-2379 /data1/tidb-deploy/pd-2379
xx.xx.x.151:9095 prometheus xx.xx.x.151 9095/12020 linux/aarch64 Up /data1/tidb-data/prometheus-9095 /data1/tidb-deploy/prometheus-9095
xx.xx.x.151:4000 tidb xx.xx.x.151 4000/10080 linux/aarch64 Up - /data1/tidb-deploy/tidb-4000
xx.xx.x.152:4000 tidb xx.xx.x.152 4000/10080 linux/aarch64 Up - /data1/tidb-deploy/tidb-4000
xx.xx.x.153:4000 tidb xx.xx.x.153 4000/10080 linux/aarch64 Up - /data1/tidb-deploy/tidb-4000
xx.xx.x.151:20160 tikv xx.xx.x.151 20160/20180 linux/aarch64 Up /data1/tidb-data/tikv-20160 /data1/tidb-deploy/tikv-20160
xx.xx.x.152:20160 tikv xx.xx.x.152 20160/20180 linux/aarch64 Up /data1/tidb-data/tikv-20160 /data1/tidb-deploy/tikv-20160
xx.xx.x.153:20160 tikv xx.xx.x.153 20160/20180 linux/aarch64 Up /data1/tidb-data/tikv-20160 /data1/tidb-deploy/tikv-20160
Total nodes: 14
[tidb@host-xx-xx-x-151 packages]$ tiup cluster display tidb-B
tiup is checking updates for component cluster …
Starting component cluster: /home/tidb/.tiup/components/cluster/v1.14.1/tiup-cluster display tidb-B
Cluster type: tidb
Cluster name: tidb-B
Cluster version: v7.5.1
Deploy user: tidb
SSH type: builtin
Dashboard URL: http://xx.xx.x.151:12399/dashboard
Grafana URL: http://xx.xx.x.151:13009
ID Role Host Ports OS/Arch Status Data Dir Deploy Dir
xx.xx.x.151:19089 alertmanager xx.xx.x.151 19089/19084 linux/aarch64 Up /data1/tidb-re-data/alertmanager-19089 /data1/tidb-re-deploy/alertmanager-19089
xx.xx.x.151:8400 cdc xx.xx.x.151 8400 linux/aarch64 Up /data1/cdc-recover /data1/tidb-re-deploy/cdc-8400
xx.xx.x.152:8400 cdc xx.xx.x.152 8400 linux/aarch64 Up /data1/cdc-recover /data1/tidb-re-deploy/cdc-8400
xx.xx.x.151:13009 grafana xx.xx.x.151 13009 linux/aarch64 Up - /data1/tidb-re-deploy/grafana-13009
xx.xx.x.151:12399 pd xx.xx.x.151 12399/12390 linux/aarch64 Up|UI /data1/tidb-re-data/pd-12399 /data1/tidb-re-deploy/pd-12399
xx.xx.x.152:12399 pd xx.xx.x.152 12399/12390 linux/aarch64 Up|L /data1/tidb-re-data/pd-12399 /data1/tidb-re-deploy/pd-12399
xx.xx.x.153:12399 pd xx.xx.x.153 12399/12390 linux/aarch64 Up /data1/tidb-re-data/pd-12399 /data1/tidb-re-deploy/pd-12399
xx.xx.x.151:19099 prometheus xx.xx.x.151 19099/22029 linux/aarch64 Up /data1/tidb-re-data/prometheus-19099 /data1/tidb-re-deploy/prometheus-19099
xx.xx.x.151:24000 tidb xx.xx.x.151 24000/20090 linux/aarch64 Up - /data1/tidb-re-deploy/tidb-24000
xx.xx.x.152:24000 tidb xx.xx.x.152 24000/20090 linux/aarch64 Up - /data1/tidb-re-deploy/tidb-24000
xx.xx.x.153:24000 tidb xx.xx.x.153 24000/20090 linux/aarch64 Up - /data1/tidb-re-deploy/tidb-24000
xx.xx.x.151:30169 tikv xx.xx.x.151 30169/30190 linux/aarch64 Up /data1/tidb-re-data/tikv-30169 /data1/tidb-re-deploy/tikv-30169
xx.xx.x.152:30169 tikv xx.xx.x.152 30169/30190 linux/aarch64 Up /data1/tidb-re-data/tikv-30169 /data1/tidb-re-deploy/tikv-30169
xx.xx.x.153:30169 tikv xx.xx.x.153 30169/30190 linux/aarch64 Up /data1/tidb-re-data/tikv-30169 /data1/tidb-re-deploy/tikv-30169
Total nodes: 14
2. 创建用户并绑定资源组。
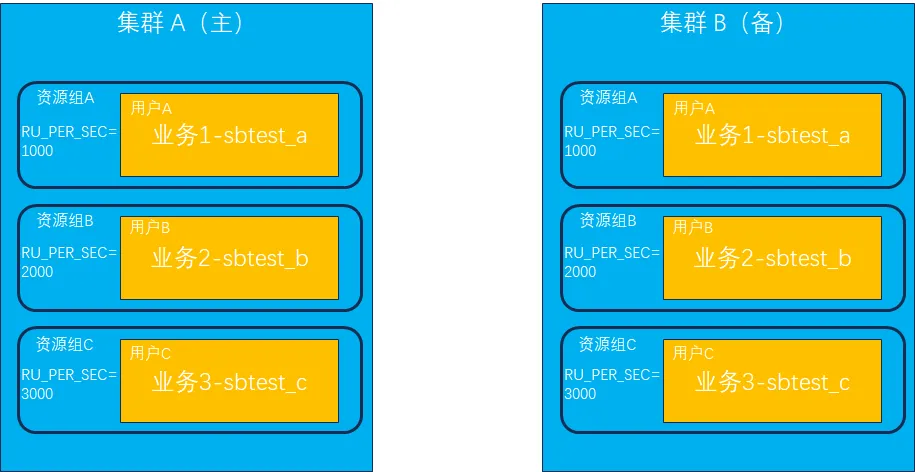
分别在两套集群中创建 3 个用户 (userA、userB、userC) 及 3 个资源组 (rgA 1000RU、rgB 2000RU、rgC 3000RU),用户和资源组一一绑定。分别使用不同用户在数据库中创建各自的 database(sbtest_a、sbtest_b、sbtest_c),它们代表不同业务系统的后台数据库。
mysql> create user userA;
Query OK, 0 rows affected (0.06 sec)
mysql> create user userB;
Query OK, 0 rows affected (0.05 sec)
mysql> create user userC;
Query OK, 0 rows affected (0.03 sec)
mysql> create resource group rgA RU_PER_SEC=1000;
Query OK, 0 rows affected (0.54 sec)
mysql> create resource group rgB RU_PER_SEC=2000;
Query OK, 0 rows affected (0.55 sec)
mysql> create resource group rgC RU_PER_SEC=3000;
Query OK, 0 rows affected (0.54 sec)
mysql> alter user userA resource group rgA;
Query OK, 0 rows affected (0.04 sec)
mysql> alter user userB resource group rgB;
Query OK, 0 rows affected (0.04 sec)
mysql> alter user userC resource group rgC;
Query OK, 0 rows affected (0.04 sec)
mysql> select user, user_attributes from mysql.user;
±------±--------------------------+
| user | user_attributes |
±------±--------------------------+
| root | NULL |
| userA | {“resource_group”: “rga”} |
| userB | {“resource_group”: “rgb”} |
| userC | {“resource_group”: “rgc”} |
±------±--------------------------+
4 rows in set (0.01 sec)
mysql> alter user userA identified by ‘userA123’;
Query OK, 0 rows affected (0.05 sec)
mysql> alter user userB identified by ‘userB123’;
Query OK, 0 rows affected (0.04 sec)
mysql> alter user userC identified by ‘userC123’;
Query OK, 0 rows affected (0.04 sec)
mysql> create database sbtest_a;
Query OK, 0 rows affected (0.54 sec)
mysql> grant all on sbtest_a.* to userA;
Query OK, 0 rows affected (0.06 sec)
mysql> create database sbtest_b;
Query OK, 0 rows affected (0.54 sec)
mysql> grant all on sbtest_b.* to userB;
Query OK, 0 rows affected (0.03 sec)
mysql> create database sbtest_c;
Query OK, 0 rows affected (0.54 sec)
mysql> grant all on sbtest_c.* to userC;
Query OK, 0 rows affected (0.04 sec)
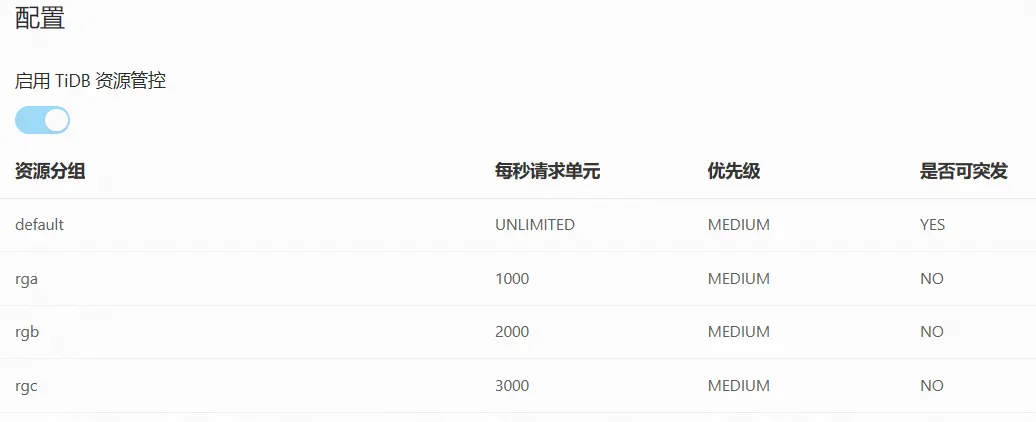
从 Dashboard->资源管控页面中,可以看到刚刚创建的资源分组及对应的 RU 设置。
3. 创建同步链路。
创建 3 条 TiCDC 同步链路 (changefeed),分别为 sbtest_a (集群 A) -> sbtest_a (集群 B) 、sbtest_b (集群 A) -> sbtest_b (集群 B) 、sbtest_c (集群 A) -> sbtest_c (集群 B) 。
– changefeed 配置文件
[tidb@host-xx-xx-x-151 packages]$ cat changfeed_sbtest_a.toml
[filter]
rules = [‘sbtest_a.’]
[tidb@host-xx-xx-x-151 packages]$ cat changfeed_sbtest_b.toml
[filter]
rules = ['sbtest_b.’]
[tidb@host-xx-xx-x-151 packages]$ cat changfeed_sbtest_c.toml
[filter]
rules = [‘sbtest_c.*’]
– 创建 changefeed 同步链路
tiup cdc cli changefeed create --server=http://xx.xx.x.151:8300 --sink-uri=“mysql://userA:userA123@xx.xx.x.151:24000/” --changefeed-id=“sbtest-a-atob” --config=changfeed_sbtest_a.toml
tiup cdc cli changefeed create --server=http://xx.xx.x.151:8300 --sink-uri=“mysql://userB:userB123@xx.xx.x.151:24000/” --changefeed-id=“sbtest-b-atob” --config=changfeed_sbtest_b.toml
tiup cdc cli changefeed create --server=http://xx.xx.x.151:8300 --sink-uri=“mysql://userC:userC123@xx.xx.x.151:24000/” --changefeed-id=“sbtest-c-atob” --config=changfeed_sbtest_c.toml
– 查看创建的 changefeed 同步链路
[tidb@host-xx-xx-x-151 packages]$ tiup cdc cli changefeed list --server=http://xx.xx.x.151:8300
tiup is checking updates for component cdc …
Starting component cdc: /home/tidb/.tiup/components/cdc/v7.5.1/cdc cli changefeed list --server=http://xx.xx.x.151:8300
[
{
“id”: “sbtest-a-atob”,
“namespace”: “default”,
“summary”: {
“state”: “normal”,
“tso”: 451948847132835850,
“checkpoint”: “2024-08-19 14:13:51.360”,
“error”: null
}
},
{
“id”: “sbtest-b-atob”,
“namespace”: “default”,
“summary”: {
“state”: “normal”,
“tso”: 451948847132835850,
“checkpoint”: “2024-08-19 14:13:51.360”,
“error”: null
}
},
{
“id”: “sbtest-c-atob”,
“namespace”: “default”,
“summary”: {
“state”: “normal”,
“tso”: 451948847132835850,
“checkpoint”: “2024-08-19 14:13:51.360”,
“error”: null
}
}
]
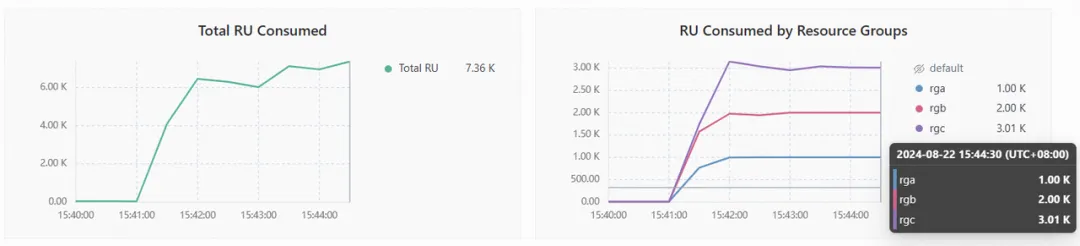
4. 模拟业务运行。
运行 3 套 sysbench 测试(oltp_read_write),用于模拟不同的业务场景。第 1 套 sysbench 测试使用 userA 用户连接到集群 A 的 sbtest_a,第 2 套 sysbench 测试使用 userB 用户连接到集群 A 的 sbtest_b,第 3 套 sysbench 测试使用 userC 用户连接到集群 A 的 sbtest_c。
sh run_sysbench_a.sh auto
sh run_sysbench_b.sh auto
sh run_sysbench_c.sh auto
查看各资源组 RU 使用情况,可以看到都按照之前设置的 1000 RU、2000 RU、3000 RU 使用到最大上限,且未出现超用的情况。
5. 验证数据一致性。
停止 sysbench 模拟测试,使用 sync-diff-inspector 检验两边集群数据是否一致。注意,针对 TiDB 主备集群对比,sync-diff-inspector 支持在不停止同步的情况下对上下游进行一致性验证,具体可参考官网文档 主从集群一致性读和数据校验(https://docs.pingcap.com/zh/tidb/stable/ticdc-upstream-downstream-check)。
数据对比配置:
[tidb@host-xx-xx-x-151 packages]$ cat sync-diff.toml
Diff Configuration.
######################### Global config #########################
检查数据的线程数量,上下游数据库的连接数会略大于该值
check-thread-count = 4
如果开启,若表存在不一致,则输出用于修复的 SQL 语句。
export-fix-sql = true
只对比表结构而不对比数据
check-struct-only = false
如果开启,会跳过校验上游或下游不存在的表。
skip-non-existing-table = false
######################### Datasource config #########################
[data-sources]
[data-sources.tidba] # mysql1 是该数据库实例唯一标识的自定义 id,用于下面 task.source-instances/task.target-instance 中
host = "xx.xx.x.151"
port = 4000
user = "userA"
password = “userA123” # 设置连接上游数据库的密码,可为明文或 Base64 编码。
#(可选)使用映射规则来匹配上游多个分表,其中 rule1 和 rule2 在下面 Routes 配置栏中定义
route-rules = [“rule1”]
[data-sources.tidbb]
host = "xx.xx.x.151"
port = 24000
user = "userA"
password = “userA123” # 设置连接下游数据库的密码,可为明文或 Base64 编码。
#(可选)使用 TLS 连接 TiDB
security.ca-path = “…/ca.crt”
security.cert-path = “…/cert.crt”
security.key-path = “…/key.crt”
#(可选)使用 TiDB 的 snapshot 功能,如果开启的话会使用历史数据进行对比
snapshot = “386902609362944000”
当 snapshot 设置为 “auto” 时,使用 TiCDC 在上下游的同步时间点,具体参考 https://github.com/pingcap/tidb-tools/issues/663
snapshot = “auto”
########################### Routes ###########################
如果需要对比大量的不同库名或者表名的表的数据,或者用于校验上游多个分表与下游总表的数据,可以通过 table-rule 来设置映射关系
可以只配置 schema 或者 table 的映射关系,也可以都配置
[routes]
[routes.rule1] # rule1 是该配置的唯一标识的自定义 id,用于上面 data-sources.route-rules 中
schema-pattern = “sbtest_a” # 匹配数据源的库名,支持通配符 “*” 和 "?"
target-schema = “sbtest_a” # 目标库名
######################### Task config #########################
配置需要对比的目标数据库中的表
[task]
output-dir 会保存如下信息
1 sql:检查出错误后生成的修复 SQL 文件,并且一个 chunk 对应一个文件
2 log:sync-diff.log 保存日志信息
3 summary:summary.txt 保存总结
4 checkpoint:a dir 保存断点续传信息
output-dir = "./output2"
上游数据库,内容是 data-sources 声明的唯一标识 id
source-instances = [“tidba”]
下游数据库,内容是 data-sources 声明的唯一标识 id
target-instance = "tidbb"
需要比对的下游数据库的表,每个表需要包含数据库名和表名,两者由 . 隔开
使用 ? 来匹配任意一个字符;使用 * 来匹配任意;详细匹配规则参考 golang regexp pkg: https://github.com/google/re2/wiki/Syntax
target-check-tables = [“sbtest_a.*”]
对比结果显示,3 个 schema 的主从集群结果完全一致:
[tidb@host-xx-xx-x-151 packages]$ ./tidb-community-toolkit-v7.5.1-linux-arm64/sync_diff_inspector --config=sync-diff-a.toml
A total of 5 tables need to be compared
Comparing the table structure of sbtest_a`.`sbtest1 … equivalent
Comparing the table structure of sbtest_a`.`sbtest2 … equivalent
Comparing the table structure of sbtest_a`.`sbtest4 … equivalent
Comparing the table structure of sbtest_a`.`sbtest3 … equivalent
Comparing the table structure of sbtest_a`.`sbtest5 … equivalent
Comparing the table data of sbtest_a`.`sbtest1 … equivalent
Comparing the table data of sbtest_a`.`sbtest3 … equivalent
Comparing the table data of sbtest_a`.`sbtest2 … equivalent
Comparing the table data of sbtest_a`.`sbtest4 … equivalent
Comparing the table data of sbtest_a`.`sbtest5 … equivalent
Progress [============================================================>] 100% 0/0
A total of 5 table have been compared and all are equal.
You can view the comparision details through './output3/sync_diff.log’
[tidb@host-xx-xx-x-151 packages]$ ./tidb-community-toolkit-v7.5.1-linux-arm64/sync_diff_inspector --config=sync-diff-b.toml
A total of 5 tables need to be compared
Comparing the table structure of sbtest_b`.`sbtest3 … equivalent
Comparing the table structure of sbtest_b`.`sbtest5 … equivalent
Comparing the table structure of sbtest_b`.`sbtest2 … equivalent
Comparing the table structure of sbtest_b`.`sbtest4 … equivalent
Comparing the table structure of sbtest_b`.`sbtest1 … equivalent
Comparing the table data of sbtest_b`.`sbtest3 … equivalent
Comparing the table data of sbtest_b`.`sbtest4 … equivalent
Comparing the table data of sbtest_b`.`sbtest5 … equivalent
Comparing the table data of sbtest_b`.`sbtest2 … equivalent
Comparing the table data of sbtest_b`.`sbtest1 … equivalent
Progress [============================================================>] 100% 0/0
A total of 5 table have been compared and all are equal.
You can view the comparision details through './output4/sync_diff.log’
[tidb@host-xx-xx-x-151 packages]$ ./tidb-community-toolkit-v7.5.1-linux-arm64/sync_diff_inspector --config=sync-diff-c.toml
A total of 5 tables need to be compared
Comparing the table structure of sbtest_c`.`sbtest1 … equivalent
Comparing the table structure of sbtest_c`.`sbtest4 … equivalent
Comparing the table structure of sbtest_c`.`sbtest5 … equivalent
Comparing the table structure of sbtest_c`.`sbtest3 … equivalent
Comparing the table structure of sbtest_c`.`sbtest2 … equivalent
Comparing the table data of sbtest_c`.`sbtest4 … equivalent
Comparing the table data of sbtest_c`.`sbtest1 … equivalent
Comparing the table data of sbtest_c`.`sbtest5 … equivalent
Comparing the table data of sbtest_c`.`sbtest3 … equivalent
Comparing the table data of sbtest_c`.`sbtest2 … equivalent
Progress [============================================================>] 100% 0/0
A total of 5 table have been compared and all are equal.
You can view the comparision details through ‘./output5/sync_diff.log’
6. 切换单个同步链路。
模拟切换单个同步链路,选择 sbtest_c (集群 A) -> sbtest_c (集群 B)。首先需要停止 sbtest_c 上的业务并移除(或暂停)当前同步链路,其次重新构建反向同步链路 sbtest_c (集群 B) -> sbtest_c (集群 A),最后将模拟业务连接切换到集群 B 上。
删除正向同步链路:
tiup cdc cli changefeed remove --server=http://xx.xx.x.151:8300 --changefeed-id="sbtest-c-atob"
tiup cdc cli changefeed list --server=http://xx.xx.x.151:8300
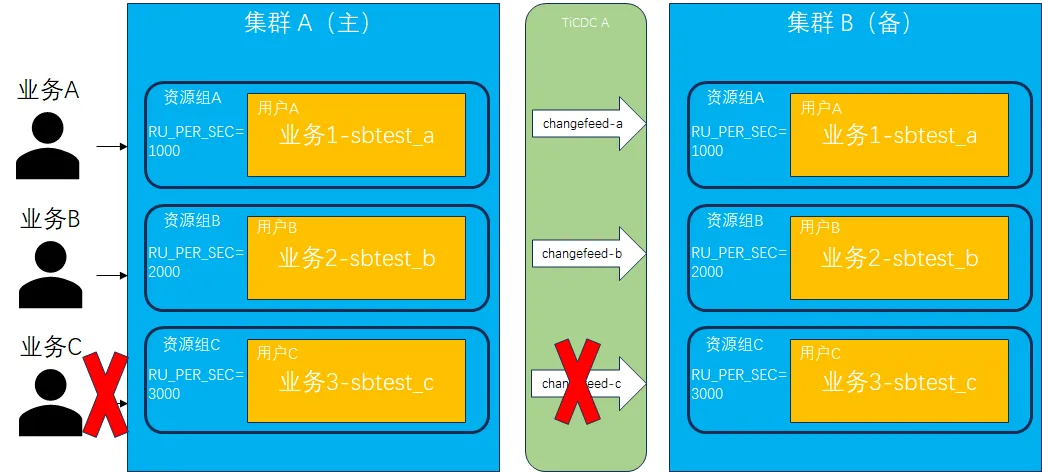
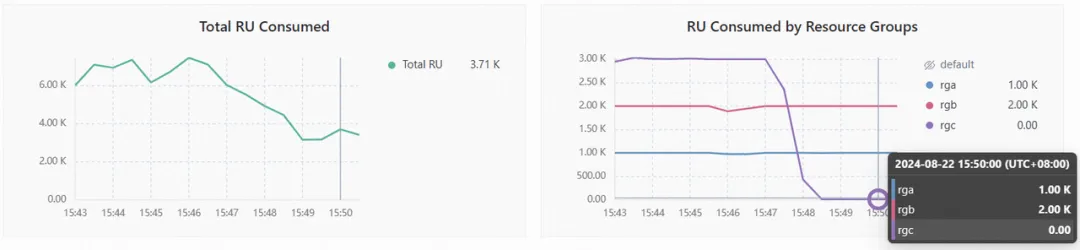
此时观察到业务 C 对应的资源组的 RU 消耗为 0,而另外两个资源组仍然在稳定运行当中。
搭建反向同步链路:
tiup cdc cli changefeed create --server=http://xx.xx.x.151:8400 --sink-uri=“mysql://userC:userC123@xx.xx.x.151:4000/” --changefeed-id=“sbtest-c-atob” --config=changfeed_sbtest_c.toml
tiup cdc cli changefeed list --server=http://xx.xx.x.151:8400
此时再查看各资源组 RU 使用情况,此时业务 C 的主要压力来自于 TiCDC 同步过来的压力。由于 TiCDC 只同步写操作,因此 RU 消耗数量比上游实际负载要低,从图中显示平均使用 RU 数约为 500。

7. 验证数据一致性。
重新启动 sbtest_c 上的业务并写入集群 B,运行一段时间后停止并验证切换后的 sbtest_c 两边数据是否一致,同时也验证原来的同步链路 sbtest_a 和 sbtest_b 数据是否仍然保持一致性同步。经验证后,数据完全一致,证明此方案实施可行。
//运行模拟业务c,并写入集群 B
sh run_sysbench_c_revers.sh auto
[tidb@host-xx-xx-x-151 packages]$ ./tidb-community-toolkit-v7.5.1-linux-arm64/sync_diff_inspector --config=sync-diff-c.toml
A total of 5 tables need to be compared
Comparing the table structure of sbtest_c`.`sbtest3 … equivalent
Comparing the table structure of sbtest_c`.`sbtest1 … equivalent
Comparing the table structure of sbtest_c`.`sbtest5 … equivalent
Comparing the table structure of sbtest_c`.`sbtest4 … equivalent
Comparing the table structure of sbtest_c`.`sbtest2 … equivalent
Comparing the table data of sbtest_c`.`sbtest5 … equivalent
Comparing the table data of sbtest_c`.`sbtest4 … equivalent
Comparing the table data of sbtest_c`.`sbtest1 … equivalent
Comparing the table data of sbtest_c`.`sbtest3 … equivalent
Comparing the table data of sbtest_c`.`sbtest2 … equivalent
Progress [============================================================>] 100% 0/0
A total of 5 table have been compared and all are equal.
You can view the comparision details through ‘./output5/sync_diff.log’
总结
本文通过模拟环境测试验证,基于 TiDB 的资源管控能力可以实现多业务融合方案,通过给不同的业务系统分配不同的资源组,实现多套业务共享一套集群资源并且相互之间资源隔离的效果。基于 TiCDC 同步工具可以实现 TiDB 主备集群容灾,通过给不同的业务创建不同的同步链路,多个业务之间的主备同步流程互不干扰。结合资源管控及 TiCDC,我们可以实现一套多业务融合的容灾解决方案,能够满足企业客户尤其是金融机构同时具有多业务融合、容灾能力以及支持单体应用容灾切换演练等方面的需求。
-
Nacos多环境配置学习入门12-27
-
Nacos快速入门学习入门12-27
-
Nacos快速入门学习入门12-27
-
Nacos配置中心学习入门指南12-27
-
Nacos配置中心学习入门12-27
-
Nacos做项目隔离学习入门12-27
-
Nacos做项目隔离学习入门12-27
-
Nacos初识学习入门:轻松掌握服务发现与配置管理12-27
-
Nacos初识学习入门:轻松掌握Nacos基础操作12-27
-
Nacos多环境配置学习入门12-27
-
阿里云ECS学习入门:新手必看教程12-27
-
阿里云ECS新手入门指南:轻松搭建您的第一台云服务器12-27
-
Nacos做项目隔离:简单教程与实践指南12-27
-
阿里云ECS学习:新手入门指南12-27
-
Nacos做项目隔离学习:新手入门教程12-27
