云计算
离线数仓建设之数据导出
为了方便报表应用使用数据需将ADS各项指标统计结果导出到MySQL方便熟悉 SQL 人员使用。
1 MySQL建库建表
1.1 创建数据库
创建car_data_report数据库
CREATE DATABASE IF NOT EXISTS car_data_report
# 字符集
DEFAULT CHARSET utf8mb4
# 排序规则
COLLATE utf8mb4_general_ci;
1.1.2 创建表
① 里程相关统计
创建ads_mileage_stat_last_month表存储里程相关统计数据。
DROP TABLE IF EXISTS ads_mileage_stat_last_month;

CREATE TABLE ads_mileage_stat_last_month (
  vin VARCHAR(20) COMMENT '汽车唯一ID',
  mon VARCHAR(7) COMMENT '统计月份',
  avg_mileage INT COMMENT '日均里程',
  avg_speed DECIMAL(16, 2) COMMENT '平均时速分子',
  danger_count DECIMAL(16, 2) COMMENT '平均百公里急加减速次数'
) COMMENT '里程相关统计';
② 告警相关统计
创建ads_alarm_stat_last_month表存储告警相关的统计数据。
DROP TABLE IF EXISTS ads_alarm_stat_last_month;

CREATE TABLE ads_alarm_stat_last_month (
  vin VARCHAR(20) COMMENT '汽车唯一ID',
  mon VARCHAR(7) COMMENT '统计月份',
  alarm_count INT COMMENT '告警次数',
  l1_alarm_count INT COMMENT '一级告警次数',
  l2_alarm_count INT COMMENT '二级告警次数',
  l3_alarm_count INT COMMENT '三级告警次数'
) COMMENT '告警相关统计';
3温控相关统计
创建ads_temperature_stat_last_month表存储温控相关的统计数据。
DROP TABLE IF EXISTS ads_temperature_stat_last_month;

CREATE TABLE ads_temperature_stat_last_month (
  vin VARCHAR(20) COMMENT '汽车唯一ID',
  mon VARCHAR(7) COMMENT '统计月份',
  max_motor_temperature INT COMMENT '电机最高温度',
  avg_motor_temperature DECIMAL(16, 2) COMMENT '电机平均温度',
  max_motor_controller_temperature INT COMMENT '电机控制器最高温度',
  avg_motor_controller_temperature DECIMAL(16, 2) COMMENT '电机控制器平均温度',
  max_battery_temperature INT COMMENT '最高电池温度',
  battery_temperature_abnormal_count INT COMMENT '电池温度异常值次数'
) COMMENT '温控相关统计';
4能耗相关统计
创建ads_consume_stat_last_month表存储能耗相关的统计数据。
DROP TABLE IF EXISTS ads_consume_stat_last_month;

CREATE TABLE ads_consume_stat_last_month (
  vin VARCHAR(20) COMMENT '汽车唯一ID',
  mon VARCHAR(7) COMMENT '统计月份',
  soc_per_charge DECIMAL(16, 2) COMMENT '次均充电电量',
  duration_per_charge DECIMAL(16, 2) COMMENT '次均充电时长',
  charge_count INT COMMENT '充电次数',
  fast_charge_count INT COMMENT '快充次数',
  slow_charge_count INT COMMENT '慢充次数',
  fully_charge_count INT COMMENT '深度充电次数',
  soc_per_100km DECIMAL(16, 2) COMMENT 'soc百公里平均消耗',
  soc_per_run DECIMAL(16, 2) COMMENT '每次里程soc平均消耗',
  soc_last_100km DECIMAL(16, 2) COMMENT '最近百公里soc消耗'
) COMMENT '能耗主题统计';
2 数据导出
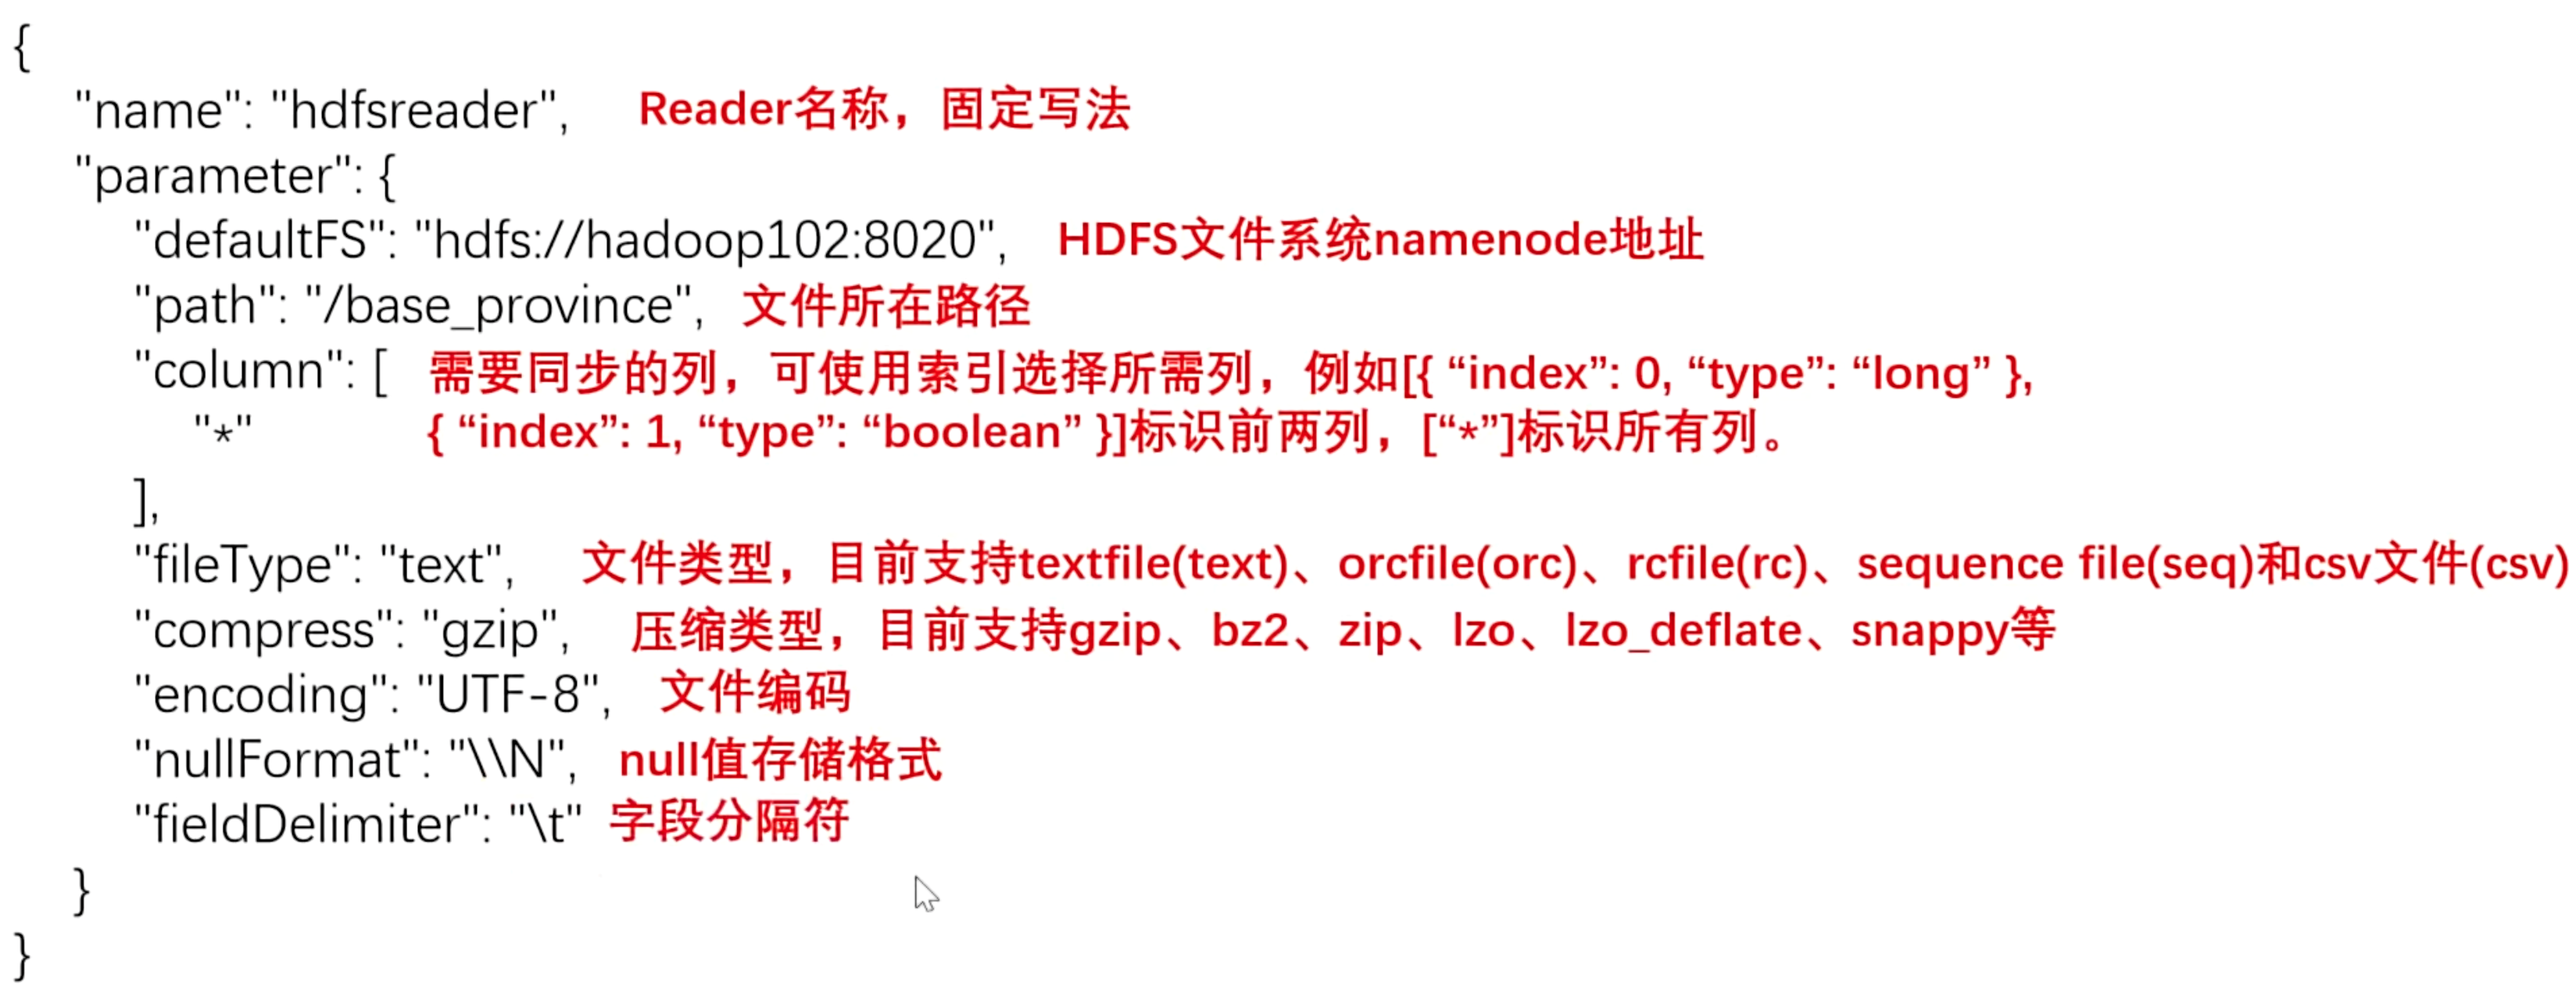
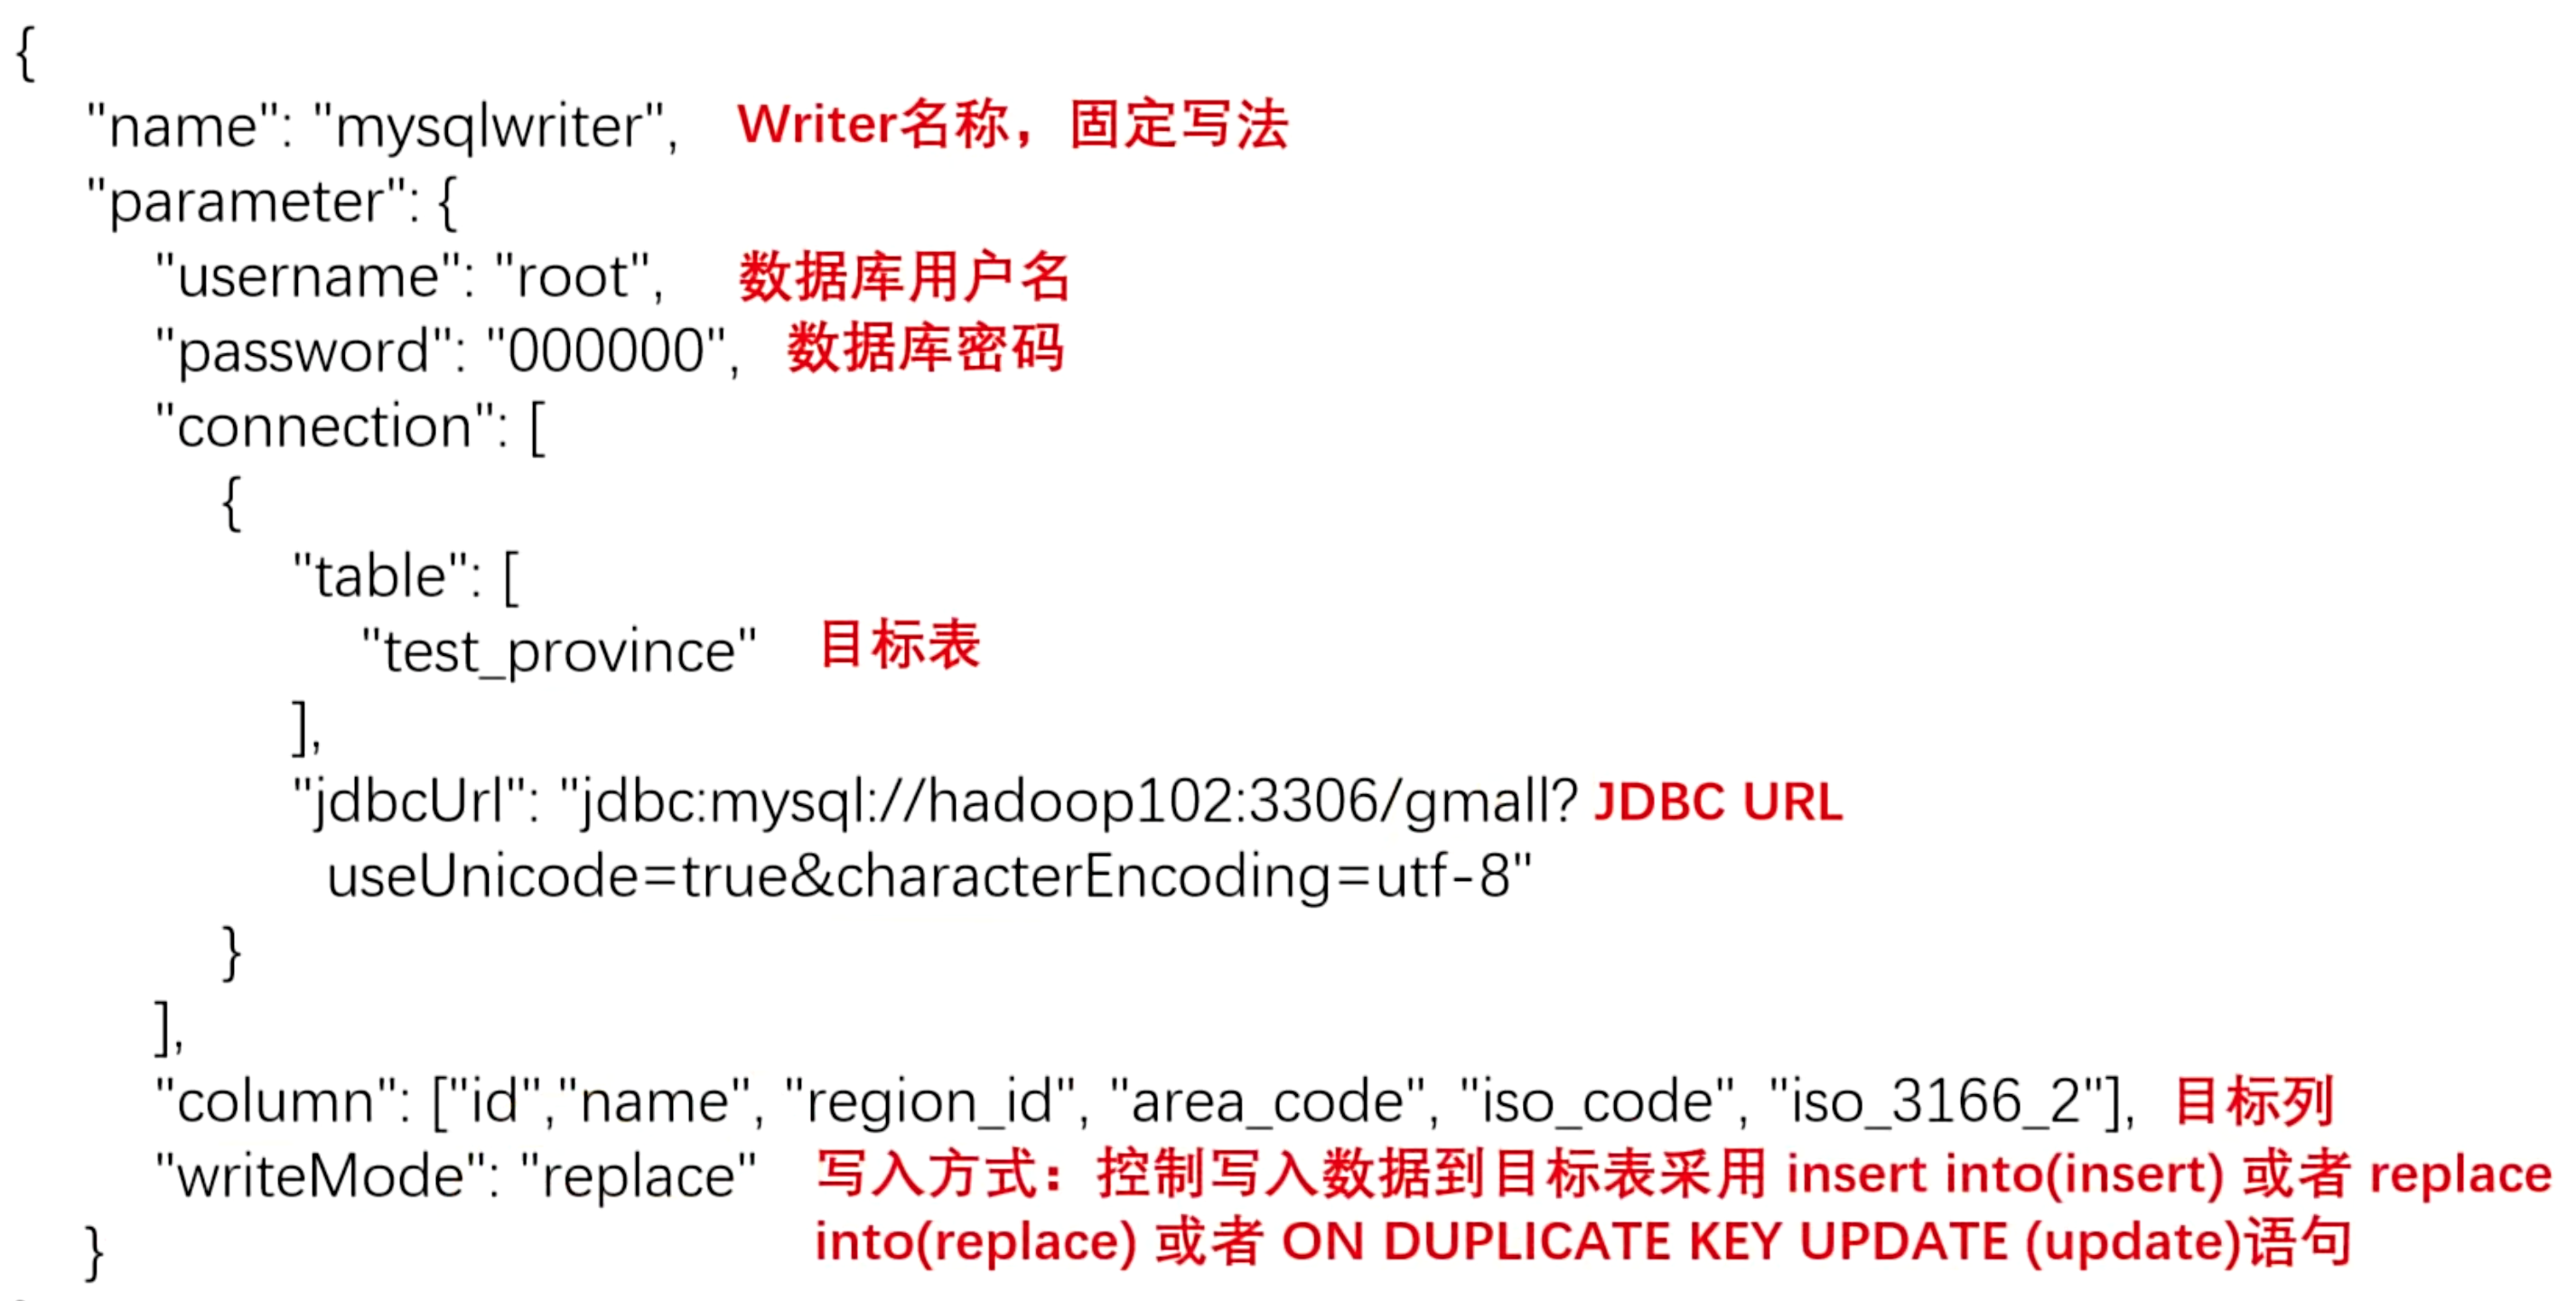
DataX作为数据导出工具并选择HDFSReader和MySQLWriter作为数据源和目标。
2.1 编写DataX配置文件
我们需要为每个表编写一个DataX配置文件。以ads_alarm_stat_last_month为例
{
  "job": {
    "setting": {
      "speed": {
        "channel": 1  // DataX 作业的并发通道数一般根据系统资源进行调整1 表示单通道
      }
    },
    "content": [
      {
        "reader": {
          ...
        },
        "writer": {
          "name": "mysqlwriter",  // 写入数据的插件类型为 MySQL 数据库写入
          "parameter": {
            "writeMode": "replace",  // 写入模式为替换如果表存在则先删除再写入
            "username": "root",  // 数据库用户名
            "password": "000000",  // 数据库密码
            "column": [  // 写入的列信息包括 vin、mon、alarm_count、l1_alarm_count、l2_alarm_count、l3_alarm_count
              "vin",
              "mon",
              "alarm_count",
              "l1_alarm_count",
              "l2_alarm_count",
              "l3_alarm_count"
            ],
            "connection": [  // 数据库连接信息列表支持多个数据库连接
              {
                "jdbcUrl": "jdbc:mysql://hadoop102:3306/car_data_report?useSSL=false&allowPublicKeyRetrieval=true&useUnicode=true&characterEncoding=utf-8",  // MySQL 数据库连接地址设置了 SSL、公钥检索、Unicode 编码等参数
                "table": [  // 写入的数据库表列表这里只写入 ads_alarm_stat_last_month 表
                  "ads_alarm_stat_last_month"
                ]
              }
            ]
          }
        }
      }
    ]
  }
}
导出路径参数path并未写死需在提交任务时通过参数动态传入参数名称为exportdir。
模版配置参数解析
HDFSReader
即
"reader": {
  "name": "hdfsreader",  // 读取数据的插件类型为 HDFS 文件读取
  "parameter": {
    "path": "${exportdir}",  // HDFS 文件路径使用 ${exportdir} 变量表示动态路径
    "defaultFS": "hdfs://hadoop102:8020",  // HDFS 默认文件系统地址
    "column": [  // 需要读取的列信息这里使用通配符 * 表示读取所有列
      "*"
    ],
    "fileType": "text",  // 文件类型为文本文件
    "encoding": "UTF-8",  // 文件编码格式为 UTF-8
    "fieldDelimiter": "\t",  // 字段分隔符为制表符
    "nullFormat": "\\N"  // 空值格式为 \N
  }
},
MySQLWriter
"writer": {
  "name": "mysqlwriter",  // 写入数据的插件类型为 MySQL 数据库写入
  "parameter": {
    "writeMode": "replace",  // 写入模式为替换如果表存在则先删除再写入
    "username": "root",  // 数据库用户名
    "password": "000000",  // 数据库密码
    "column": [  // 写入的列信息包括 vin、mon、alarm_count、l1_alarm_count、l2_alarm_count、l3_alarm_count
      "vin",
      "mon",
      "alarm_count",
      "l1_alarm_count",
      "l2_alarm_count",
      "l3_alarm_count"
    ],
    "connection": [  // 数据库连接信息列表支持多个数据库连接
      {
        "jdbcUrl": "jdbc:mysql://hadoop102:3306/car_data_report?useSSL=false&allowPublicKeyRetrieval=true&useUnicode=true&characterEncoding=utf-8",  // MySQL 数据库连接地址设置了 SSL、公钥检索、Unicode 编码等参数
        "table": [  // 写入的数据库表列表这里只写入 ads_alarm_stat_last_month 表
          "ads_alarm_stat_last_month"
        ]
      }
    ]
  }
}
2.2 DataX配置文件生成脚本
将 **TODO在下载的资料压缩包里**datax_config_generator拷贝到/opt/module。
修改/opt/module/datax_config_generator/configuration.properties
mysql.username=root
mysql.password=000000
mysql.host=hadoop102
mysql.port=3306
mysql.database.import=car_data
mysql.database.export=car_data_report
mysql.tables.import=
mysql.tables.export=
is.seperated.tables=0
hdfs.uri=hdfs://hadoop102:8020
import_out_dir=/opt/module/datax/job/import
export_out_dir=/opt/module/datax/job/export
执行配置文件生成器
java -jar datax-config-generator-1.0.1-jar-with-dependencies.jar
观察生成的配置文件
ll /opt/module/datax/job/export/

总用量 20
-rw-rw-r--. 1 atguigu atguigu  961 4月  26 19:47 car_data_report.ads_alarm_stat_last_month.json
-rw-rw-r--. 1 atguigu atguigu 1095 4月  26 19:47 car_data_report.ads_consume_stat_last_month.json
-rw-rw-r--. 1 atguigu atguigu 1062 4月  26 19:47 car_data_report.ads_electric_stat_last_month.json
-rw-rw-r--. 1 atguigu atguigu  939 4月  26 19:47 car_data_report.ads_mileage_stat_last_month.json
-rw-rw-r--. 1 atguigu atguigu 1083 4月  26 19:47 car_data_report.ads_temperature_stat_last_month.json
2.3 测试生成的DataX配置文件
以ads_trans_order_stats为例测试用脚本生成的配置文件是否可用。
1执行DataX同步命令
python /opt/module/datax/bin/datax.py -p"-Dexportdir=/warehouse/car_data/ads/ads_order_stats" /opt/module/datax/job/export/tms_report.ads_order_stats.json
2观察同步结果
观察MySQL目标表是否出现数据。
2.4 编写导出脚本
创建hdfs_to_mysql.sh
vim hdfs_to_mysql.sh
#!/bin/bash

# 设置 DataX 的安装路径
DATAX_HOME=/opt/module/datax

# 清理指定路径下的空文件
# 参数 $1: 待清理的路径
handle_export_path() {
  for file in $(hadoop fs -ls -R "$1" | awk '{print $8}'); do
    # 检查文件是否为空
    if hadoop fs -test -z "$file"; then
      echo "$file 文件大小为0正在删除..."
      # 删除空文件
      hadoop fs -rm -r -f "$file"
    fi
  done
}

# 导出数据到指定路径
# 参数 $1: DataX 配置文件路径
# 参数 $2: 导出路径
export_data() {
  datax_config="$1"
  export_dir="$2"
  # 调用清理空文件函数
  handle_export_path "$export_dir"
  # 执行 DataX 导出命令
  $DATAX_HOME/bin/datax.py -p"-Dexportdir=$export_dir" "$datax_config"
}

# 主逻辑根据传入的参数执行数据导出操作
case $1 in
  'ads_mileage_stat_last_month' | 'ads_alarm_stat_last_month' | 'ads_temperature_stat_last_month' | 'ads_electric_stat_last_month' | 'ads_consume_stat_last_month')
    # 导出单个表的数据
    export_data "/opt/module/datax/job/export/car_data_report.$1.json" "/warehouse/car_data/ads/$1"
    ;;
  'all')
    # 导出所有表的数据
    for table in 'ads_mileage_stat_last_month' 'ads_alarm_stat_last_month' 'ads_temperature_stat_last_month' 'ads_electric_stat_last_month' 'ads_consume_stat_last_month'; do
      export_data "/opt/module/datax/job/export/car_data_report.$table.json" "/warehouse/car_data/ads/$table"
    done
    ;;
  *)
    # 未知参数打印提示信息
    echo "Usage: $0 {ads_table_name | all}"
    echo "Example: $0 ads_mileage_stat_last_month"
    ;;
esac
chmod +x hdfs_to_mysql.sh

hdfs_to_mysql.sh all
关注我紧跟本系列专栏文章咱们下篇再续
作者简介魔都技术专家兼架构多家大厂后端一线研发经验各大技术社区头部专家博主。具有丰富的引领团队经验深厚业务架构和解决方案的积累。
负责
- 中央/分销预订系统性能优化
- 活动&优惠券等营销中台建设
- 交易平台及数据中台等架构和开发设计
目前主攻降低软件复杂性设计、构建高可用系统方向。
参考
- 编程严选网
-
Fluss 写入数据湖实战12-23
-
揭秘 Fluss:下一代流存储,带你走在实时分析的前沿(一)12-22
-
DevOps与平台工程的区别和联系12-20
-
从信息孤岛到数字孪生:一本面向企业的数字化转型实用指南12-20
-
手把手教你轻松部署网站12-20
-
服务器购买课程:新手入门全攻略12-20
-
动态路由表学习:新手必读指南12-20
-
服务器购买学习:新手指南与实操教程12-20
-
动态路由表教程:新手入门指南12-20
-
服务器购买教程:新手必读指南12-20
-
动态路由表实战入门教程12-20
-
服务器购买实战:新手必读指南12-20
-
新手指南:轻松掌握服务器部署12-20
-
内网穿透入门指南:轻松实现远程访问12-20
-
网站部署入门教程12-20


