Javascript
【备战春招】第2天 React零基础入门到实战,完成企业级项目简书网站开发——React初探篇
课程名称
React零基础入门到实战,完成企业级项目简书网站开发
课程章节
第2章 React初探5 节 | 53分钟
- 2-3 工程目录文件简介
- 2-4 React中的组件
- 2-5 React 中最基础的JSX语法
课程讲师
Dell
课程内容
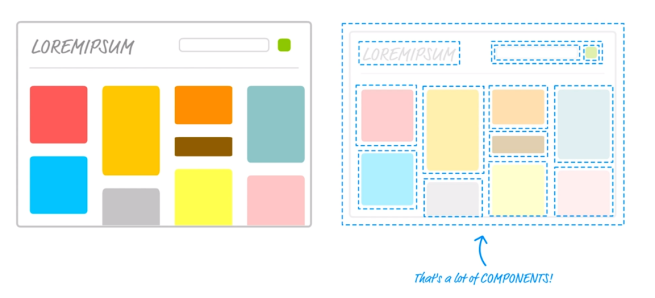
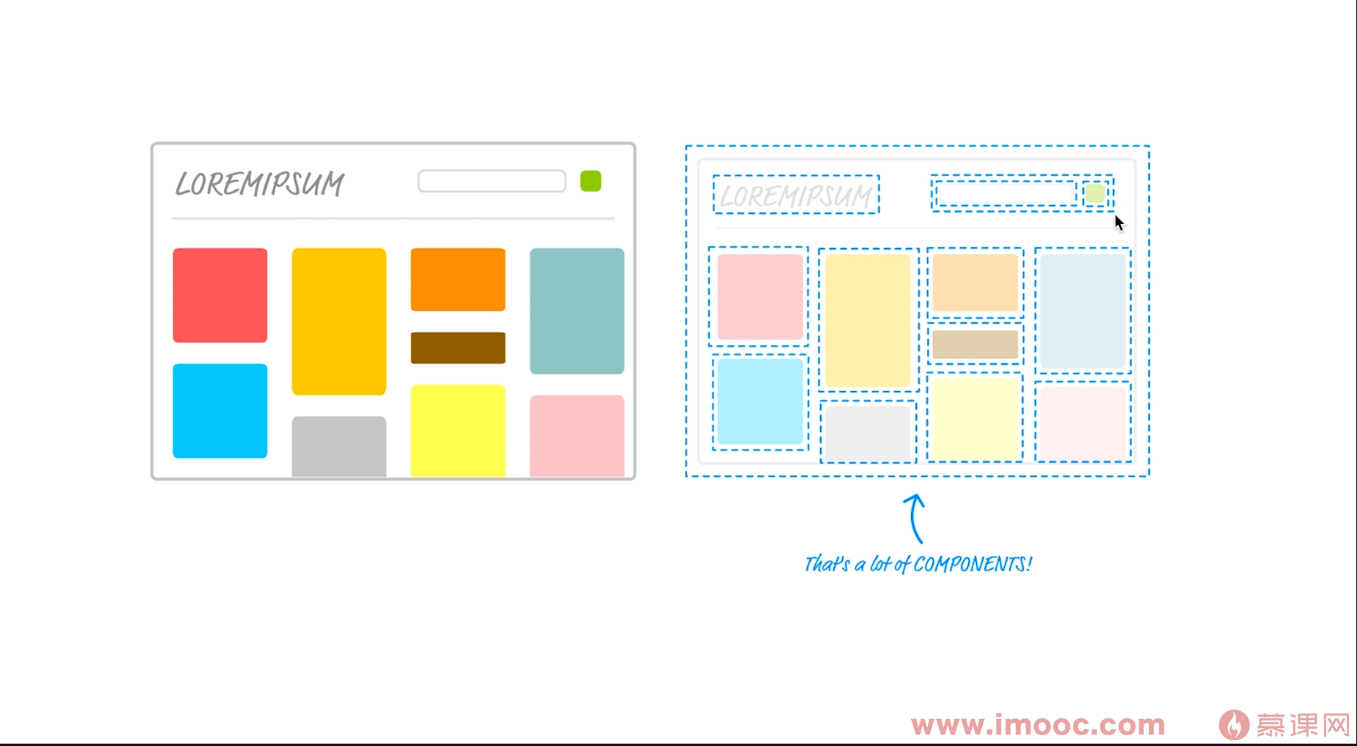
左侧是一个网页,右侧是对应的组件图,可以把一个大的网页拆分成很多小的部分。
如:标题部分,对应标题组件,搜索部分,对应搜索组件、内容区域多个组件等等,搜索组件还可以继续拆分,它是由一个input框和button组成的,即还可以继续往下拆分成两个小组件。
一个页面很复杂,当把它拆分成一个个小组件后,再来维护这些小组件,就比较简单了,这就前端组件化的思想。
index.js 中使用 App组件
App类 继承 React.Component类,只要继承React.Component类,其实它就是一个React组件了,
该类中必须有一个render方法,该方法必须返回一个内容。实际该组件显示的内容,由render函数决定。利用export default导出该组件,在哪里用,直接import,就可以使用该组件了。
哪怕感觉app.js中没有用组件,还引入React,删除编译同样报错。实际在React当中render函数中的标签,包括div,实际也是jsx的语法。
import React,{ Component } from "react";

class App extends Component {
  render() {
    return (
      <div className="App">
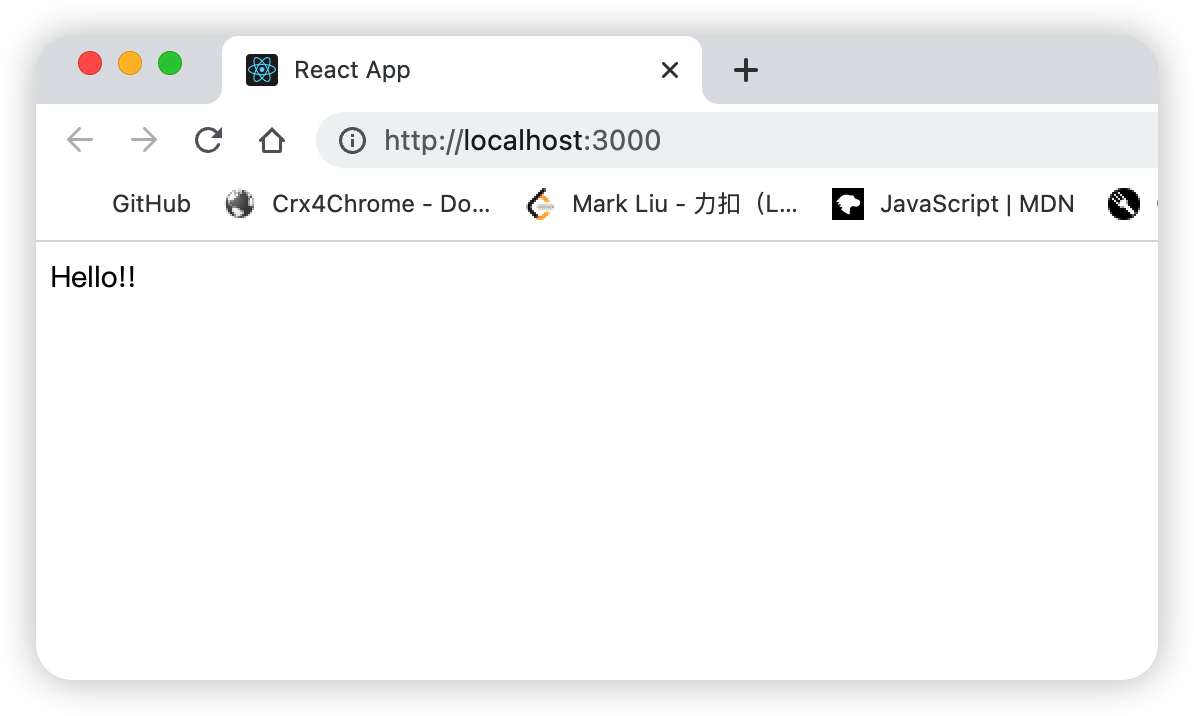
        Hello!!
      </div>
    )
  }
}

export default App;
ReactDOM 是 React的第三方模块,它有一个render方法,可以把一个组件挂载到一个dom节点上面。
(老版本的脚手架写法)
ReactDOM。render(<App />,document.getElementById('root'))
这里没有用到React组件,为啥还要引入,如果删去会报错。使用App组件的时候是使用标签的方式,这种语法实际是jsx语法,只要使用该语法,就必须在该文件内引入React,不引入的话,是无法编译识别jsx语法的。包括div标签,以前html标签都是写在html文件中的,现在却可以写在js文件中了,这其实就是jsx语法。哪怕以前js文件中是可以写html标签的,但是需要添加引号的,而在jsx中是不需要引号的。
index.js
import React from 'react';
import ReactDOM from 'react-dom/client';
import App from './App';

const root = ReactDOM.createRoot(document.getElementById('root'));
root.render(
  <React.StrictMode>
    <App />
  </React.StrictMode>
);
app.js
import React,{ Component } from "react";

class App extends Component {
  render() {
    return (
      <div className="App">
      Hello!!
      </div>
    )
  }
}

export default App;
工程入口模版 =>
public/index.html
<!DOCTYPE html>
<html lang="en">
  <head>
    <meta charset="utf-8" />
    <link rel="icon" href="%PUBLIC_URL%/favicon.ico" />
    <meta name="viewport" content="width=device-width, initial-scale=1" />
    <meta name="theme-color" content="#000000" />
    <meta
      name="description"
      content="Web site created using create-react-app"
    />
    <link rel="apple-touch-icon" href="%PUBLIC_URL%/logo192.png" />
    <!--
      Notice the use of %PUBLIC_URL% in the tags above.
      It will be replaced with the URL of the `public` folder during the build.
      Only files inside the `public` folder can be referenced from the HTML.

      Unlike "/favicon.ico" or "favicon.ico", "%PUBLIC_URL%/favicon.ico" will
      work correctly both with client-side routing and a non-root public URL.
      Learn how to configure a non-root public URL by running `npm run build`.
    -->
    <title>React App</title>
  </head>
  <body>
    <noscript>You need to enable JavaScript to run this app.</noscript>
    <div id="root"></div>
    <!--
      This HTML file is a template.
      If you open it directly in the browser, you will see an empty page.

      You can add webfonts, meta tags, or analytics to this file.
      The build step will place the bundled scripts into the <body> tag.

      To begin the development, run `npm start` or `yarn start`.
      To create a production bundle, use `npm run build` or `yarn build`.
    -->
  </body>
</html>
最基础的JSX语法
SX语法中,如果我们要使用自己创建的组件,开头首字母一定要大写,如:App。
实际当一个标签中大写字母开头的时候,则是组件,否则一般是原始的h5标签。
课程收获
熟练掌握React的工程目录 =>
package-lock.json => 项目依赖的安装包,它的一些版本号,会在这里做一些限制,这个文件一般不动。
README.md => 项目说明文件,可以通过markdown语法自己写一些介绍
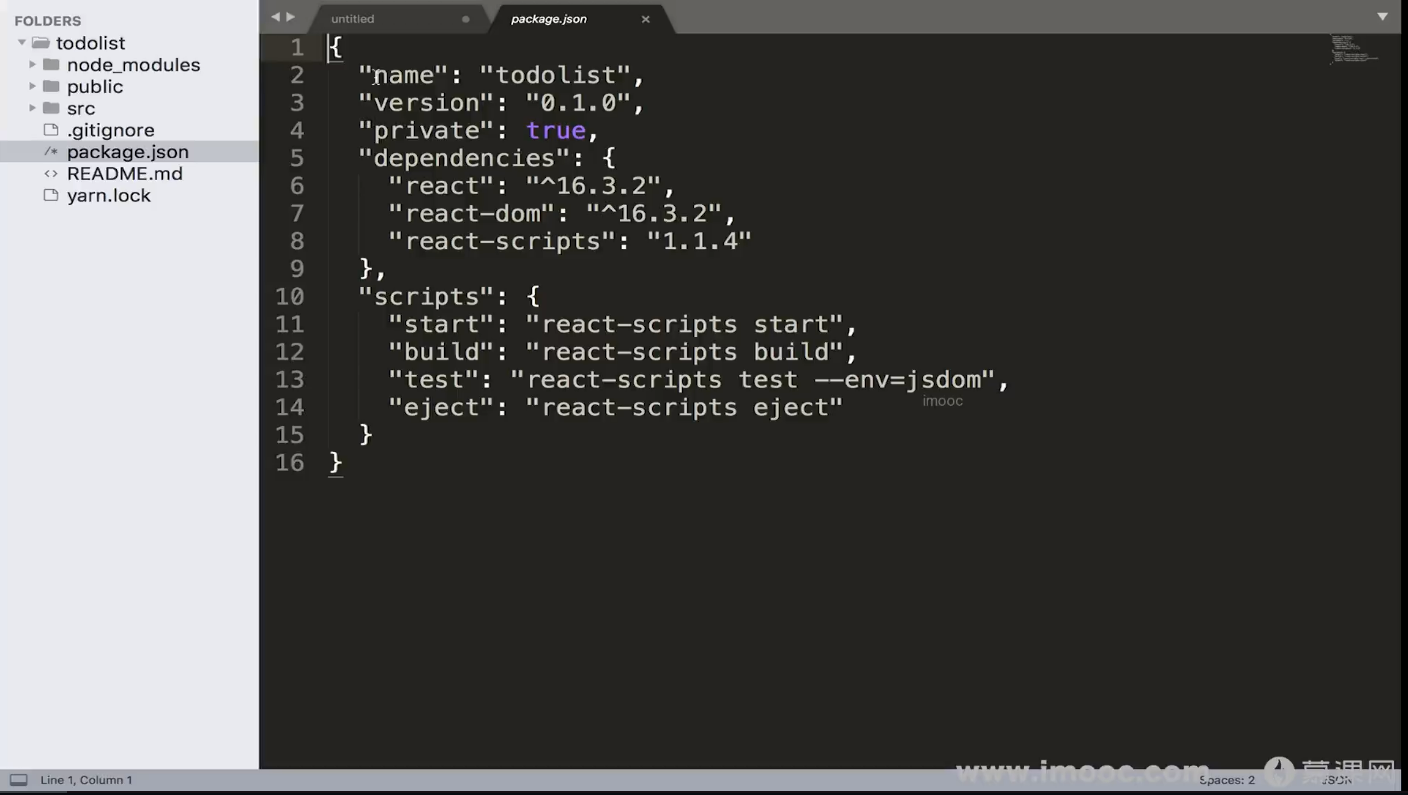
package.json => 任何一个脚手架工具,都会有该文件,它就代表这个脚手架工具就是一个node包的文件,这里也会有一些项目的介绍,名称、版本号、是否是私有的、项目的依赖、一些指令供我们调用。比如:npm run start => 对应scripts里的配置项里的命令,后面是它借助的工具,去控制该项目。这里的内容,其实是一些node的知识,它其实就是node的包文件,它可以让我们的项目变成一个node的包。这个文件一般不会手动动,基本上都是脚手架自动生成的文件。
.gitignore => git管理我们代码,有一些文件不想传给git仓库上,可以把这些文件定义在这里。
node_modules => 项目依赖的一些第三方的包
public => favicon.ico:网页标签的上的icon
index.html:项目首页的html模版,没什么东西
● noscript:如果网页上把script禁掉了,这个时候会给用户一个提示,相当于是容错的。
manifest.json : 定义该网页,如果可以当成一个app来使用,就可以把它存储在桌面上,在手机上可以通过快捷方式,直接进入到该网页,快捷方式的图标,配置icons属性。不用pwa也可把它删掉的。
● start_url:快捷方式对应的网址
● 主题颜色
{
  "short_name": "React App",
  "name": "Create React App Sample",
  "icons": [
    {
      "src": "favicon.ico",
      "sizes": "64x64 32x32 24x24 16x16",
      "type": "image/x-icon"
    },
    {
      "src": "logo192.png",
      "type": "image/png",
      "sizes": "192x192"
    },
    {
      "src": "logo512.png",
      "type": "image/png",
      "sizes": "512x512"
    }
  ],
  "start_url": ".",
  "display": "standalone",
  "theme_color": "#000000",
  "background_color": "#ffffff"
}
src => 项目开发最重要的一个目录,这里放着项目中所有的源代码,所有代码的入口在该文件的index.js中
老版本是引入registerServiceWorker,而不是reportWebVitals
registerServiceWorker => PWA (progressive web application)
● 通过写网页的形式写一些手机端的app,借助网页写手机app
○ 假若写了一个这样的页面,把它放在一个支持https协议的服务器上,网页具备特性
■ 当用户第一次访问该网页,用户需要联网才能看到该网页
■ 如果访问完网页就断网了,也能看到之前访问的页面
● 它会帮忙把之前浏览过的网页存储到浏览器之内,下一回即使没有网络,也能访问该网页
reportWebVitals => 性能统计
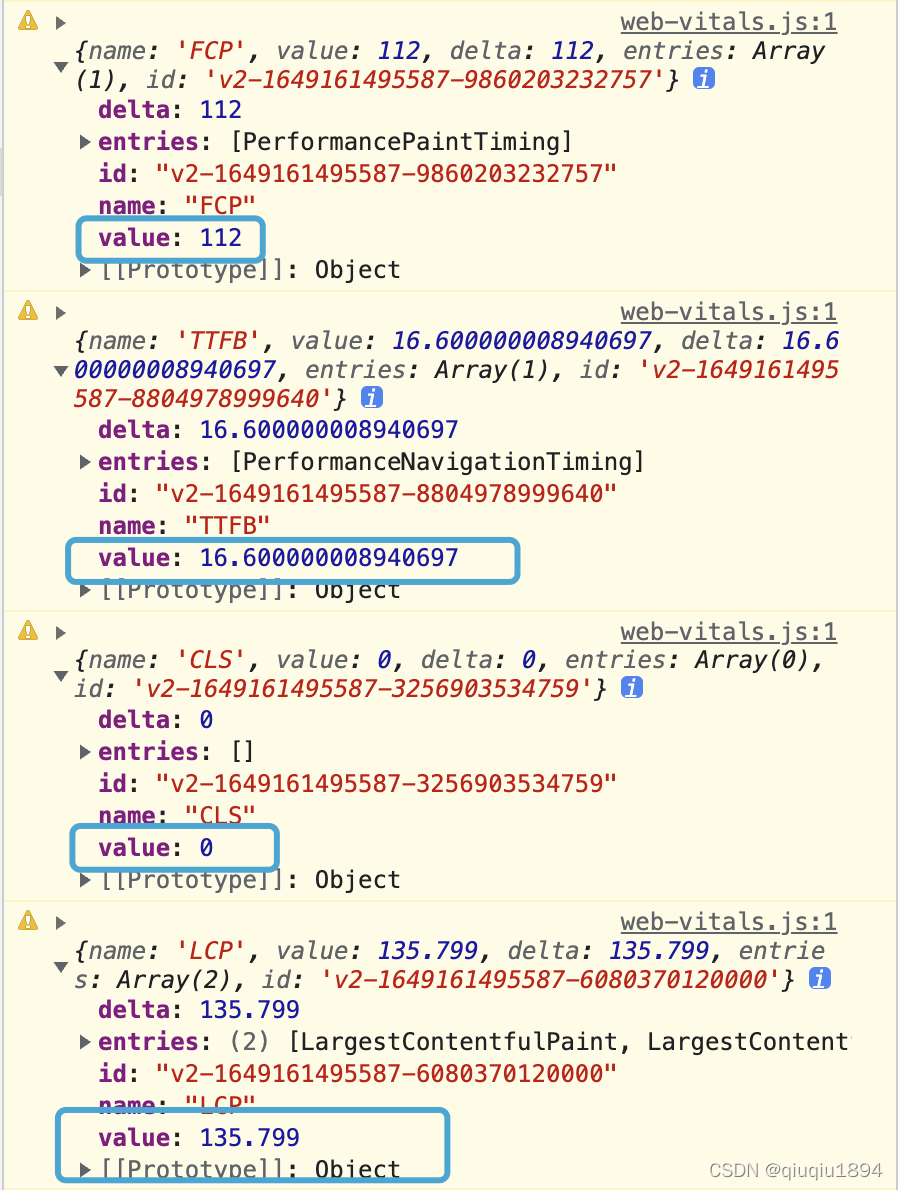
这个webVital是Google提出的、检测用户体验的标准,这些指标包含三个关键指标(CLS、FID、LCP)和两个辅助指标(FCP、TTFB)。具体含义如下(参考链接):
LCP (Largest Contentful Paint):最大内容渲染时间。指的是从用户请求网址到窗口中渲染最大可见内容所需要的事件(最大可见内容通常是图片或者视频,或者大块的文本)。
FID (First Input Delay):首次输入延迟。指的是从用户首次与网页互动(点击链接、按钮等)到浏览器响应此次互动直接的时间。用于判断网页进入互动状态的时间。
CLS (Cumulative Layout Shift) :累计布局偏移,得分范围0-1,指的是网页布局在加载期间的偏移量,0表示没有偏移,1表示最大偏移,这个指标指示用户与网站的交互体验,如果网址在加载过程布局一直跳动,用户体验会很差。比如加载一张图片,但没有大小空白占位,导致图片显示时页面高度跳动。
FCP(First Contentful Paint)首次内容绘制。标记浏览器渲染来自 DOM 第一位内容的时间点,内容可能是文本、图像等元素。
TTFB (Time to First Byte) 首字节到达的时间点。
很晦涩啊,通过把index.js文件的最后一行改为:
reportWebVitals(console.warn);
FCP值表示,当前页面中元素最早出现时间是在页面开始加载后的112ms。LCP值表示元素最晚出现的时间是加载开始后135.8ms。CLS值表示我的页面中元素的没有偏移,在缩放变换后该值还是0,那么说明这个页面还是比较稳定流畅的。
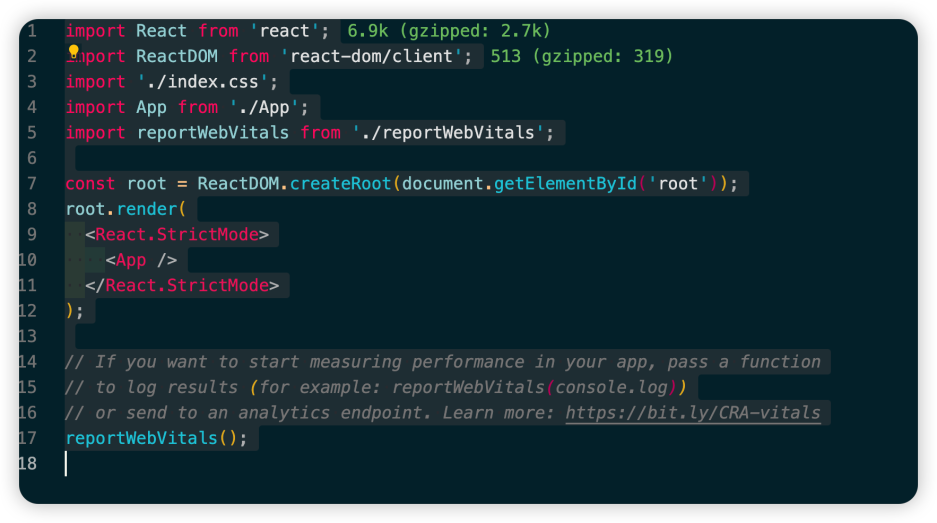
index.js => 渲染App.js
import React from 'react';
import ReactDOM from 'react-dom/client';
import './index.css';
import App from './App';
import reportWebVitals from './reportWebVitals';

const root = ReactDOM.createRoot(document.getElementById('root'));
root.render(
  <React.StrictMode>
  <App />
  </React.StrictMode>
);

// If you want to start measuring performance in your app, pass a function
// to log results (for example: reportWebVitals(console.log))
// or send to an analytics endpoint. Learn more: https://bit.ly/CRA-vitals
reportWebVitals();
这里引入react和reactDom包,这个之所以可以引入,是在package.json中安装了,所以可以在index.js中直接引入。
"dependencies": {
  "@testing-library/jest-dom": "^5.16.5",
  "@testing-library/react": "^13.4.0",
  "@testing-library/user-event": "^13.5.0",
  "react": "^18.2.0",
  "react-dom": "^18.2.0",
  "react-scripts": "5.0.1",
  "web-vitals": "^2.1.4"
},
还引入了index.css样式文件,React的设计思路“all in js”,以前css和js是相分离的,但是在React种,css可以像js一样,以模块的形式嵌入到js中,其他框架,如Vue、Angular也同样的。
注意:import是es6的语法,模块化导入,这里import App from ‘./App’; => 相当于 import App from ‘./App.js’;,只不过脚手架工具会帮助我们加后缀的。
app.js
import logo from './logo.svg';
import './App.css';

function App() {
  return (
    <div className="App">
    <header className="App-header">
    <img src={logo} className="App-logo" alt="logo" />
    <p>
    Edit <code>src/App.js</code> and save to reload.
    </p>
    <a
  className="App-link"
  href="https://reactjs.org"
  target="_blank"
  rel="noopener noreferrer"
    >
    Learn React
    </a>
    </header>
    </div>
  );
}

export default App;

可以删除一些没用的文件和引入:
1、index.css
2、logo.svg
3、app.css
4、修改app.js 入口文件
5、index.js 中reportWebVitals、registerServiceWorker
6、app.test.js、setupTests.js  : 自动化的测试文件
● React、Vue项目中可能会涉及一些函数式的编程,所以可以做一些自动化的测试。
7、public
● manifest.json  (包括index.html的包含)

App.js  =>  负责主显示口

```jsx
import React,{ Component } from "react";

class App extends Component {
  render() {
    return (
      <div className="App">
        Hello!!
      </div>
    )
  }
}

export default App;
-
Vue3学习:从入门到初步掌握12-25
-
Vue3入门:新手必读的简单教程12-25
-
【JS逆向百例】爱疯官网登录逆向分析12-23
-
Vue3教程:新手入门到实践应用12-21
-
VueRouter4教程:从入门到实践12-21
-
Vue3项目实战:从入门到上手12-20
-
Vue3项目实战:新手入门教程12-20
-
VueRouter4项目实战:新手入门教程12-20
-
如何实现JDBC和jsp的关系?-icode9专业技术文章分享12-20
-
Vue项目中实现TagsView标签栏导航的简单教程12-20
-
Vue3入门教程:从零开始搭建你的第一个Vue3项目12-20
-
从零开始学习vueRouter4:基础教程12-20
-
Vuex4课程:新手入门到上手实战全攻略12-20
-
Vue3资料:新手入门及初级教程12-20
-
Vuex4入门指南:轻松掌握Vue状态管理12-20


