Javascript
【学习打卡】第4天 【2022版】Vue3 系统入门与项目实战第四讲
课程名称: 2022持续升级 Vue3 从入门到实战 掌握完整知识体系
课程章节: Vue 中的动画
主讲老师: Dell
课程内容:
今天学习的内容包括:
在tarnsition type中
transition以过度为准
nimation以动画为准
duration(秒(1000))不以动画过度里时间为准。
可以输入对象
可以对Enter和Leave的时长进行控制
不用CSS动画效果
JS动画效果
before-enter动画开始之前
enter开始执行动画
after-enter当动画结束之后
el为元素
done函数,告诉系统动画已结束
clearInterval(animation)清楚动画
课程收获:
4.2/4.3/4.4 心得:
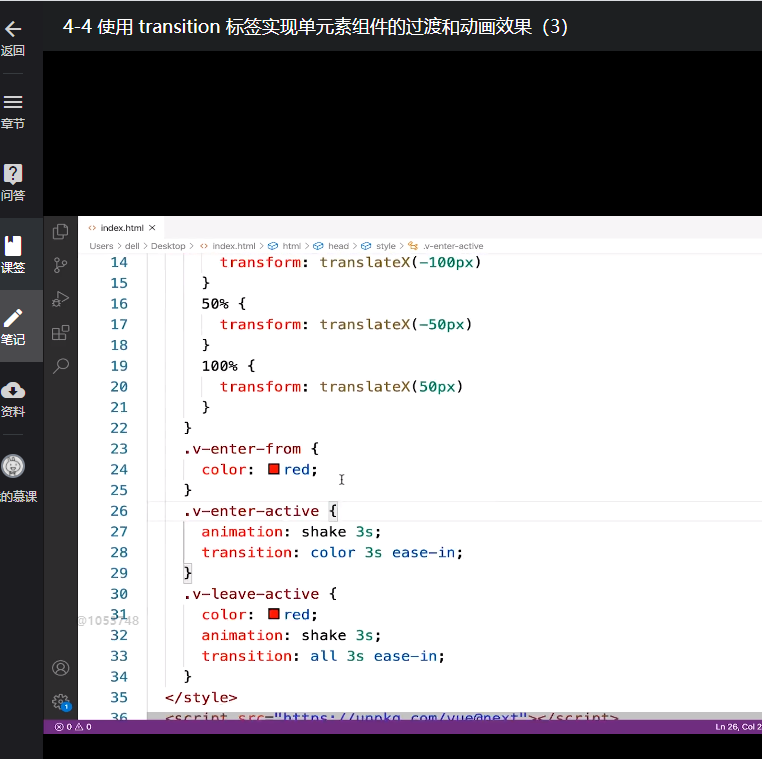
@keyframes 动画关键帧属性
0%, 25%… 表示动画执行的阶段百分比
动画只需要定义 v-enter-active / v-leave-active
   //单元素,单组件的入场出场动画

       const app = Vue.createApp({

        data(){

            return {

               show:false

            }

        },


        methods:{

          hanleClick() {

            this.show = !this.show;

          }


        },


        template:`

          <div>

            <transition>

              <div v-if="show"> hello world </div>

            </transition>

            <button @click = "handleClick">切换</button>

          </div>

        `

     });


/*固定写法,入场,执行中,结束,隐藏*/


@keyframes shake{

    0% {

        transform:translateX( -100px )

     }


    50% {

        transform:translateX( -50px )

     }


    100% {

        transform:translateX( 0px )

     }

}


.v-enter-form {

    opacity:0;

}


.v-enter-active{

    transition : opacity 3s ease-out

}


.v-enter-to {

    opacity:1;

}


/*这一步可以省略*/

.v-leave-from{

     opacity:1;

}


.v-leave-active{

   transition : opacity 3s ease-in

}


.v-leave-to{

     opacity:1;

}
自定义class名可以使用第三方的网站,例如animate.style
Vue transtion组件类名可以用animate.css里面的动画类名去做
示例代码:
template: 、
<div>
	<transition
		enter-active-class="aninate_animated animste_bounce">
		leave-active-class-"aninate_aninated anjmate_bounce"
	>
	<div v-show="show">hello world</div>
</transition>
<button @click="handleclick">切换</button>
<div>
、
template:
<div>
<transition
	enter-active-class="hello"
	leave-active-clasp="bye"
>
	<div v-show="show">hello world</div>
</transition>
<button @click="handleClick">切换</button> </div>
JS通过钩子控制transition标签的动画
methods:{
	handleClick(){
		this.show=!this.show;
},
handleBeforeEnter(el){
	el.style.color ="red";
},
handleEnterActive(el,done){
	const animation = setInterval(() => {
		const color=el.style.color;
		if(color==='red'){
			el.style.color= 'green';
		} else {
		el.style.color='red';
		}
}, 1000)
setTimeout(() => {
	clearInterval(animation);
	done();
}, 3000)
用JS动画之前先关掉CSS动画,以及JS的入场JS动画钩子和出场动画钩子函数
<transition
	:css="false"
	@before-enter="handleBeforeEnter"
	@enter="handleEnterActive"
	@after-enter="handleEnterEnd"
	@before-leave=
	@leave=
	@leave-after= >
	<div v-show="show">hello world</div>
</transition>
done回调的使用、after-enter之前先调用done()才有效果
template:、
	<div>
		<transition
			:css="false"
			@before-enter="handleBeforeEnter"
			@enter="hand leEnterActvie"
		>
			<div v-show="show">hello world</div>
		</transition>
		<button @click="handleClick">切换</button>
	</div>
、
transiton 组件通过:css=false 关掉css控制动画的能力
transiton组件 通过js钩子去做动画的实现
4.5 心得:
多个单元素标签之间的切换:
组件切换时的动画效果,一般不同时执行,可以在transition标签中设置 mode = “out-in”(先出再入)
appear初次对某一个标签进行展示的时候,也会带上动画效果
<transition  mode=‘out-in’ appear>
	<div  v-if = ‘show’>hellow world</div>
	<div  v-else = ‘show’>bye world</div>
</transition>
多个单组件之间的切换:
const app =Vue.createApp({
	data(){
		return { show: false} },
methods:{
	handleClick(){
		this.show=!this.show; },
},
components:{
' component-a': ComponentA,
'component-b': ComponentB,
},
template:
	<div>
	<transition mode="out-in" appear>
		<component-a v-if="show" />
		<component-b v-else="show" />
	</transition>
<button @click="handleClick">切换</button>
</div>
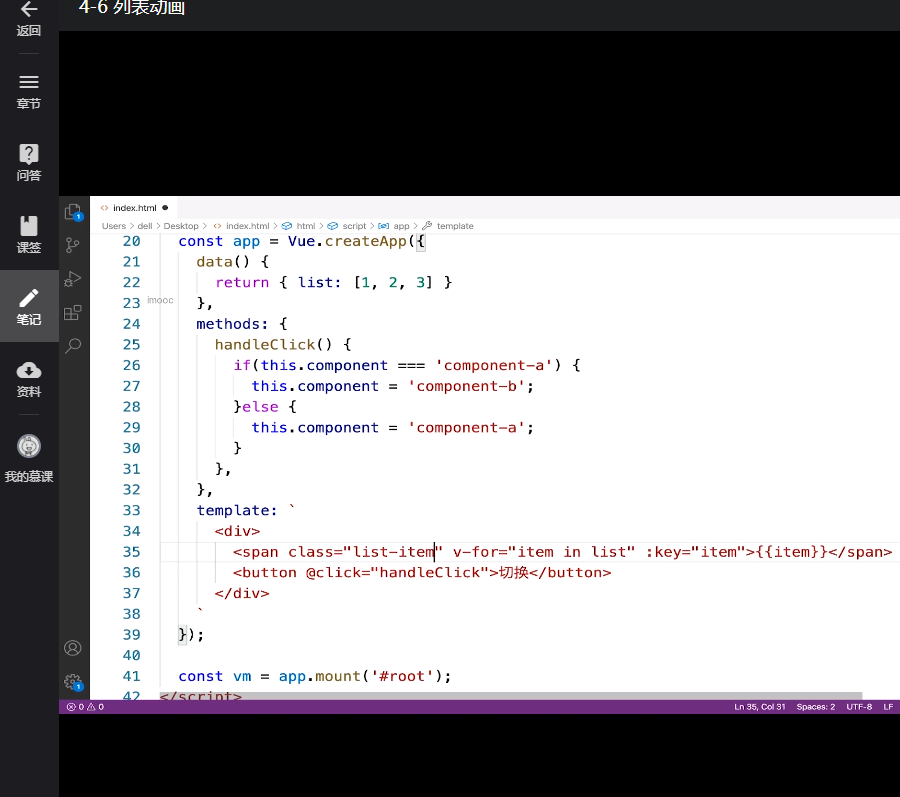
methods:{
	handleClick(){
		if(this.component === 'component-a'){
			this.component = 'component-b';
			}else{
				this.component = 'component-a';
			}
	},
},
components:{
	'component-a': ComponentA,
'	component-b': ComponentB,
},
template:
<div>
	<transition mode="out-in" appear>
		<component :is="component" />
	</transition>
	<button @click="handleClick">切换</button>
</div>
4.6 心得:
列表添加动画效果标签为transition-group
v-move:除了进出的动画,其他列表标签的动画效果
<!DOCTYPE html>

<html lang="en">

<head>

    <meta charset="UTF-8">

    <meta http-equiv="X-UA-Compatible" content="IE=edge">

    <meta name="viewport" content="width=device-width, initial-scale=1.0">

    <title>Document</title>

    <script class="lazyload" src="data:image/png;base64,iVBORw0KGgoAAAANSUhEUgAAAAEAAAABCAYAAAAfFcSJAAAAAXNSR0IArs4c6QAAAARnQU1BAACxjwv8YQUAAAAJcEhZcwAADsQAAA7EAZUrDhsAAAANSURBVBhXYzh8+PB/AAffA0nNPuCLAAAAAElFTkSuQmCC" data-original="https://unpkg.com/vue@next"></script>

    <style>

        .inline-item {

            display: inline-block;

            margin-right: 10px;

            width: 30px;

            text-align: center;

            font-size: 21px;

            font-weight: 600;

        }

        /* 入场之前元素的状态设定 */

        .v-enter-from {

            opacity: 0;

            transform: translateY(30px);

        }

        .v-enter-active {

            /* 动画过程中执行的状态 */

            transition: all .5s ease-in;

        }

        /* 入场动画结束后的元素状态 */

        .v-enter-to {

            opacity: 1;

            transform: translateY(0px);

        }

        /* 如果希望元素左右移动的时候也需要有动画效果,添加固定的类名即可 */

        .v-move {

            transition: all .5s ease-in;

        }

        .v-leave-from {

            opacity: 1;

            transform: translateY(0px);

        }

        .v-leave-active {

            /* 动画过程中执行的状态 */

            transition: all .5s ease-in;

        }

        /* 入场动画结束后的元素状态 */

        .v-leave-to {

            opacity: 0;

            transform: translateY(30px);

        }

    </style>

</head>

<body>

    <div id="root">


    </div>

</body>

<script>

    const app = Vue.createApp({

        data(){

            return {

                list:[1,2,3]

            }

        },

        methods:{

            handleClick(){

                this.list.unshift(this.list.length+1)

            },

            handleClickRemove(){

                this.list.pop()

            }

        },

        template:`

            <transition-group>

                <span v-for="item in list" :key = item class="inline-item">{{item}}</span>

            </transition-group>

            <button v-on:click="handleClick">增加</button>

            <button v-on:click="handleClickRemove">移除</button>


        `

    })

    const vm = app.mount('#root')

</script>

</html>
4.7 心得:
状态动画:(通过操作数据模拟动画的效果)
/**

* 使删除列表元素的时候产生动画要让删除的元素先脱离文档流,旁边的元素才能过渡过来

*/

.v-leave-active {

position:absolute;

}
Vue 获取dom元素中的自定义属性值
方法一:
HTML<div id="app">
 <button  @click="getData($event,'100')">点我</button></div>

JSmethods : {   getData(e,num) {
       console.log(num);     // 输出 100
  }
}
方法二:
HTML<div id="app">
 <button data-num="100" ref="dataNum"  @click="getData($event)">点我</button></div>JSmethods : {
  getData (e) {
      console.log(this.$refs.dataNum.dataset.num);     // 输出 100
  }
}
方法三:
HTML<div id="app">
 <button data-num="100" @click="getData($event)">点我</button></div>JSmethods : {   getData (e) {
      console.log(e.target.getAttribute('data-num'));     // 输出 100
  }
}
关于状态动画点击按钮到10停止,再次点击可以继续增加,可以在button的事件添加once,之后就失效了
<button @click.once='ChangeNumber'>切换</button>
-
React入门教程:从零开始搭建你的第一个React应用12-26
-
Vue2入门教程:轻松掌握前端开发基础12-25
-
Vue3入门指南:快速搭建你的第一个Vue3项目12-25
-
JS基础知识入门教程12-25
-
React基础知识详解:从入门到初级应用12-25
-
Vue3基础知识详解与实战指南12-25
-
Vue3学习:从入门到初步掌握12-25
-
Vue3入门:新手必读的简单教程12-25
-
【JS逆向百例】爱疯官网登录逆向分析12-23
-
Vue3教程:新手入门到实践应用12-21
-
VueRouter4教程:从入门到实践12-21
-
Vue3项目实战:从入门到上手12-20
-
Vue3项目实战:新手入门教程12-20
-
VueRouter4项目实战:新手入门教程12-20
-
如何实现JDBC和jsp的关系?-icode9专业技术文章分享12-20


