Android开发
Android 面试题:说一下 PendingIntent 和 Intent 的区别
请点赞,你的点赞对我意义重大,满足下我的虚荣心。
🔥 Hi,我是小彭。本文已收录到 GitHub · Android-NoteBook 中。这里有 Android 进阶成长知识体系,有志同道合的朋友,关注公众号 [彭旭锐] 跟我一起成长。
前言
- 从字面意思上理解,PendingIntent 是一种延迟的 Intent,表示一种延迟执行的意图操作。对,但又不完全对。 一句话概括,PendingIntent 一种是支持授权其他应用以当前应用的身份执行包装的 Intent 操作的系统特性。
- 在这篇文章里,我将带你理解 PendingIntent 的使用方法、设计理念以及核心源码分析,相信阅读完这篇文章后你对 PendingIntent 的理解将超过绝大部分同学。如果能把帮上忙,请务必点赞加关注,你的支持对我非常重要。
1. 认识 PendingIntent
1.1 为什么要使用 PendingIntent?
PendingIntent 的应用场景关键在于间接的 Intent 跳转需求, 即先通过一级 Intent 跳转到某个组件,在该组件完成任务后再间接地跳转到二级的 Intent。PendingIntent 中的单词 “pending” 指延迟或挂起,就是指它是延迟的或挂起的。例如,你在以下场景中就可以使用 PendingIntent:
- 场景 1 - 系统通知消息的点击操作
- 场景 2 - 桌面微件的点击操作
- 场景 3 - 系统闹钟操作
- 场景 4 - 第三方应用回调操作
可以看到,在这些场景中,我们真正感兴趣的操作是挂起的,并且该操作并不是由当前应用执行,而是由某个外部应用来 “间接” 执行的。例如,我们在发送系统通知消息时,会通过 PendingIntent 构造一个系统通知 Notification ,并调用 NotificationManagerCompat.notify(…) 发送通知,此时并不会直接执行 PendingIntent。而是当系统显示通知,并且用户点击通知时,才会由系统通知这个系统应用间接执行 PendingIntent#send() ,而不是通过当前应用执行。
当然,在低版本系统中,你还可以使用嵌套 Intent(Intent#extra 中嵌套另一个 Intent)来实现以上需求。但是从 Android 12 开始,嵌套 Intent 将被严格禁止,原因下文会说。
1.2 PendingIntent 和 Intent 有什么区别?
从结构上来说,PendingIntent 是 Intent 的包装类,其内部持有一个代表最终意图操作的 Intent(事实上,内部是通过 IIntentSender 间接持有)。它们的区别我认为可以概括为 3 个维度:
- 1、执行进程不同 —— PendingIntent 在其他进程执行: Intent 通常会在创建进程中执行,而 PendingIntent 通常不会在创建进程中执行;
- 2、执行时间不同 —— PendingIntent 会延迟执行: Intent 通常会立即执行,而 PendingIntent 通常会延迟执行,延迟到其他进程完成任务后再执行,甚至延迟到创建进程消亡后。例如,在 场景 1 - 系统通知消息的点击操作 中,即使发送系统通知消息的进程已经消亡了,依然不妨碍二级 Intent 的跳转;
- 3、执行身份不同 —— PendingIntent 支持授权: PendingIntent 内部持有授权信息,支持其他应用以当前应用的身份执行,这有利于避免嵌套 Intent 存在的安全隐患。而直接使用 Intent 的话,一般只能以当前应用的身份执行(为什么说一般?因为有 Activity#startActivityAsUser() 这个 API,但一般你拿不到所需的参数)。
提示: 当然了,如果你创建 PendingIntent 后又马上同步地在当前进程消费这个 PendingIntent,那么时间维度上就没区别了。但是这样做其实不符合 PendingIntent 的应用场景。
1.3 嵌套 Intent 存在的安全隐患
上文提到,在低版本系统中,你可以使用嵌套 Intent 实现类似于 PendingIntent 的需求。但这一方案从 Android 12 开始被严格禁止,为什么呢 —— 存在安全隐患。
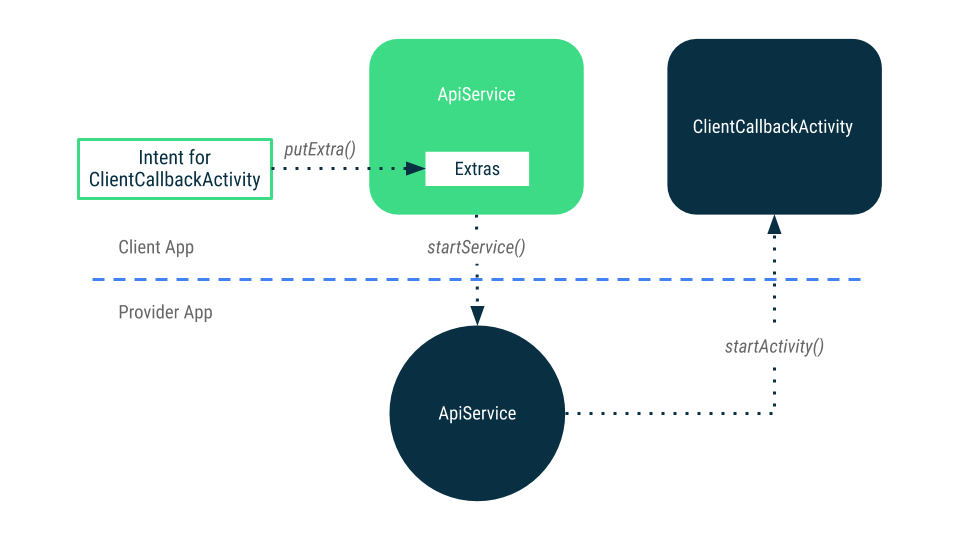
举个例子,我们将启动 ClientCallbackActivity 的 Intent 嵌套到启动 ApiService 的 Intent 里,实现一个 场景 4 - 第三方应用回调操作 的效果:
- 步骤 1: Client App 请求 Provider App 的一个服务(这通过一级 Intent 实现);
- 步骤 2: Provider App 在任务结束后回调到 Client App 的 ClientCallbackActivity(这通过嵌套的二级 Intent 实现)。
该过程用示意图表示如下:
乍看起来没有问题,但其实存在 2 个隐蔽的安全隐患:
- 隐患 1 - Client App: 由于 ClientCallbackActivity 是从另一个应用 Provider App 启动的,因此该 Activity 必须暴露为 exported。这意味着除了 Provider App 可以启动该 Activity 外,同时也给了恶意应用启动该 Activity 的可能性。如果 ClientCallbackActivity 是一个普通的 Activity 还要说,要是 ClientCallbackActivity 是一个敏感或高风险的行为(例如支付回调),那么这就存在很大的安全隐患了;
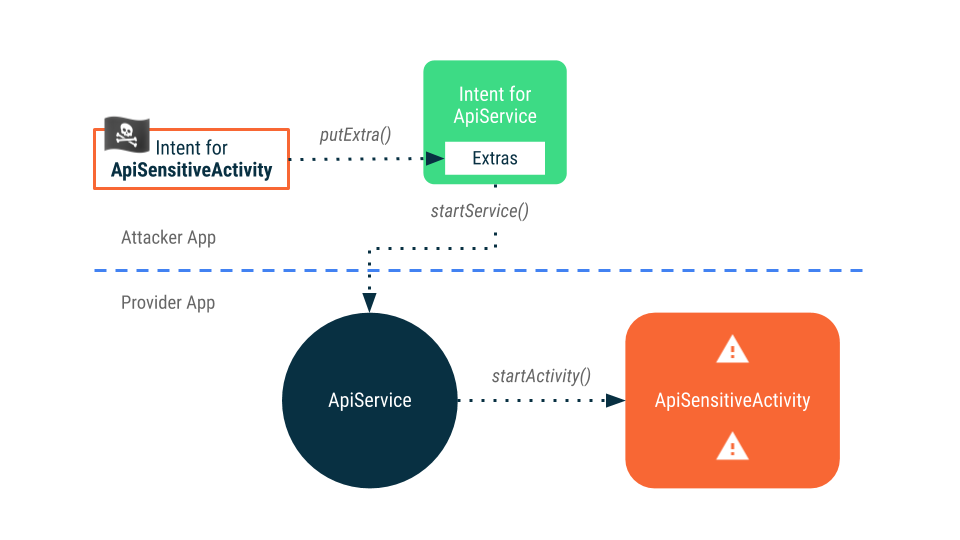
- 隐患 2 - Provider App: 由于嵌套的 Intent 是在 Provider App 的上下文中启动的,那么二级 Intent 不仅可以正常启动 Client App 中的 ClientCallbackActivity(打开 exported 时),还可以启动 Provider App 中任意 Activity。这意味着给了恶意应用启动 Provider App 中敏感或高风险的 Activity 的可能性,即使这个敏感的 Activity 事先已经关闭 exported。这说明 exported 机制失效了,也存在很大的安全隐患。
该攻击过程用示意图表示如下:
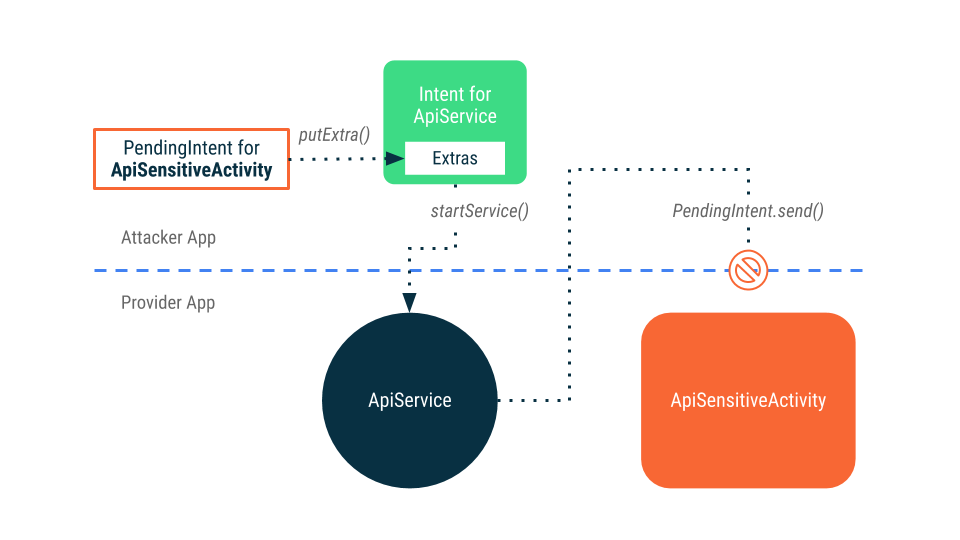
解决方法是使用 PendingIntent 代替嵌套 Intent,此时这两个风险都不存在。为什么呢?—— 因为 PendingIntent 将以 Client App(PendingIntent 的创建进程)的身份执行,而不是 Provider App (PendingIntent 的消费进程)的身份执行。
现在,我们再回顾下还有没有安全隐患:
- 隐患 1 - Client App: 由于 PendingIntent 使用 Client App 的身份执行,那么 ClientCallbackActivity 不再需要暴露为 exported。此时,恶意应用不存在常规启动 ClientCallbackActivity 的可能性,风险解除;
- 隐患 2 - Provider App: 由于 PendingIntent 使用 Client App / Attacker App 的身份执行,而它们是没有权限访问 Provider App 非 exported 的 ApiSensitiveActivity 的。此时,恶意应用不能启动 ApiSensitiveActivity,风险解除。
该过程用示意图表示如下:
提示: 担心有的同学钻牛角这里再补充一下:如果我的二级 Intent 就是想要回调到 Provider App 中的 ApiSensitiveActivity 那怎么办?很简单,说明 Client 并不关心回调,那么就直接使用 Intent 即可,Provider App 内部的回调行为交给其内部处理。
2. PendingIntent 的使用方法
2.1 创建 PendingIntent
PendingIntent 支持在启动 Activity、Service 或 BroadcastReceiver。不同类型的组件必须使用特定的静态方法:
示例程序
// 启动 Activity
PendingIntent.getActivity(Context context, int requestCode, Intent intent, int flags)
// 启动 Service
PendingIntent.Service(Context context, int requestCode, Intent intent, int flags)
// 启动 BroadcastReceiver(发送广播)
PendingIntent.getBroadcast(Context context, int requestCode, Intent intent, int flags)
创建 PendingIntent 后,就可以将 PendingIntent 发送给其他应用,例如发送到系统通知消息:
示例程序
// 通知构造器
NotificationManagerCompat compat = NotificationManagerCompat.from(context);
NotificationCompat.Builder builder = null;
if (Build.VERSION.SDK_INT >= Build.VERSION_CODES.O) {
    builder = new NotificationCompat.Builder(context, CHANNEL_ID);
} else {
    builder = new NotificationCompat.Builder(context);
}
...
// 设置 PendingIntent
builder.setContentIntent(pendingIntent);
// 构造通知
Notification notification = builder.build()
// 发送通知
compat.notify(NOTIFICATION_TAG, NOTIFICATION_ID, notification);
简单说明下创建 PendingIntent 的 4 个参数:
- 1、context: 当前应用的上下文,PendingIntent 将从中抽取授权信息;
- 2、requestCode: PendingIntent 的请求码,与 Intent 的请求码类似;
- 3、intent: 最终的意图操作;
- 4、flag: 控制标记位,我们暂且放到一边。
创建 PendingIntent 时有一个容易犯错的地方需要注意:重复调用 PendingIntent.getActivity() 等创建方法不一定会返回新的对象,系统会基于两个要素判断是否需要返回相同的 PendingIntent:
- 要素 1 - requestCode: 不同的 requestCode 会被认为不同的 PendingIntent 意图;
- 要素 2 - Intent: 不同的 Intent 会被认为不同的 PendingIntent 意图,但并不是 Intent 中所有的参数都会参与计算,而是仅包含 Intent.filterEquals() 方法考虑的参数,即:action、data、type、identity、class 和 categories,但不包括 extras。
2.2 消费 PendingIntent
上面提到 PendingIntent 是 Intent 的嵌套类,那么在消费 PendingIntent 时是否可以从中取出嵌套的 Intent 再执行 startActivity 之类的方法呢?NO!消费 PendingIntent 的方法只能使用 PendingIntent#send() 相关重载方法。例如:
PendingIntent.java
public void send() throws CanceledException {
    send(null, 0, null, null, null, null, null);
}

public void send(Context context, int code, @Nullable Intent intent) throws CanceledException {
    send(context, code, intent, null, null, null, null);
}
关于 send() 内部的实现原理,我们在下一节原理分析中再说。
2.3 取消 PendingIntent
调用 PendingIntent#cancel() 方法可以取消已经创建的 PendingIntent,该方法将从系统中移除已经注册的 PendingIntent(事实上,是移除 IIntentSender)。如果后续继续消费这个已经被取消的 PendingIntent,将抛出 CanceledException 异常。
PendingIntent.java
private final IIntentSender mTarget;

public void cancel() {
    ActivityManager.getService().cancelIntentSender(mTarget);
}
2.4 可变性与不可变性
PendingIntent 可变性是一种对外部应用消费行为的约束机制,通过标记位 FLAG_MUTABLE 和 FLAG_IMMUTABLE 控制 PendingIntent 可变或不可变。例如:
示例程序
// 创建可变 PendingIntent
val pendingIntent = PendingIntent.getActivity(applicationContext, NOTIFICATION_REQUEST_CODE, intent, PendingIntent.FLAG_MUTABLE)

// 创建不可变 PendingIntent
val pendingIntent = PendingIntent.getActivity(applicationContext, NOTIFICATION_REQUEST_CODE, intent, PendingIntent.FLAG_IMMUTABLE)
那么,可变性意味着什么呢?可变性意味着在消费 PendingIntent 时,可以针对其中包装的 Intent 进行修改,即使用 PendingIntent#send(Context, int, Intent) 进行修改。需要注意的是,这里的 Intent 参数并不会完全替换 PendingIntent 中包装的 Intent,而是将修改的信息填充到原有的 Intent 上。
源码摘要
// send() 内部通过 Intent#fillIn() 修改 Intent,而不是替换 Intent

// PendingIntent#send() 最终执行到:
int changes = finalIntent.fillIn(intent, key.flags);
例如,以下为修改可变 PendingIntent 示例:
示例程序
val intentWithExtrasToFill = Intent().apply {
    putExtra(EXTRA_CUSTOMER_MESSAGE, customerMessage)
}
mutablePendingIntent.send(applicationContext, PENDING_INTENT_CODE, intentWithExtrasToFill)

// 至此,PendingIntent 内部包装的 Intent 将持有 EXTRA_CUSTOMER_MESSAGE 信息
另外,PendingIntent 可变性的注意事项:
- 注意事项 1 - 修改不可变 PendingIntent: 即使是不可变的 PendingIntent 类型,创建 PendingIntent 的应用总是可以修改,因为可变性只是对外部应用消费行为的约束。例如:
修改示例
// 创建不可变 PendingIntent
val pendingIntent = PendingIntent.getActivity(applicationContext, NOTIFICATION_REQUEST_CODE, intent, PendingIntent.FLAG_IMMUTABLE)

// 在当前应用修改不可变 PendingIntent,需要使用 PendingIntent.FLAG_UPDATE_CURRENT 标记位
val updatedPendingIntent = PendingIntent.getActivity(applicationContext, NOTIFICATION_REQUEST_CODE, anotherIntent, PendingIntent.FLAG_IMMUTABLE or PendingIntent.FLAG_UPDATE_CURRENT)
- 注意事项 2 - 显式指定可变性: FLAG_MUTABLE 可变标记位是 Android 12 新增的,在 Android 12 之前,未使用 FLAG_IMMUTABLE 不可变标记位的 PendingIntent 都默认是可变的。但是,从 Android 12 开始,为了使 PendingIntent 的处理更加安全,系统要求 PendingIntent 必须显式声明一个可变性标志。这个问题我们在 Android 系统适配手册 里讲到过。
- 注意事项 3 - 可变 PendingIntent 需要使用显式 Intent: 可变 PendingIntent 应该将其中包装的 Intent 设置为显式 Intent,确保修改后的 PendingIntent 没有安全隐患。
2.5 PendingIntent 标记位
现在,我们回过头再总结一下 PendingIntent 的 flags 标记位:
3. PendingIntent 实现原理分析
3.1 创建 PendingIntent 的执行过程
创建 PendingIntent 需要使用特定的静态方法,内部会通过 Binder 通信将 PendingIntent 意图注册到 AMS 系统服务进程中,并获得一个 Binder 对象 IIntentSender。关键源码摘要如下:
PendingIntent.java
private final IIntentSender mTarget;

// 此处运行在应用进程
public static PendingIntent getActivity(Context context, int requestCode, Intent intent, @Flags int flags) {
    return getActivity(context, requestCode, intent, flags, null);
}

public static PendingIntent getActivity(Context context, int requestCode, @NonNull Intent intent, @Flags int flags, @Nullable Bundle options) {
    String packageName = context.getPackageName();
    String resolvedType = intent != null ? intent.resolveTypeIfNeeded(context.getContentResolver()) : null;
    intent.migrateExtraStreamToClipData(context);
    intent.prepareToLeaveProcess(context);
    // 通过 Binder 通信注册 Intent,得到 IIntentSender
    IIntentSender target = ActivityManager.getService().getIntentSenderWithFeature(
        ActivityManager.INTENT_SENDER_ACTIVITY, packageName,
        context.getAttributionTag(), null, null, requestCode, new Intent[] { intent },
        resolvedType != null ? new String[] { resolvedType } : null,
        // 注意这个参数,使用当前应用的 UserId
        flags, options, context.getUserId());
    return new PendingIntent(target);
}
ActivityManagerService.java
// 此处运行在 AMS 系统服务进程
public IIntentSender getIntentSenderWithFeature(int type, String packageName, String featureId,
    IBinder token, String resultWho, int requestCode, Intent[] intents,
    String[] resolvedTypes, int flags, Bundle bOptions, int userId) {
    ...
    int callingUid = Binder.getCallingUid();
    return mPendingIntentController.getIntentSender(type, packageName, featureId,
        callingUid /*调用应用进程*/, userId /*原始应用进程*/, token, resultWho, requestCode, intents, resolvedTypes,
        flags, bOptions);
}
PendingIntentController.java
// 存储已注册的 pendingIntent 记录
final HashMap<PendingIntentRecord.Key, WeakReference<PendingIntentRecord>> mIntentSenderRecords = new HashMap<>();

// 此处运行在 AMS 系统服务进程
public PendingIntentRecord getIntentSender(int type, String packageName,
    @Nullable String featureId, int callingUid, int userId, IBinder token, String resultWho,
    int requestCode, Intent[] intents, String[] resolvedTypes, int flags, Bundle bOptions) {

    // 构建 PendingIntent 的 Key
    PendingIntentRecord.Key key = new PendingIntentRecord.Key(type, packageName, featureId,token, resultWho, requestCode, intents, resolvedTypes, flags, SafeActivityOptions.fromBundle(bOptions), userId);

    WeakReference<PendingIntentRecord> ref = mIntentSenderRecords.get(key);

    // 此处处理以下标记位的逻辑
    // FLAG_NO_CREATE
    // FLAG_CANCEL_CURRENT
    // FLAG_UPDATE_CURRENT

    if(ref != null) {
        return ref;
    }
    rec = new PendingIntentRecord(this, key, callingUid);
    mIntentSenderRecords.put(key, rec.ref);
    return rec;
}
PendingIntentRecord.java
public final class PendingIntentRecord extends IIntentSender.Stub {

    final static class Key {

        // 关键参数:创建进程的 UserId
        final int userId;

        Key(int _t, String _p, ..., int _userId) {
            ...
            userId = _userId;
        }

        public boolean equals(Object otherObj) {
            ...
            // 要素 1 - requestCode 源码体现
            if (requestCode != other.requestCode) {
                return false;
            }
            // 要素 2 - Intent 源码体现
            if (requestIntent != other.requestIntent) {
                if (requestIntent != null) {
                    if (!requestIntent.filterEquals(other.requestIntent)) {
                        return false;
                    }
                } else if (other.requestIntent != null) {
                    return false;
                }
            }
        }
    }
}
至此,PendingIntent 就在系统进程中以 PendingIntentRecord 记录的形式存在,相当于 PendingIntent 是存在于比当前应用更长生命周期的系统进程中。这就是应用进程退出后,依然不影响消费 PendingIntent 的原因。
3.2 消费 PendingIntent 执行过程
消费 PendingIntent 需要使用 PendingIntent#send() 方法,内部会将创建 PendingIntent 时获得的 Binder 对象 IIntentSender 发送给 AMS 服务,用于执行最终的 Intent 操作。关键源码摘要如下:
PendingIntent.java
private final IIntentSender mTarget;

// 此处运行在应用进程
public void send(Context context, int code, @Nullable Intent intent, ...) throws CanceledException {
    if (sendAndReturnResult(context, code, intent, onFinished, handler, requiredPermission,options) < 0) {
        throw new CanceledException();
    }
}

public int sendAndReturnResult(Context context, int code, @Nullable Intent intent, ...) throws CanceledException {
		// 通过 Binder 通信执行 IIntentSender
		return ActivityManager.getService().sendIntentSender(mTarget, mWhitelistToken, code, intent, resolvedType, ...);
}
ActivityManagerService.java
// 此处运行在 AMS 系统服务进程
@Override
public int sendIntentSender(IIntentSender target, IBinder whitelistToken, int code, Intent intent, String resolvedType, ...) {
    if (target instanceof PendingIntentRecord) {
        return ((PendingIntentRecord)target).sendWithResult(code, intent, resolvedType, ...);
    }else {
        ...
    }
}
PendingIntentRecord.java
// 此处运行在 AMS 系统服务进程
public int sendInner(int code, Intent intent, String resolvedType, ...) {
    // 此处处理以下标记位的逻辑
    // FLAG_ONE_SHOT
    // FLAG_MUTABLE
    // FLAG_IMMUTABLE

    // FLAG_ONE_SHOT 标记会移除 PendingIntentController 存储的记录
    if ((key.flags & PendingIntent.FLAG_ONE_SHOT) != 0) {
        controller.cancelIntentSender(this, true);
    }

    int res = START_SUCCESS;

    // 关键参数:创建进程的 UserId
    int userId = key.userId;

    switch (key.type) {
        case ActivityManager.INTENT_SENDER_ACTIVITY:
            res = controller.mAtmInternal.startActivitiesInPackage(
                uid /*关键参数*/, callingPid, callingUid, key.packageName, key.featureId,
                allIntents, allResolvedTypes, resultTo, mergedOptions, userId,
                false /* validateIncomingUser */,
                this /* originatingPendingIntent */,
                mAllowBgActivityStartsForActivitySender.contains(whitelistToken));
        break;

        case ActivityManager.INTENT_SENDER_ACTIVITY_RESULT:
        ...
        break;

        case ActivityManager.INTENT_SENDER_BROADCAST:
        ...
        break;

        case ActivityManager.INTENT_SENDER_SERVICE:
        case ActivityManager.INTENT_SENDER_FOREGROUND_SERVICE:
        ...
        break;
    }
    return res;
}
ActivityTaskManagerInternal.java
public abstract class ActivityTaskManagerInternal {
    public abstract int startActivityInPackage(int uid, int realCallingPid, int realCallingUid, ...);
}
ActivityTaskManagerInternal 是一个抽象类,小彭没有找到其最终的实现类,有大佬知道的话请在评论区告诉我。
至此,就完成执行 PendingIntent 中延迟操作的目的。 那么,为什么在当前进程执行,还会以另一个进程(PendingIntent 的创建进程) 的身份执行呢,关键在于使用了保存在 PendingIntentRecord 记录中的 userId,这与我们通过常规的 Activity#startActivityAsUser() 是类似的。
Activity.java
@Override
public void startActivityAsUser(Intent intent, UserHandle user) {
    startActivityAsUser(intent, null, user);
}
4. 总结
到这里,PendingIntent 的内容就讲完了,相信你对 PendingIntent 的理解已经超过绝大部分同学,你认同吗?关注我,带你了解更多,我们下次见。
你的点赞对我意义重大!微信搜索公众号 [彭旭锐],希望大家可以一起讨论技术,找到志同道合的朋友,我们下次见!
-
android.permission.read_media_video01-18
-
android_getaddrinfo failed eai_nodata01-18
-
androidmo01-18
-
Android下三种离屏渲染技术01-15
-
Android 蓝牙使用01-09
-
Android对接华为AI - 文本识别01-06
-
代码安全之代码混淆及加固(Android)11-15
-
简述Android语音播报TTS11-10
-
Android WiFi工具类11-06
-
Android开发未来的出路07-22
-
Android JNI 学习实践06-28
-
Android13 安装最新版 Frida06-26
-
Android Studio中SQLite的使用,主要介绍sqlite插入和读出图片(ViewBinder)的操作方法06-20
-
Android-NDK开发——基本概念06-18
-
Android Studio历史版本下载地址汇总06-04


