Javascript
Vue 3 组件开发:搭建基于 Vite 的在线表格编辑系统(组件集成)
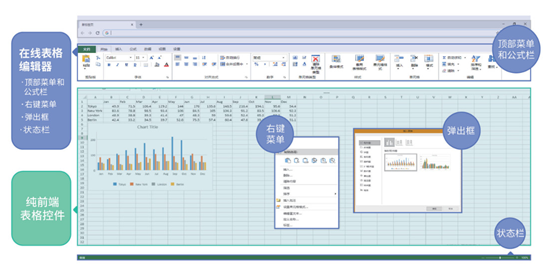
通过前文的学习,我们已经用 Vite 搭建出了Vue 3 的项目原型。今天,我们将基于这个原型,集成 SpreadJS 电子表格组件和在线编辑器组件,使其具备 Excel公式计算、在线导入导出 Excel 文档、数据透视表和可视化分析能力,实现在线表格编辑系统的雏形。
设计思路
· 同时创建SpreadJS 和Designer(表格编辑器)两个组件,用切换路由的方式显示不同组件类型。
· 在编辑器组件的工具栏中增加“加载”和“更新”两个按钮。
· 点击“加载”即可加载从服务器获取的Excel文件,在编辑器中对该组件做一些修改,点击“更新”按钮,将修改后的文件传递给服务器。
· 切换路由显示 SpreadJS 组件,在该组件添加 “加载”和“更新”两个button,功能同上。
SpreadJS 组件介绍
SpreadJS是一款基于 HTML5 的原生JavaScript组件,兼容 450 种以上的 Excel 公式,提供高度类似 Excel 的功能,主要用于开发 Web Excel 组件,实现多人协同编辑、高性能模板设计和数据填报等功能模块,组件架构符合UMD规范,可以以原生的方式嵌入各类应用,并与前后端技术框架相结合。
目前,SpreadJS已针对Vue 2做了组件封装,暂时还未对Vue 3提供组件封装,不过我们可以通过自己封装SpreadJS组件和表格编辑器的方式,将其集成在Vue 3项目中。
将 SpreadJS 与Vue 3 集成
1. 安装模块
修改package.json 文件,添加我们需要的模块,运行命令 npm install 来安装所有依赖项目。
"dependencies": {

    "@fortawesome/fontawesome-free": "^5.14.0",

    "@grapecity/spread-excelio": "^14.0.1",

    "@grapecity/spread-sheets": "^14.0.1",

    "@grapecity/spread-sheets-barcode": "^14.0.1",

    "@grapecity/spread-sheets-charts": "^14.0.1",

    "@grapecity/spread-sheets-designer": "^14.0.1",

    "@grapecity/spread-sheets-designer-resources-cn": "^14.0.1",

    "@grapecity/spread-sheets-designer-vue": "^14.0.1",

    "@grapecity/spread-sheets-languagepackages": "^14.0.1",

    "@grapecity/spread-sheets-pdf": "^14.0.1",

    "@grapecity/spread-sheets-pivot-addon": "^14.0.1",

    "@grapecity/spread-sheets-print": "^14.0.1",

    "@grapecity/spread-sheets-resources-zh": "^14.0.1",

    "@grapecity/spread-sheets-shapes": "^14.0.1",

    "@grapecity/spread-sheets-vue": "^14.0.1",

    "axios": "^0.21.0",

    "vue": "^3.0.2",

    "vue-router": "^4.0.0-rc.5"

  },
2. 配置路由
在src文件夹下添加3个文件。
· router/index.js
· views/SpreadSheet.vue
· views/Designer.vue
配置路由:
import { createRouter, createWebHistory } from "vue-router";

const routes = [

  {

    path: "/",

    name: "Designer",

    component: () => import("../views/Designer.vue"),

  },

  {

    path: "/spreadSheet",

    name: "SpreadSheet",

    component: () => import("../views/SpreadSheet.vue"),

  }

];

export const router = createRouter({

  history: createWebHistory(),

  routes:routes

});
3. 在main.js中引入:
import { createApp } from 'vue'

import { router } from './router/index'

import App from './App.vue'

import './index.css'

const app = createApp(App)

app.use(router);

app.mount('#app')
4. 修改App.vue:
在main.js文件中,将 Vue Router 文件添加到项目中(在Vue 2 中,导入它使用的是 Vue.use(router) ,但在Vue 3中添加方式发生了变化)。如下面的截图所示,Vue 3是使用createApp方法来实际创建项目的,在挂载应用程序前,需要通过 app.use(router) 来添加到项目中。
<template>

<div id="app">

    <div>

        <router-link to="/">Designer</router-link> |

        <router-link to="/spreadSheet">SpreadSheet</router-link>

    </div>

  <router-view/>

</div>

</template>

<script>

export default {

  name: 'App',

  components: {

  },

  setup(){

  }

}

</script>
看到这里大家应该会发现,Vite中的路由配置以及 main.js 引入的方式较Vue 2有所不同,为了让其更好的支持Typescript,Vue Router的Vue 3版本要求我们必须导入新方法才能使代码正常工作,其中最重要的是createRouter 和 createWebHistory。
5. 集成designer组件
配置完路由之后,就可以开始集成designer组件了。首先,在components文件夹下添加2个文件:
· components/Designer.vue
· components /SpreadSheet.vue
接着,在 Designer.vue 中集成SpreadJS 表格编辑器,代码如下图所示:
· 在模板中添加一个div,这个div就是编辑器的容器,可以通过css设置容器的宽高位置等,也就是自定义了编辑器的显示大小及位置。
· 导入编辑器所需要的依赖。
· 在setup函数中新建一个编辑器。
<template>

  <div>

      <div ref="ssDesigner" style="height:700px;width:100%;text-align: left;"></div>

  </div>

</template>

<script>

import { onMounted, ref} from "vue";

import "../../node_modules/@grapecity/spread-sheets/styles/gc.spread.sheets.excel2013white.css";

import "../../node_modules/@grapecity/spread-sheets-designer/styles/gc.spread.sheets.designer.min.css";

import "@grapecity/spread-sheets-designer-resources-cn";

import "@grapecity/spread-sheets-designer";

import GC from '@grapecity/spread-sheets'

import ExcelIO from '@grapecity/spread-excelio'

export default {

  name: 'Designer',

  props: {

  },

  setup(props, {emit}) {

    const ssDesigner = ref(null);

    onMounted(() => {

      var designer = new GC.Spread.Sheets.Designer.Designer(ssDesigner.value);

      emit("designerInitialized", designer);

    });

    return {

      ssDesigner

    };

  }

}

</script>
第三步,在views/Designer.vue中引入该组件及相关依赖。
import Designer from '../components/Designer.vue'

import {ref} from "vue"

import axios from "axios"

import GC from '@grapecity/spread-sheets'

import ExcelIO from '@grapecity/spread-excelio'
第四步,在模板中使用该组件标签。
<template>

  <div>

    <Designer v-on:designerInitialized="designerInitialized"></Designer>

  </div>

</template>
最后,在setup函数中初始化编辑器。
let designer = undefined;

let designerInitialized=(wb)=>{

      designer = wb;

      let spread = designer.getWorkbook();

    }
完成上述步骤,页面就可以显示编辑器UI了。
如何自定义编辑器的工具栏?
完成了上述步骤,我们已经成功的将 SpreadJS编辑器集成到项目中,接下来演示如何在工具栏中新建 “加载”和“更新”两个按钮。
由于 SpreadJS 在线表格编辑器采用了全新可配置设计,在任何区域都可采取json config 的配置方式。通过修改默认的GC.Spread.Sheets.Designer.DefaultConfig,便可以达到自定制功能。
1. 定制 Ribbon 选项卡
在浏览器Console中输入GC.Spread.Sheets.Designer.DefaultConfig可查看默认ribbon选项卡配置。参考默认配置,可以自定义操作选项卡。
let DefaultConfig = GC.Spread.Sheets.Designer.DefaultConfig;

let customerRibbon = {

      id: "operate",

      text: "操作",

      buttonGroups: [

      ],

};
2、自定义按钮
在定义按钮之前,需要先定义按钮点击时的命令Commands,并将命令注册到config的commandMap属性上。
let ribbonFileCommands = {

        "loadTemplateCommand": {

            iconClass: "ribbon-button-download",

            text: "加载",

            //bigButton: true,

            commandName: "loadTemplate",

            execute: load

        },

        "updateTemplateCommand": {

            iconClass: "ribbon-button-upload",

            text: "更新",

            //bigButton: true,

            commandName: "updateTemplate",

            execute: update

        }

    }
上面的示例代码注册了 loadTemplateCommand和 updateTemplateCommand 两个命令。
· execute对应具体执行内容的function,也就是 load 和 update 方法。
· iconClass为按钮样式,可以制定按钮图片
· text为按钮显示文字
· commandName为命令名称,需要全局唯一
iconClass示例代码:
.ribbon-button-download {

 background-image: url(图片地址,可以是base64 svg)};
有了命令就可以添加对应button 的config了:
let customerRibbon = {

      id: "operate",

      text: "操作",

      buttonGroups: [

        {

          label: "文件操作",

          thumbnailClass: "ribbon-thumbnail-spreadsettings",

          commandGroup: {

            children: [

              {

                direction: "vertical",

                commands: ["loadTemplateCommand", "updateTemplateCommand"],

              }

            ],

          },

        },

      ],

    };
在designer的config中加入自定义的命令和按钮:
DefaultConfig.ribbon.push(customerRibbon);

    DefaultConfig.commandMap = {};

    Object.assign(DefaultConfig.commandMap, ribbonFileCommands);
最后,不要忘了补充Load方法和update方法中的代码。
Load方法和update方法的作用
Load方法用于执行excel文件的加载。在接收到后台传递的json数据后,使用fromJSON方法加载该文件,代码如下图:
let load = (e)=>{

        let spread = designer.getWorkbook();

        let formData = new FormData();

        formData.append("fileName", "path");

        axios.post('spread/loadTemplate', formData, {

            responseType: "json",

        }).then((response) => {

            if(response) {

                alert("加载成功");

                templateJSON = response.data;

                spread.fromJSON(templateJSON);

            }

        }).catch((response) => {

            alert("错误");

        })

}
Update方法用于执行文件的更新。在编辑器对加载的文件做出操作,如修改背景色、添加文本时,使用toJSON方法将当前spread保存为json数据传递给后台存储,代码如下:
let update = (e)=>{

        let spread = designer.getWorkbook();

        let spreadJSON = JSON.stringify(spread.toJSON());

        let formData = new FormData();

        formData.append("jsonString", spreadJSON);

        formData.append("fileName", "fileName");

        axios.post('spread/updateTemplate', formData).then((response) => {

            if(response) {

                alert("更新成功");

            }

        }).catch((response) => {

            alert("错误");

        })

    }
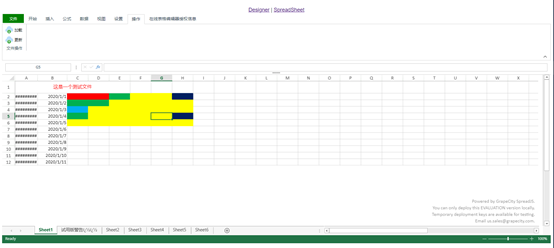
完成上述操作,新建的按钮就可以正常工作了。如下图示例,点击工具栏加载按钮,文件已在 SpreadJS 表格编辑器成功加载。
以上就是Vue 3 组件开发:搭建基于SpreadJS的表格编辑系统(组件集成篇)的全部内容,通过集成 SpreadJS 电子表格组件和在线编辑器组件,我们搭建的项目原型已经具备了在线表格编辑系统的雏形。
在下一章功能拓展篇中,我们将演示如何为这个系统雏形增加更多电子表格功能,并提供整个工程源码供参考。
扩展阅读
· Vue 3 组件开发实战:搭建基于SpreadJS的表格编辑系统(环境搭建篇)
· Vue 3 组件开发实战:搭建基于SpreadJS的表格编辑系统(功能拓展篇)
· SpreadJS Vue 框架支持
-
Vue CLI多环境配置学习:从入门到实践11-24
-
Vue CLI多环境配置学习:新手入门教程11-24
-
Vue CLI学习:初学者指南11-24
-
Vue CLI学习:从入门到上手的简单教程11-24
-
Vue3+Vite学习:从零开始的前端开发之旅11-24
-
Vue3阿里系UI组件学习入门教程11-24
-
Vue3的阿里系UI组件学习入门指南11-24
-
Vue3公共组件学习:新手入门教程11-24
-
Vue3公共组件学习入门指南11-24
-
vue3核心功能响应式变量学习11-24
-
Vue3学习:从入门到初级实战教程11-24
-
集成Ant Design Vue的图标入门11-24
-
集成Ant Design Vue图标入门教程11-24
-
Vue新手入门教程:从零开始学习Vue框架11-23
-
如何集成Ant Design Vue的图标11-23


